How to Integrate Facebook Login With Your WordPress Website
Last updated on September 29th, 2021 at 11:01 am
Today’s trend is moving with lots of social media platforms. In this article, we are going to discuss integrating Facebook login accounts in the WordPress website. For the new user, it is challenging to enter a user name, email address, or password to subscribe to your website. However, to make this simple we are just creating a Facebook login button by integrating Facebook login into your wordpress website. This directly helps you to tell getting more visitors and an audience through Facebook.
There are a lot of reason that users are integrating their Facebook login account with wordpress but we are going to mention a few of them these such as
- In this rushing world, everyone wants to save time.
- The Facebook visitor also help to increase the traffic to the website
- Apart from user collection data, you can also collect much information about the subscriber with the help of a Facebook profile.
So before we start integrating Facebook login into wordpress website users must be aware about that which processor is divided into two parts. In the first part, users need to create an App with the help of a Facebook developer account. And the second part is that we need to integrate that app into a wordpress website.
How to Integrate Facebook Login For WordPress?
Step 1- How to create a developer account?
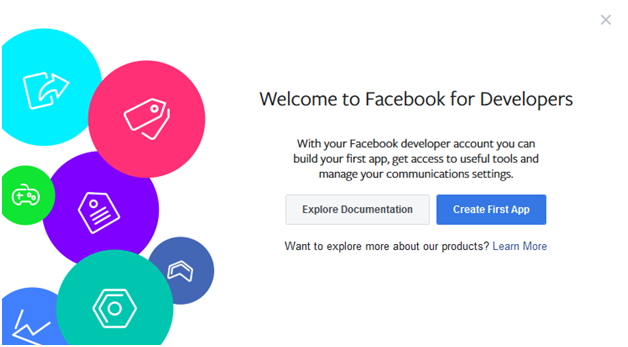
If the user never created a single Facebook app then the first step for the user is to create a developer account on Facebook. this Facebook developer account will be going to have to create a Facebook application. For that user must visit “developers.facebook.com” or the user can click here.
After successfully logged in to the Facebook developer account, the Facebook developer console will ask to create your first app. For that user must click on the “create first app” option and start configuring the wizard. Users can see the screen look like the image given below.
Step 2 – How to create a new App
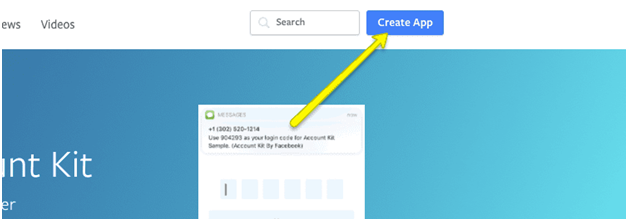
This is the developer’s subdomain of a Facebook ok, in this developer subdomain user can create a new app under users Facebook account. Create a new app button is present on the top right corner of the screen. For moving a step ahead then the user must click on that button. For better understanding, users must see the image which is present below.
Step 3 How to create facebook the new APP ID?
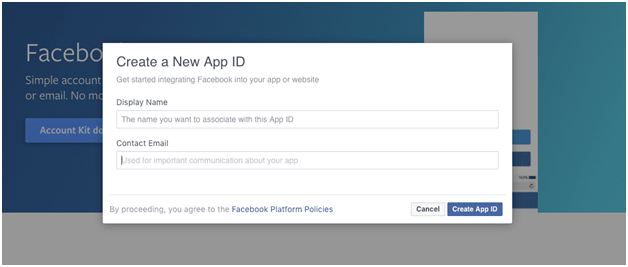
This time we are going to learn how to create Facebook new app ID with the help of Facebook developer account. Let’s go deeper into it. This app is very different from others before creating Facebook EV users need to create a new app ID for it. User needs to fill two blocks 1 for the display name and another is contact email. Users not required to enter Facebook or anything related to face into the display name option. One more thing the user needs to enter the same email ID which is used in the Facebook account. After completing creating a new app ID sign up form or login form then the user must click on create app ID.
Step 4 how to create the product?
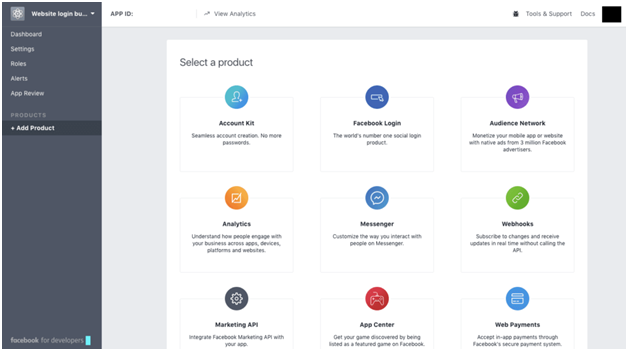
Now the user will see the product list on the screen. From this product, list users are required to select one product category. But the user must know that the category will depend upon your app list. For more information, users can check out the image which is present below.
Step 5 how to select technology
After listing the product inside the new app user will move the next step. In this type, the user can see there are four options present on the screen.
- The platform for the app with iOS
- A platform for the app with Android
- A platform for the app with web
- A platform for an app with others
These are the four options that have been given to launch your app on which platform. Users must select any one platform. Clearing out this step, the user can check out the image given below.

Step 6 enter your website
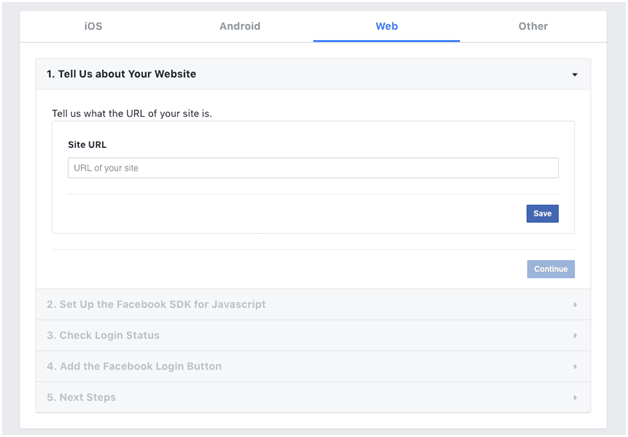
After choosing the platform for the new app, the user will face a new screen. On the screen, the user must tell about their website. Another word we can say that the user needs to enter the website URL address. After entering the website URL address, the user must click on the save option. Check out the image given below.
Step 7 copy the SDK
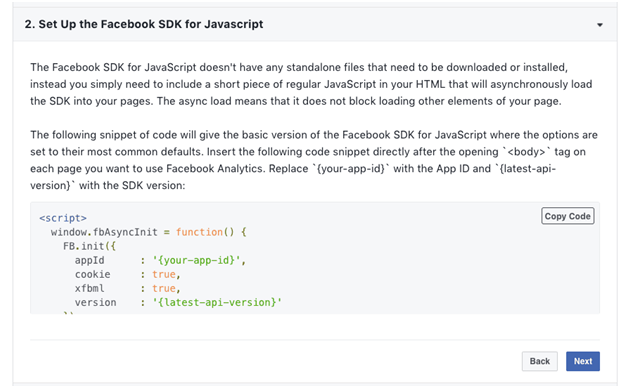
SDK stands for the software development kit. In this step, the user must set up Facebook SDK for JavaScript. Users will see script code which is present on the screen. Users must copy that Facebook software development kit for JavaScript. In a simple word this Facebook SDK for JavaScript helps to communicate between your website and Facebook. That is known as Facebook API. Based on the example user can check out the image present below.
Step 8 configuring the login button
In this type, the user must go for configuring the login button but the user must be sure about that. How the login button looks like and is that the same button that the user wants. For detailed information, the user must click here
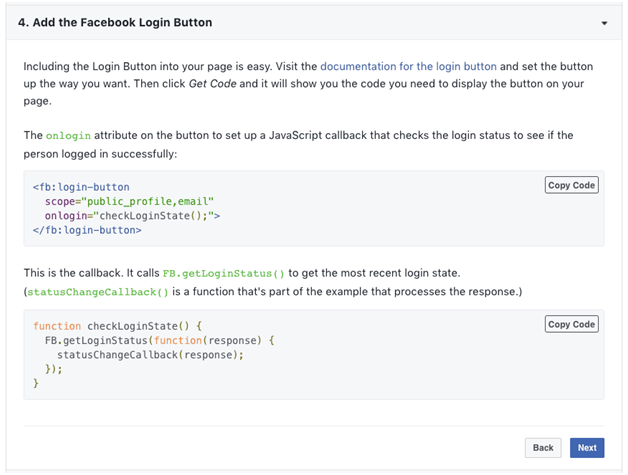
Facebook provides helpful tips for the button such as text formation text size colour of the button and many more things. There are a lot of tips that Facebook share regarding login buttons so you can update according to that. After finalising the login button, users can copy that button code and embed it on your website page.
Step 9 review the dashboard
This is the final step after that your new Facebook developer app has been created. There is a lot of things you will see in terms of detail such as Apple ID number and the app secret code. This app ID number and app secret code are going to be used later in the wordpress dashboard.
Step 10 integrate the Facebook login into WordPress
The real in the final step is this where we are going to integrate Facebook into WordPress. First phone users need to login into a wordpress website. For that users must enter their username or email and password.
After successfully logged in to the WordPress admin panel of the website. To connect Facebook with WordPress users is required to install the plugin for that. Users must install Nextend Facebook, connect the login, and activate also. The best thing about this plugin is that it also gives the user self create login button option to connect to Facebook…

After installation and activating the extend Facebook connect plugin users need to encounter these recommended steps. The user will see a form in which the user required to enter all the details. For better experience music and check out the image given below.

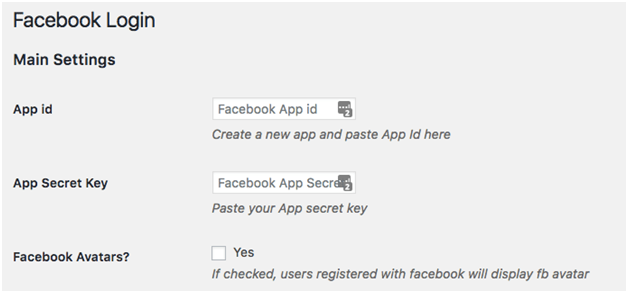
Real Facebook login looks like the image given below. Where the user needs to app ID and app secret key. This is what the setting of the plugin looks like. Users can check out the image given below.
There is only a small limitation that is going to be faced by us is that no restriction options are present to your users for login. Apart from that if your known is using other social accounts then to reach them you must install and activate another plugin.
Conclusion
We are very well known that there are lots of ways to increase user experience. Connecting with social media platforms is another best way. Facebook plays an important role in this type of situation. However, Facebook is used by all people throughout the world. Making more traffic to your website with the help of integrating the Facebook login plugin in wordpress.


