How to Create Custom Taxonomies in WordPress
Last updated on October 13th, 2021 at 11:31 am
Before creating custom taxonomies we should know about taxonomies. It is a type of process through which we can group content based on certain properties and criteria. In this article, we are going to learn about creating custom taxonomies into a WordPress website. This complete process can be done with the help of manually and the plugin user can take a deep breath and read this article carefully.
What are the default taxonomies in the world?
We learnt above about taxonomies now there is a term default taxonomies however, according to this term taxonomies are categorized into four default types in wordpress such as Categories, Tags, Link Category, and Post Format. Many users use categories and Tag as default taxonomies. Let us understand with the help of examples.
Categories:- categories are divided like a parents and child relationship however text is not that kind. There will be a one category which can be made as a parent category of all subcategories. Latest Daikin example to understand in dip what a category defines for.
Example:- if user is using and entertainment below then user make movies as a category. This movie category is a parent category while the user characterized movie e category into these categories for child category searches drama, action, comedy.
Tags:- fall under the non-hierarchical category however after that it does not contain parent child relationships.
How are taxonomies Displayed in the frontend?
We suggest one thing to all our readers that any blog or any website must have unique and define wordpress default taxonomies. Users can do with the help of wordpress widget that are present in predefined widgets. If it is not then the user reads all the steps which are given below carefully.
- Users login to their wordpress website by using username and password and then hit the submit option.
- After that, the user needs to click on the Appearance option. When a new tab appears in front of the user.
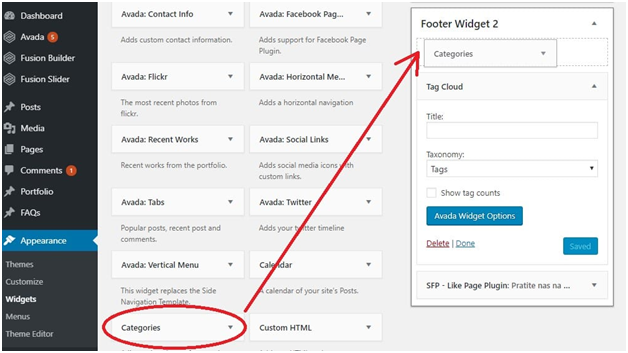
- Now users need to drag and drop the “Category” and “Tags” to the respective area. Check out the image given below and mark your all steps.
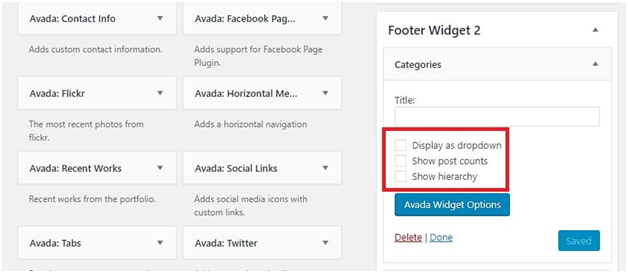
- After doing this the user needs to choose a few options that are given below in the image.
What are the wordpress custom taxonomies?
To set up wordpress custom taxonomies users can go for two methods as manually and plugin. Manually users need to setup function php code. This is present inside the theme function.php files.
Here is the list of all commonly used plugins for custom wordpress taxonomy.
Using any plugin users must be aware that this plugin is supported by their wordpress website or not. So users need to take a precaution that a complete backup of users web sites needs to be taken before installing or updating any plugin. Listing if you completely support the plugin.
- Toolset Types (paid/premium)
- Pods (open source/free)
- Custom Post Type UI (open source/free)
Users need to install all these plugins in that case if the user is not comfortable or not having proper knowledge of PHP coding and that time the user takes help of all these plugins. Because this plugin is easy to use and zero coding skills required to install and activate all these WordPress plugins which are given above. Moving a step ahead and showing with an example using the first plugin.
How to install and activate the pods plugin?
Generic Process to install and activate any plugin
- The first of all users need to visit the wordpress admin panel with the help of entering the correct credentials which are required. Details that are required for login into the wordpress admin panel are username or Email Id and password.
- After successfully logged in into the wordpress admin panel, users need to click on the “Plugin” option.
- Now the supporters menu appears in front of the user but with lots of options but the user needs to click on the “ Add New Plugin” option.
- A new tab appears in front of the user now the user needs to add a Keyword in the search box panel which appears on the right side of the page.
Installing and Activate Pods Plugin
- Now the user needs to enter the “ Pods” keyword in the search panel and then press the enter button on the keyboard.
- Now a complete new list appears in front of the user. However, users need to choose the first option from the list.
- Now the user needs to install Pods Plugin after this process is completed the user needs to click on the activate option at the same time.
- Now the Pods plugin has been successfully installed and activated into the wordpress admin panel of the user.
- The unique feature of this plugin is that users can extend their taxonomies.
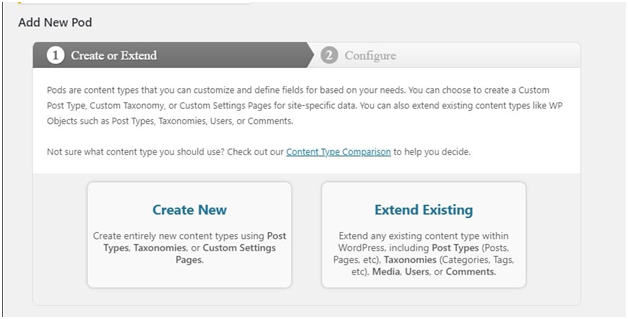
- So that user can edit any type of taxonomies later when they are required.
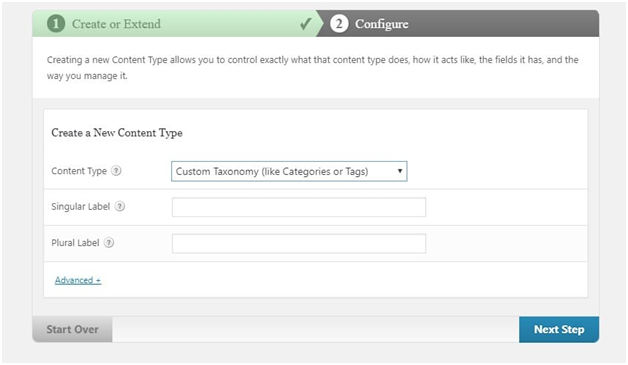
- The above image shows that users can create custom taxonomies with the help of plugin.
How to create custom taxonomies manually?
In the above section, users can create custom taxonomies with the help of a plugin. Now users need to do manually so read it carefully. All the steps given below.
The register_taxonomy() function
- The taxonomy name
- Post type it relates to
- List of predefined arguments ($args) that are specified before the function is called
How to create Hook?
We can say that this is the first portion of the php code that must be added. This will be a call function of the create_instrument_taxonomies(). Check out the code given below.
Code:-
// hook into the init action and call
create_instrument_taxonomies when it fires
add_action( ‘init’,
‘create_instrument_taxonomies’, 0 );
How to define $labels and $args?
Code :-
function create_instrument_taxonomies() {
// Add new taxonomy
$labels = array(
‘name’ => _x( ‘Instruments’, ‘taxonomy general name’, ‘textdomain’ ),
‘singular_name’ => _x( ‘Instrument’, ‘taxonomy singular name’, ‘textdomain’ ),
‘search_items’ => __( ‘Search Instruments’, ‘textdomain’ ),
‘all_items’ => __( ‘All Instruments’, ‘textdomain’ ),
‘parent_item’ => __( ‘Parent Instrument’, ‘textdomain’ ),
‘parent_item_colon’ => __( ‘Parent Instrument:’, ‘textdomain’ ),
‘edit_item’ => __( ‘Edit Instrument’, ‘textdomain’ ),
‘update_item’ => __( ‘Update Instrument’, ‘textdomain’ ),
‘add_new_item’ => __( ‘Add New Instrument’, ‘textdomain’ ),
‘new_item_name’ => __( ‘New Instrument Name’, ‘textdomain’ ),
‘menu_name’ => __( ‘Instrument’, ‘textdomain’ ),
);
The other part of the code should look like this:
$args = array(
‘hierarchical’ => true,
‘labels’ => $labels,
‘show_ui’ => true,
‘show_admin_column’ => true,
‘query_var’ => true,
‘rewrite’ => array( ‘slug’ => ‘instrument’ ),
);
In the first line $args item means “hierarchical”.
The last bit of code is:
register_taxonomy( ‘instrument’, array( ‘musical-instruments’ ), $args );
}
User never left this symbol “}” because this is a closed function. While coding this symbol must close any code. In anyways users are not able to apply close function then it may crash your code or complete wordpress website also. Chat Now

