A Step by Step Guide Using Every Google Tool Within WordPress
Last updated on August 11th, 2021 at 06:05 am
How To Use Every Google Tools Within WordPress
When it comes to optimizing your site across all platforms, whether it be content or user interaction, to everything in between, your first step is to utilize what’s readily available for use. Google tools with wordpress.
If you’re at all interested in Google tools yet have no prior knowledge in regards to using them on your site, this step-by-step guide will be your road map to success. For those who don’t believe any third-party tools will benefit you and your users, think again. These tools will make your blogging and CMS experience a hundred times better. The best part? WordPress software is extremely compatible with Google and does not take a mastermind IT specialist to manipulate.
Disclaimer: This guide in its entirety does not require readers to create code, manipulate code, or even remove code. The most a reader may do with code is embed some sort of Google content. This does not require coding, just simple copy and pasting. If you are looking for a tutorial that includes coding you are in the wrong place. Sorry for this inconvenience!
To begin, it is important to note what a sitemap really is. Sitemaps used to be used exclusively by government websites in order to provide viewers easy access to every page on that specific website. At that time, sitemaps would be created using HTML, and would simply be a bullet point list. Now a days, sitemaps are created using XML. So, what do modern XML sitemaps look like and what do they do?
An XML sitemap is very similar to the older government sitemaps, however, instead of displaying a list of pages for your readers, the map now displays a map of your pages for search engines. Search engines will then have a far easier time displaying the more important pages on your website, and can even regulate when they should prioritized based off of how often you update each page.
It’s important to note that XML sitemaps do not boost your search engine results, but rather, they allow for search engines to optimize your search result page rankings for when your results show up to viewers.
Your first step on the road to utilizing a sitemap, is to download a sitemap plugin. For our purposes, we recommend that you use WordPress SEO by Yoast. This plugin has been deemed one of the best sitemap plugins because it’s extremely efficient, offers various other utilities to explore, and allows you to optimize your posts.
In order to download this plugin, go to your WordPress admin panel. If you’re unfamiliar with this panel, simply type in your site URL, and add “/wp-admin/“ onto the end. This should take you to a login screen. Use the credentials sent to you when you first created your site.
Next, scroll through your administrative menu on the left hand side of your screen. You should see something called “Plugins”. Click it, and select “Add New”.
Go to the search box, and type in “Yoast SEO”. When you see the plugin, select it. Look at the information bar on the right hand side. Ensure that your WordPress Version is up to date and that all other requirements are fulfilled.
If you’re not certain that you’ve selected the correct plugin, look at the image below. Do they match up? If not, you may have to update your WordPress installation. Either that or look towards the details that the plugin provides. Do the details match up? That might mean they display different pictures depending on factors such as time and even date.
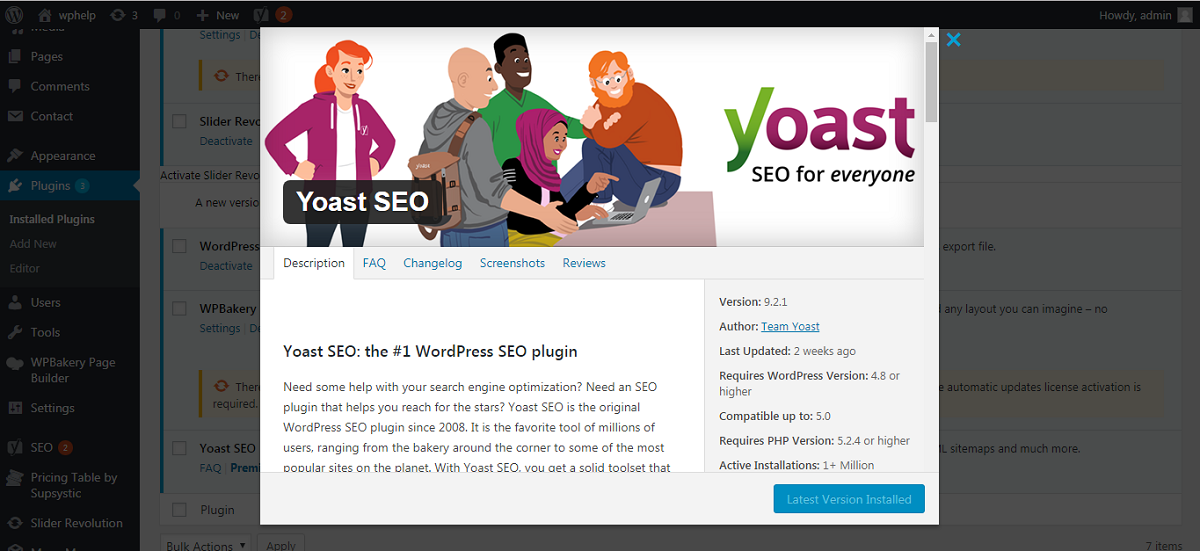
Next, select “Install Now”. Once the plugin is installed, it should automatically activate. If it does not, go to your plugins once again. Scroll through your installed plugins until you find “Yoast SEO”. Click “Activate”.
Your next step is to click on “SEO”. It should be located within your admin menu on the left hand side. The same place that you found the plugins menu. Find it? Good. Click on “Features”. Now, scroll down until you see “XML sitemaps”. If the switch is set to the off position, select “On”.
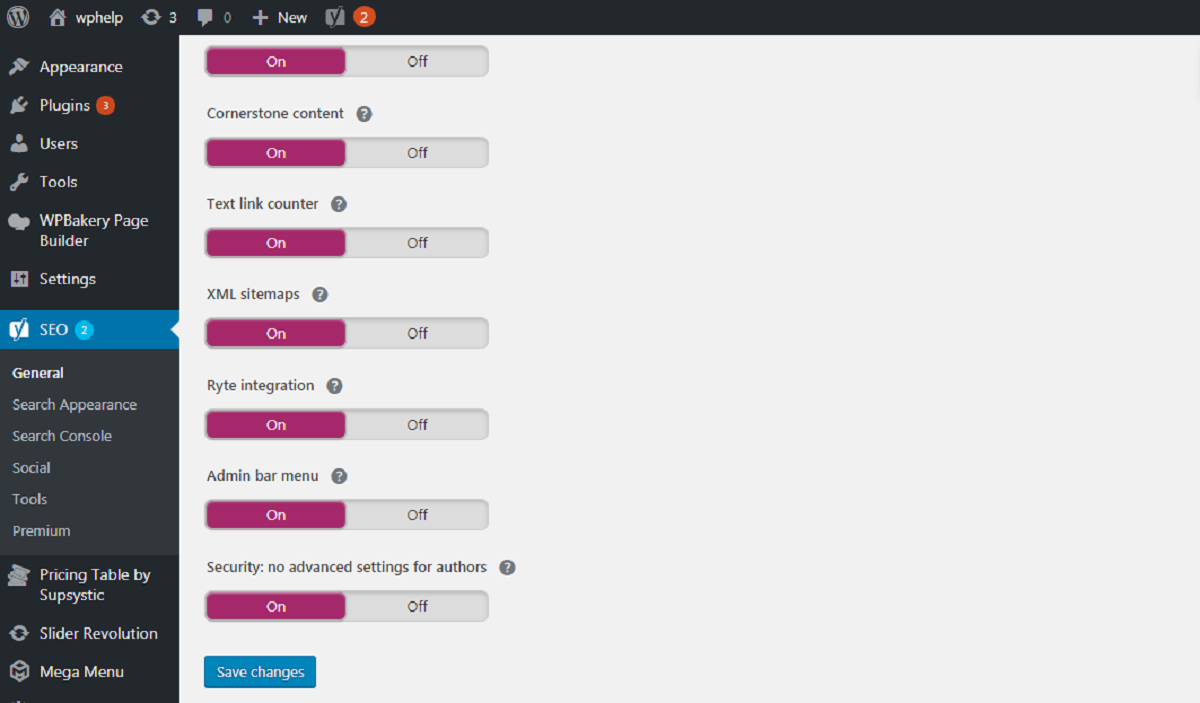
Now that you’ve set up your XML sitemap, all you have to do now is sit back and relax. Every time you post something new, search engines will receive a ping. This ping lets them know that your sitemap has been altered.
If you’d like to proactively tell search engines about your sitemap, visit “Google Webmaster Tools”. All you’ll have to do is prove your site is yours and then add your sitemap. Make sure to visit Google’s Webmaster monthly if you’d like to see how your site is doing and how you can manipulate certain things for better results.
Interested in seeing how your site is doing content wise? Perhaps you want to see where most of your viewers are from. Well, Google Analytics is about to be your best friend. The steps below will provide you with an in depth look into setting yourself up with this remarkable Google tool.
First, you’re going to need a Google Analytics account. Simply search “Google Analytics” in a Google search bar and select the appropriate result. Next, create your account. You can use the same credentials you used for your pre-existing Google account.
Once you’re signed in, you should see the following screen. The next few steps are very simple and require no knowledge of coding.
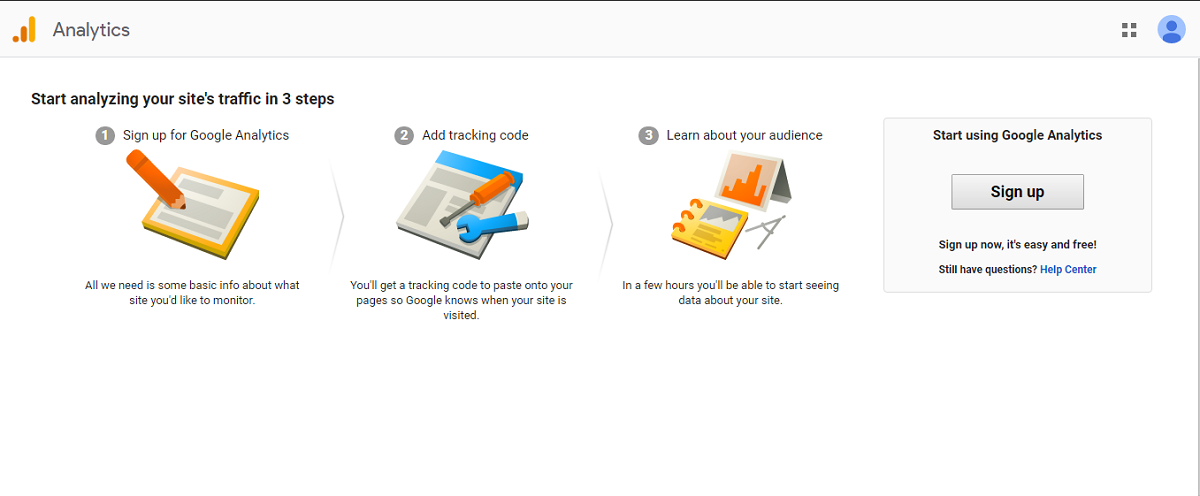
Sign up for Google Analytics with your Google account. Once you’ve done this, you’ll be prompted to choose what you’ll be tracking, a website or a mobile app. Make sure you select website, NOT mobile app.
Next, you’ll be prompted to enter and fill out a few information fields. There should be an account name, which is essentially your username for the site. Next, you’ll have to add your Website’s name and URL. Make sure these are correct before moving onto the next fields. Your final steps for this information screen is to provide details in regards to what your site is about and what time zone you live in.
Once this has been completed, click on “Get Tracking ID”. This code is what you’re going to implement into your site. When you get the code, copy it. Once you’ve copied it, go back to your WordPress administrative panel.
In order to avoid having to code, you’re going to need a plugin. One of the best plugins for utilizing Google Analytics is MonsterInsights. To download this plugin, go to your plugins page and select “Add New”. Go to your search bar, and type in “MonsterInsights”.
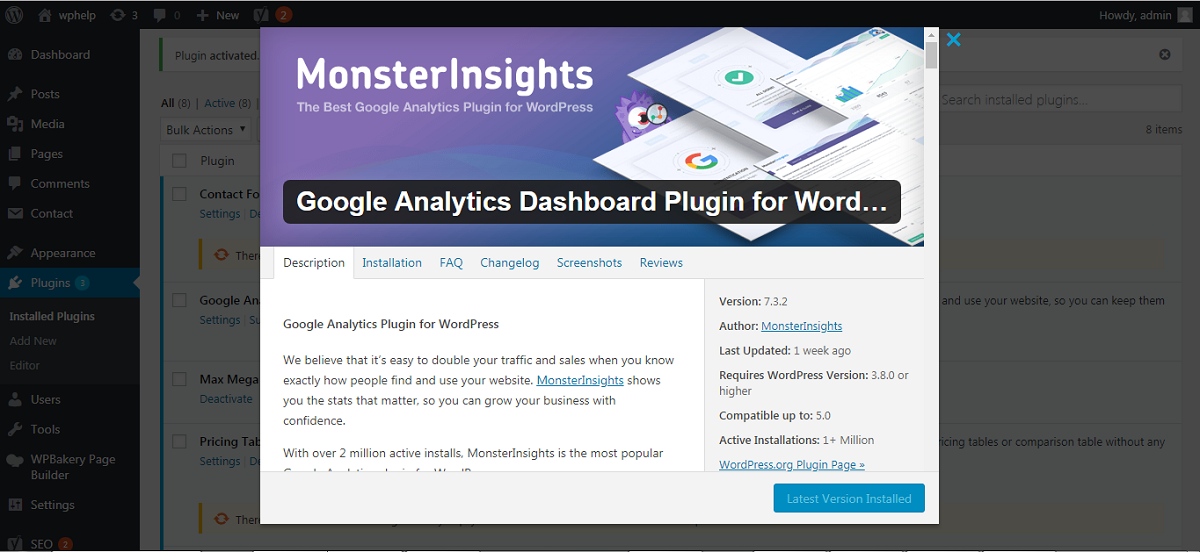
Once you’ve selected the proper plugin, download and install it. Next, if the plugin hasn’t already been activated, select “Activate”. You may be able to find the activate option after you downloaded the plugin immediately. If the option is not readily available to you, go to your plugins page. Click on the installed plugins. Find MonsterInsights and select “Activate”.
Once the plugin is activated, go to your admin menu on the left hand side. Click on “Insights” and go to “Settings”. First, enter your tracking ID into where it says “Manually enter your UA code”. You now need to authenticate your Google account. Click on “Authenticate with your Google Account”.
You will then be redirected to a Google sign-in page. Here you need to sign into the same Google account you used to sign up for Google Analytics. You will be prompted to allow MonsterInsights access to your Analytics account. Click “Allow”
Pick a profile to track, complete the reCAPTCHA, and select “Complete Authentication”. You should immediately be redirected back to your WordPress site. If you’re not automatically redirected, wait about 30 seconds, and then return on your own by typing in your URL and including “/wp-admin/“ on the end of it. Type in your credentials once again and boom! You’re back at your site.
Disclaimer: On the odd occasion a user will report that the reCAPTCHA is malfunctioning or does not work at all. If this is the case, simply refresh the tab. If this doesn’t work, close the tab completely. Wait two to three minutes and try again. If this still does not get the reCAPTCHA back up and running it may be a configuration problem with the site it’s located on and you will need to contact that site’s support team. In this case, Google Analytics seems to be configured correctly and reCAPTCHA errors are very rare.
Congratulations, you’ve now set up Google Analytics. Feel free to fiddle with the Insight settings, and be sure to visit the console every now and then to keep an eye on your progress. This allows you to see where you should place ads, and where you should post your highest quality content. Not that your content should be of lower quality anywhere else, but you get the concept.
Are you looking to add code snippets to your traffic and conversions but simply don’t have the time or skill to do so? Well the following steps are for you. Google Tag Manager allows for an extremely easy way of doing exactly what you want, all through one clean and simple dashboard.
For this tool, you absolutely must have a Google Analytics account. If for whatever reason you do not have one, the steps to create one can be found above.
Your first step is to visit Google’s Tag Manager website. This can be found through a simple google search. Next, sign in with the same credentials you used for Google Analytics. Once signed in, you will need to provide a name for you account. Click “Continue”.
Your next step is to set up a container. In this case, you can use your website as the container. Your site meaning your domain name. All you have to do is enter your domain name under “Domain Name” and choose “Web” when it asks you where you want to use the container.
Your account should be created and you should be brought to your container dashboard. You now need to add a tag. There should be upwards of 20 products already integrated. For now, click on Google Analytics. Choose “Universal Analytics”. You will then be prompted for your Tracking ID. If you don’t know what your Tracking ID is, visit the step by step guide on how to implement Google Analytics to WordPress.
Your fourth data entry field should prompt for a “Track Type”. Choose “Page View”. Click “Continue”.
You should be visited by the tag wizard. Choose “All Pages”.
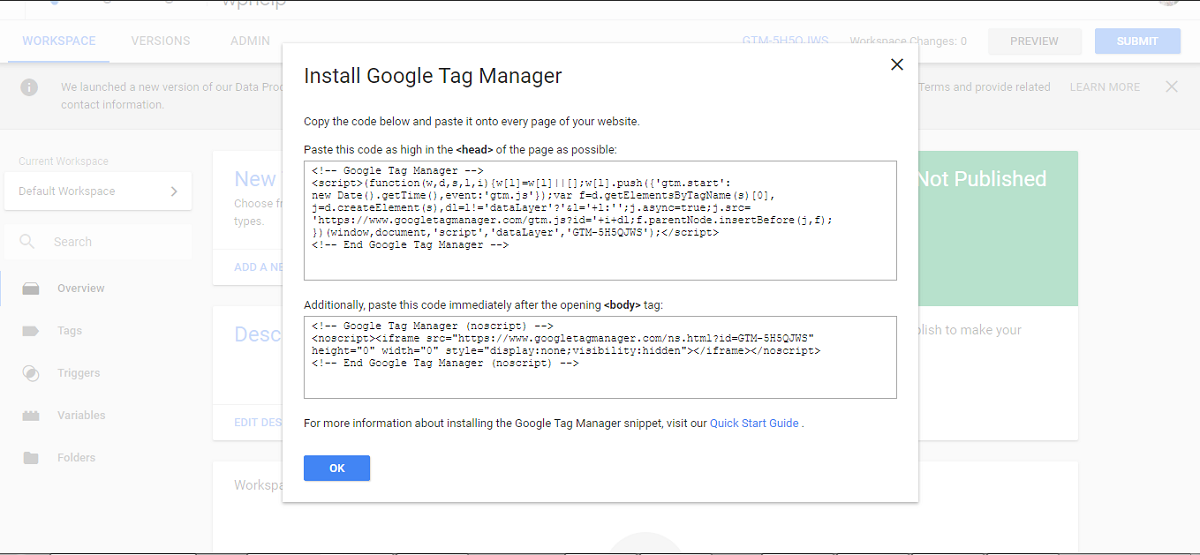
You should now see a prompt similar to the one displayed above. Copy this code.
Disclaimer: Your various windows may look slightly different than what is displayed within this tutorial article. This may be due to different versions being installed. However, due to the fact that these Google tools require certain versions of WordPress to be installed, the varying looks of windows may not matter. All you will have to do is make sure the information displayed is correct and represents what is shown in this tutorial. Another reason for various window appearances is your country of origin, and even the time of you reading this tutorial.
You now need to download a plugin called “Insert Headers and Footers”. Visit “Plugins” under your admin menu and choose “Add New”. Remember, if the plugin does not automatically activate you will need to manually activate it from your installed plugins page by clicking “Activate”.
Next, go to your “Settings” on the admin menu. Next, click “Insert Headers and Footers”.
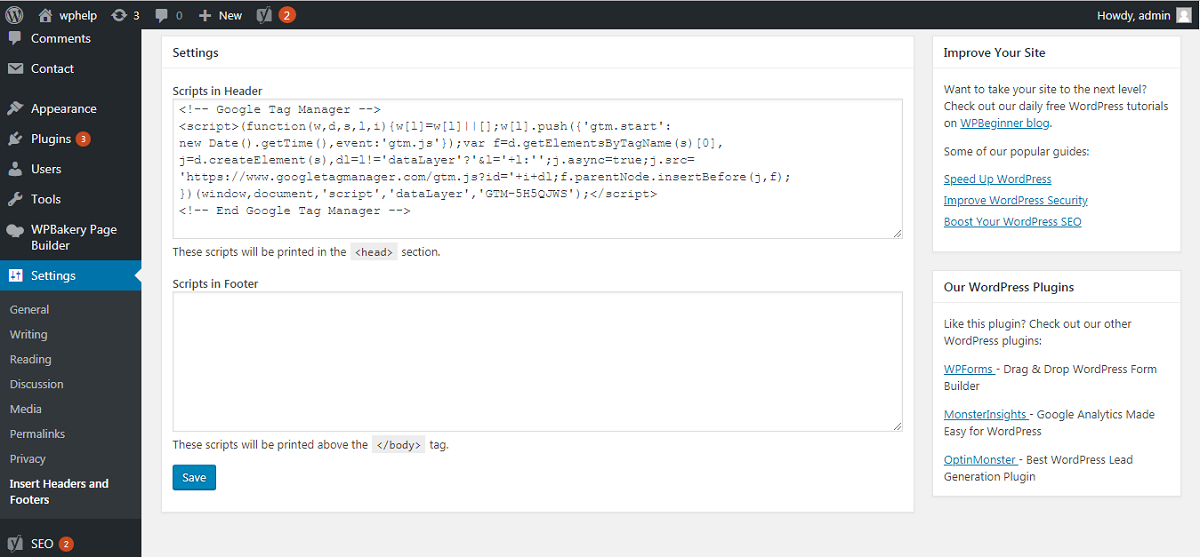
In the case the the above graphic does not display due to copyright reasons, the code should look something like the following. Some of the values may differ, along with the link. Do not stress, this is normal. Various values may differ because you probably, (well almost certainly), are not embedding the same item that we are within this tutorial!

Something similar to the above graphic should be displayed to you. Paste your copied code into the header section and click “Save”.
Your final step is to go back to Google Tag Manager, and to click “Publish”. Tags will not go live automatically.
Congratulations, your tag manager is now set up!
Google Calendar is perhaps one of the most useful tools within this whole article. Not only because it helps you organize and manage virtually everything, but because you can share things with the world as well. If you’re at all interested in trying out this calendar, the following step by step guide is for you.
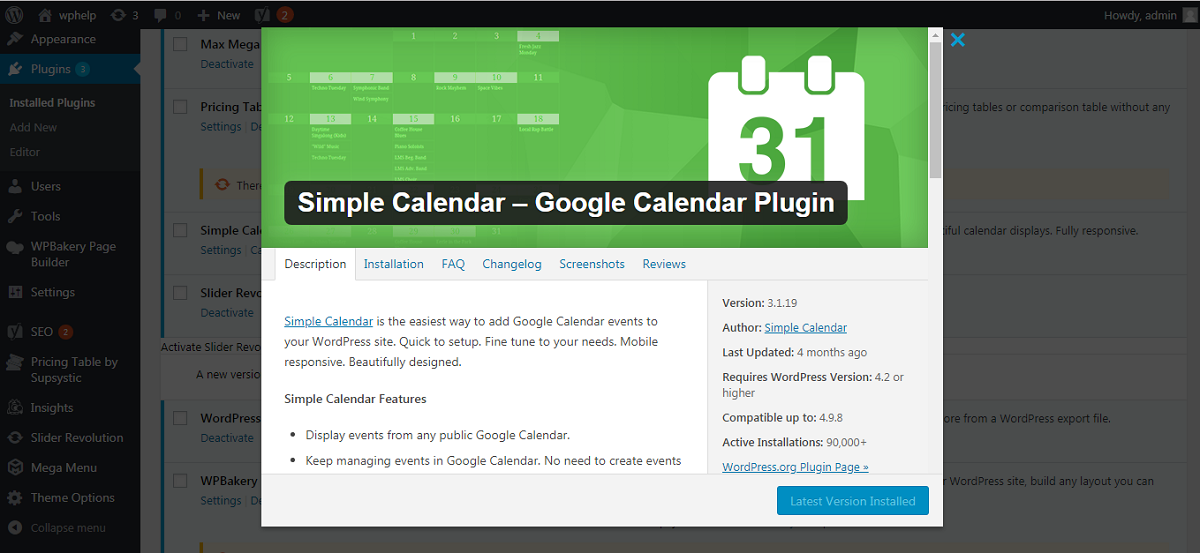
First, you need to download and install a plugin. This plugin is named “Simple Calendar”. In order to do this, go to your admin panel by typing in your URL followed by “/wp-admin/“. Next find your admin menu on the left hand side of your screen. Next find the plugins page and search up the plugin. Once it is downloaded and installed, activate it manually in the installed plugins page if it does not automatically activate.
The plugin should look like the following image.
Once everything has been activated, go to your admin menu and select “Calendar”. Next, go to “Settings”. This can be found in the submenu under “Calendar”.
Next, you need to give the plugin access to your Google Calendar. You’ll need to create a Google API Key to provide to the plugin. To do this, do a quick Google search on, Google Developer Console. Once here, select “Create Project”. Give a name to your project when prompted and make sure it helps you identify the project. This is important.
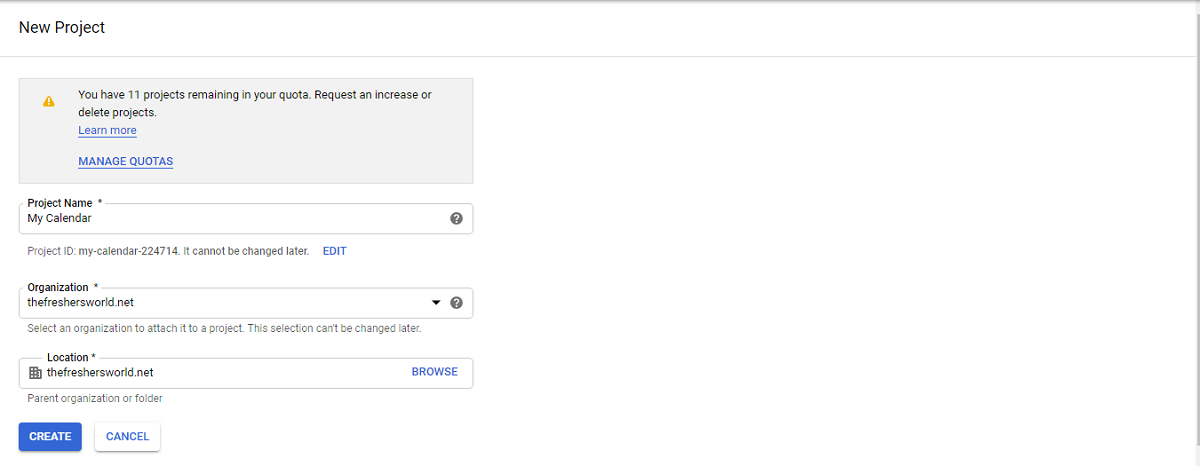
Once the project is created, you’ll be redirected to your project’s new dashboard. Here you can manage and activate your API key. Click the prompt. You should now see multiple Google products and services. Click on “Google Calendar API”.
On the next page, simply click “Enable”. After this, you need to click “Go to Credentials” as displayed in the next image.
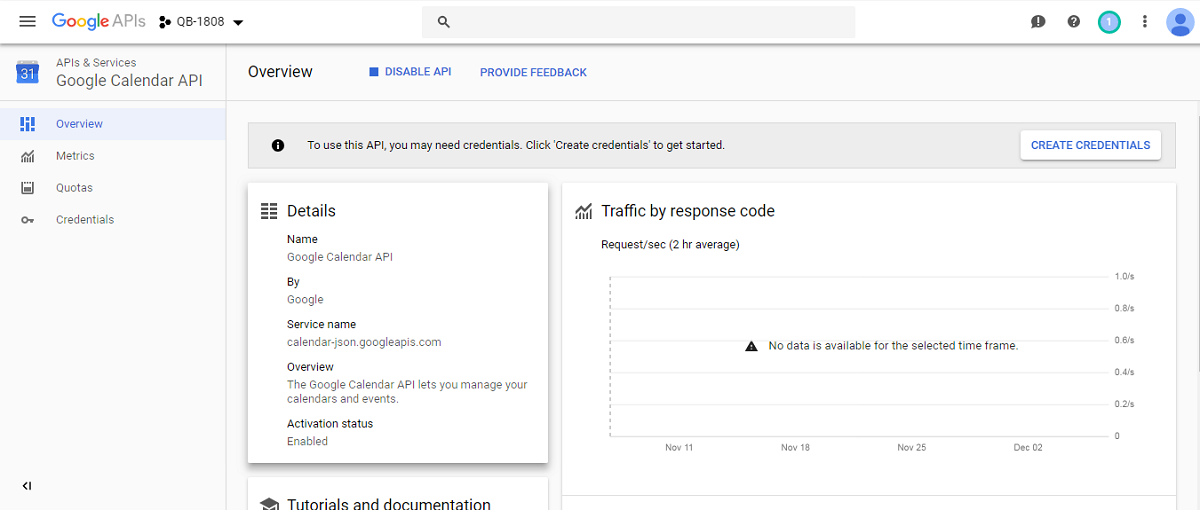
Disclaimer: Your various windows may look slightly different than what is displayed above. This may be due to different versions being installed. However, due to the fact that these Google tools require certain versions of WordPress to be installed, the varying looks of windows may not matter. All you will have to do is make sure the information displayed is correct and represents what is shown in this tutorial. Another reason for various window appearances is your country of origin, and even the time of you reading this tutorial.
When prompted to choose the credentials, select the API key link. Next, choose Server key when prompted.
Now you need to name your key. Something simple that you can remember. Perhaps “WordPress Calendar API Key”. Leave the IP field blank.
Congratulations, your calendar has successfully been implemented into your WordPress site. To make the calendar public, simply go to the drop down menu beside the calendar and select “Share”. Next, select “Make Public”.
Would you like to implement a Google Map into your WordPress site? Well the following step by step guide is for you!
Your first step is to go to google maps. Either do a Google search or simply visit their app list.
Next, type in any address or location and click “Search”. Click “Share”. Your screen should now look like this.
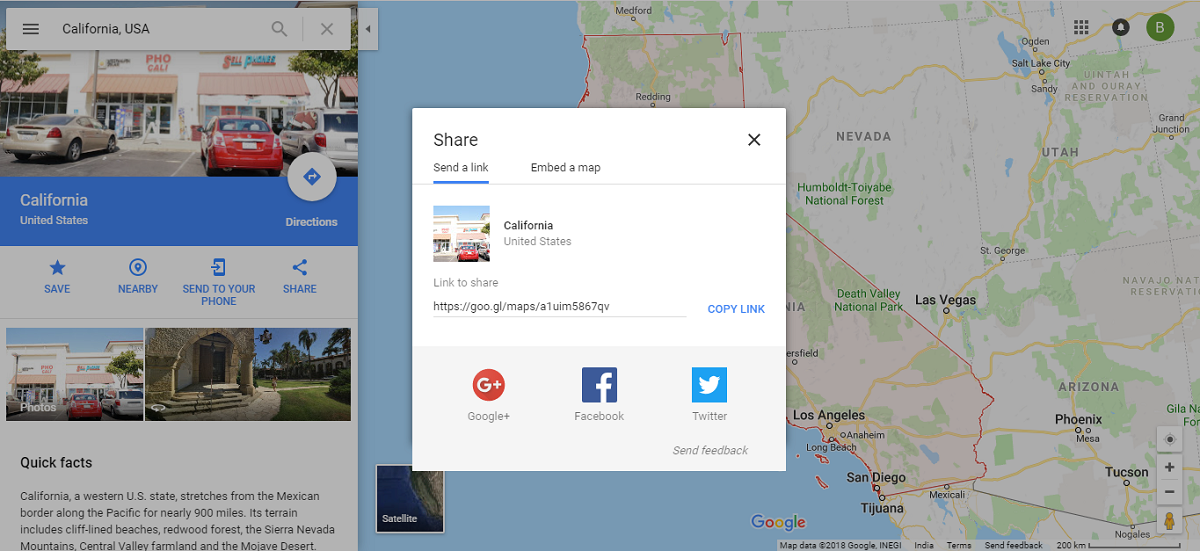
Click on “Embed a Map” and copy the code that starts with “<iframe”.
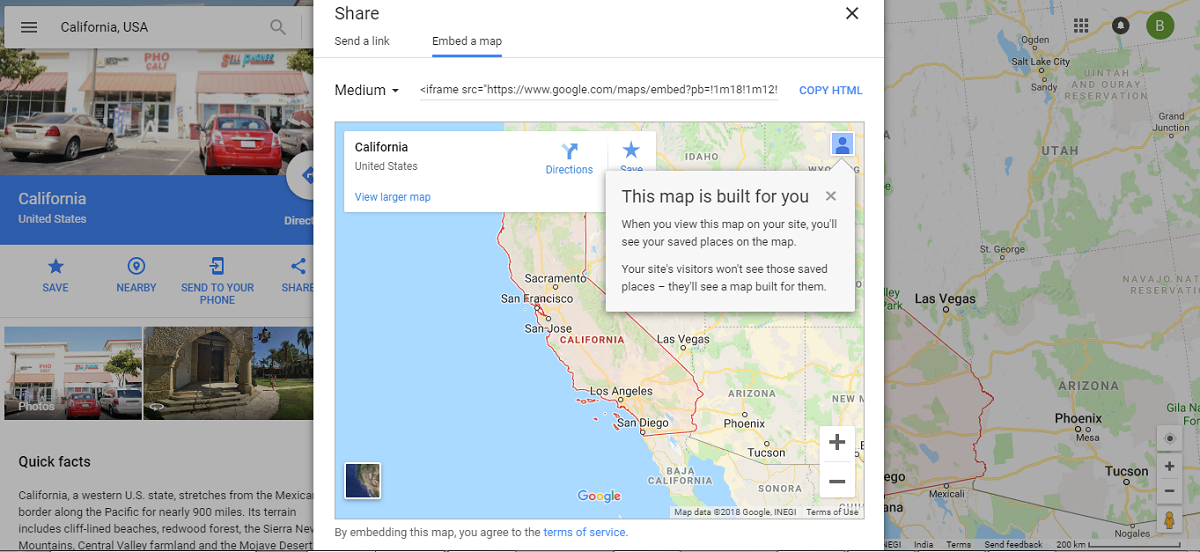
Next, go to your WordPress administration panel. Go to any post or page and go into editing mode. Open the HTML editor and paste the code you just copied directly into the page or post.
Publish the post or page! You have now used a Google map within your website. Congratulations!
Are you at all interested in Google Cloud Hosting? Well the following step by step guide is about to be your best friend! Make sure to pay attention! The following guide will make being hosted by a single server seem like child’s play. In with the new and out with the old. Google Cloud will be more efficient, faster, and have nearly no downtimes.
How To Use Google Cloud Hosting For a WordPress Blog
Your first step when it comes to using Google’s hosting service is to obviously buy it. Choose a package or plan that works for you and be on your way.
Next, log into your Google account and go to the cloud console. Click on “Project”. There should be a drop down menu. Click “Create Project”.
You should now see a popup. Fill in all the appropriate fields and select the appropriate tasks. Finally, click enable.
Now, search for Cloud Installation. Click on WordPress under the Blog/CMS tab.
Now, click “Launch on Compute Engine”.
You’re now going to have to complete the form that should be displayed. Below is what Google themself says you must check off.

“Install phpMyAdmin”
“Enable Google Cloud Monitoring to receive regular reports on your service”
“Allow HTTP traffic and HTTPS traffic, found under Firewall”
Next, click “Deploy”. Once everything is installed you should be provided with your login credentials, and then instructions on how to view your installation.
Congratulations, you are now set up on Google Cloud!
Google Adsense serves to provide content creators with money. It’s perhaps the number one way of doing so that is legit and easy to use.
Google Adsense, in simple terms, is a Google tool that displays advertisements on someone’s site. Google pays these sites based off of how their advertisements are doing. You don’t even have to worry about dealing with the advertisers because Google does it themselves. They take their management fee and give the rest to you. You can get information on Google advertisement fees when you accept terms and conditions and anything similar. Make sure you actually read them rather than skim them or just skip them all together. This is your money, and possibly your way of life we’re talking about here. Don’t take this for granted. Make sure you are proactive rather than reactive. Your future self will thank you for it.
Getting Google Adsense Set Up
First, you need to create a Google Adsense account. If you have a Google account already, use that to sign up. You are now going to have to fill out an application. You’ll here back in 4 – 8 hours from Google. They’ll have a decision based on whether or not you passed based off the application. Don’t rush through that application, take your time.
If You Passed
You can now log into your Google Adsense account and get your AD code. Click on “My ads” and then click on the new add button, labelled “New Ad Unit”.
You will now be prompted to choose between several ad types. Next you’ll have to sort through several ad details like size, content and location. Remember! The bigger the ad the bigger the payout! Also ensure that your advertisement placement is where the majority of your viewers and readers go. Don’t put ads on barren wasteland like places on your site. Place them near the front, easily accessible to readers. Just don’t make them too big, as you don’t want to annoy readers either! Best of luck with this set up!
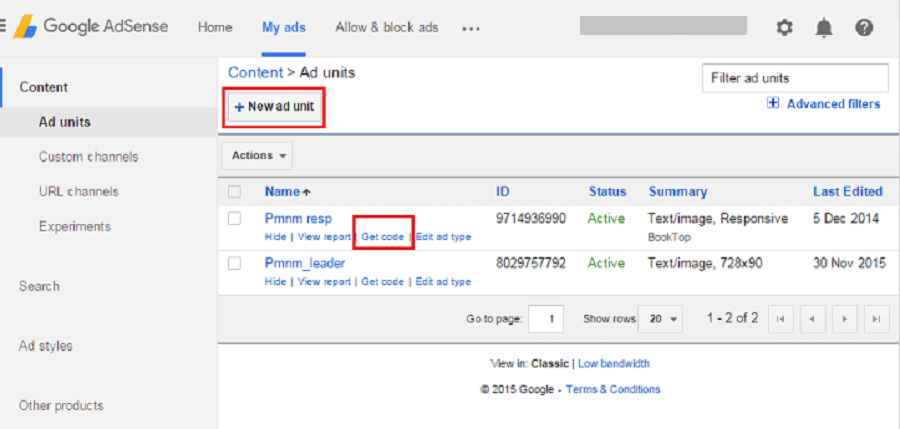
Once this setup is completed, you’ll see a message along the lines of “Ad Successfully Created”. Code should be included with the message.
Copy the provided code and save it somewhere. A text editor like notepad would be beneficial. You’re going to need this code for the next step. Make sure the code is easily accessible and that you don’t lose it!
Go to your WordPress admin panel by typing in your URL and on the end add “/wp-admin/“. Click on “Appearance” under your admin menu which can be located on the left hand site of the admin panel. Next, click on “Widgets”. Now click on “Custom HTML”. Paste the copied code here, and add it your widget location.
Congratulations, you’ve added your first advertisement! Wasn’t that easy?
So, you’re looking to embed a Google form within your WordPress site? You’re in luck! It’s super easy and the following step by step guide will tell you exactly what to do and how to do it.
Your first step is to of course have a Google form ready. If you don’t already have one, go to the Google Forms website. Quick Google search should get you there. Next, choose a template and create the form by following Google’s simple instructions. You’ll have to select the purpose of your form, the questions, the answers you want to provide, and of course which questions are a required question. A required question is one that the user has to answer, otherwise they won’t be able to submit the form. Lastly, you may also want to leave users with a place to write in their own answers. For some of the questions you can even leave an “other” option and it will include a text box for a more personalized answer. Have some fun with it if you’re just exploring Google tools rather than looking for a tutorial on just one! The options are limitless!
Once you’ve created the form, click “SEND”. This will provide you with the code needed to embed the form. Copy the provided code.
Next, simply go to any page or post on your website and enter the edit screen. Click on “Text Editor”. Paste the copied code into this space.
There! You’re all done! Head on over to your website and check out your new Google form! The form will be located on the post or page that you opened the text editor on!
Google Domains is an easy to use and inexpensive tools that’ll spare you the hassle of trying to figure out other Domain companies like GoDaddy. Not to mention GoDaddy domains tend to be extremely expensive if you try to get a rare one.
Google Domains offers several new domain endings that are extremely vital to today’s internet community. Endings like .ninja and .today are now being used today due to the increasing amount of websites that end in things like .com or .ca or .org. Due to these facts, there are actually a surprisingly low amount of URLs left that are still available to content creators. Thankfully Google Domains have solved this problem for its users. Prices typically start around $12 for the majority of their domains, the price may increase or decrease depending on the rarity of that domain. Something like www.ghosts.com may go for two hundred dollars a year, whereas www.24x7wpsupport.com may go for thirteen dollars a year. Choose your domain carefully ladies and gentlemen!
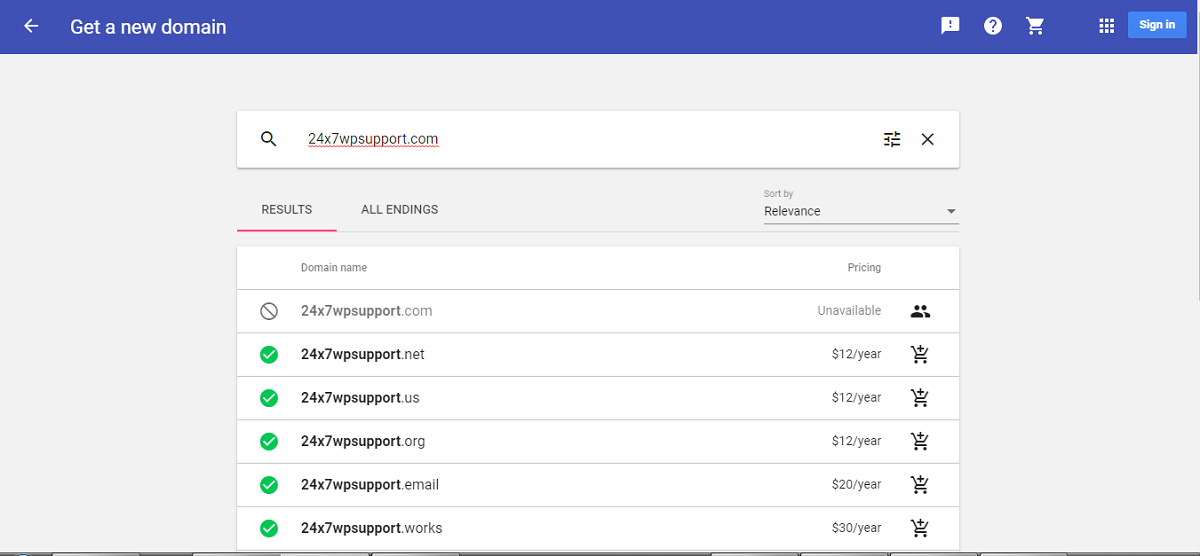
Buying a Google Domain is simple. Simply go to the Google Domains website, and search for the domain name you want. You’ll be provided with information in regards to whether or not the name is already taken, and if it is, a list of suggested alternatives. Once you’ve decided on a good domain name, add it to your cart. Go to your cart.
Ensure that privacy protection and Auto-renew is on. This saves a lot of the hassle that comes with yearly payments and is recommended to use by WordPress and Google themselves.
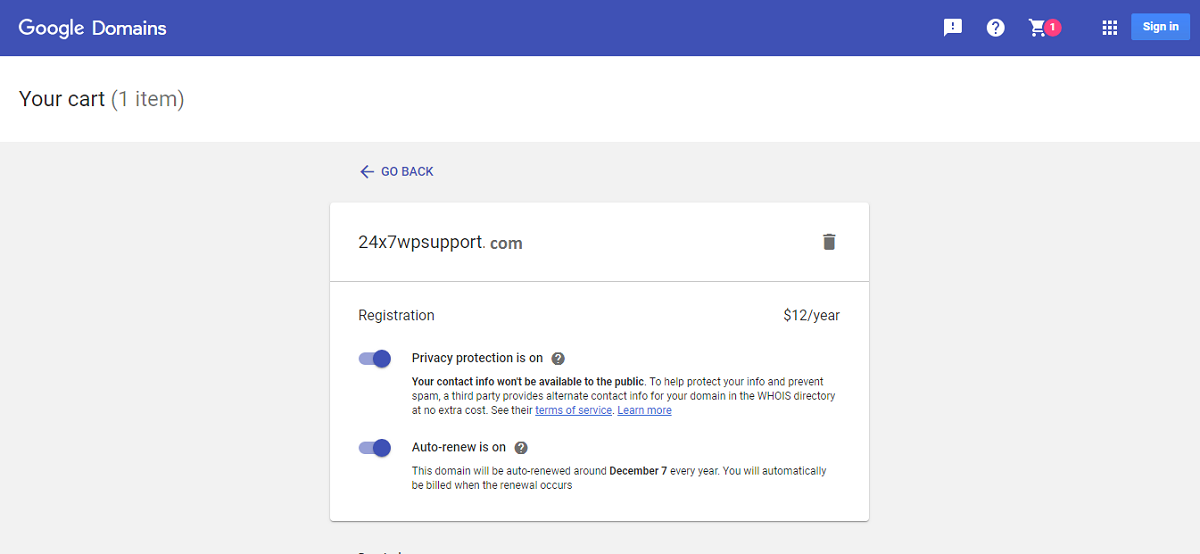
Your next step is to fill out several information fields. These are standard purchase fields and should be of no concern. Google Domains is a secure website and you don’t have to worry about information being stolen or manipulated.
Disclaimer: As a side note, if your information and/or credentials is every stolen or manipulated without your consent, make sure you call WordPress, your host and even Google right away. While doing this, make sure you change your passwords. Make sure they’re long passwords as well. They need to have capitals and lowercase letters, numbers, and sometimes even a symbol depending on what platform you’re changing. Also! Make sure that all of your passwords are different! Don’t let your blog password be the same as your Facebook account! That’s just ridiculous and foolish at the same time! Not to worry or stress though, Google and WordPress alike rarely have any security problems. Just don’t use Yahoo! They have security problems all the time!
Congratulations! You’ve bought your first Google Domain! There are several ways to link the name to your site. WordPress themselves have put together several comprehensive guides that are vital in regards to choosing the route you must take based off of your own specific circumstances. Good luck!
In order to embed a Google document within a WordPress page or post, the first thing you need to do is click on “File” under the document you want to embed. Next, click “Publish to Web”. Select “Embed”.
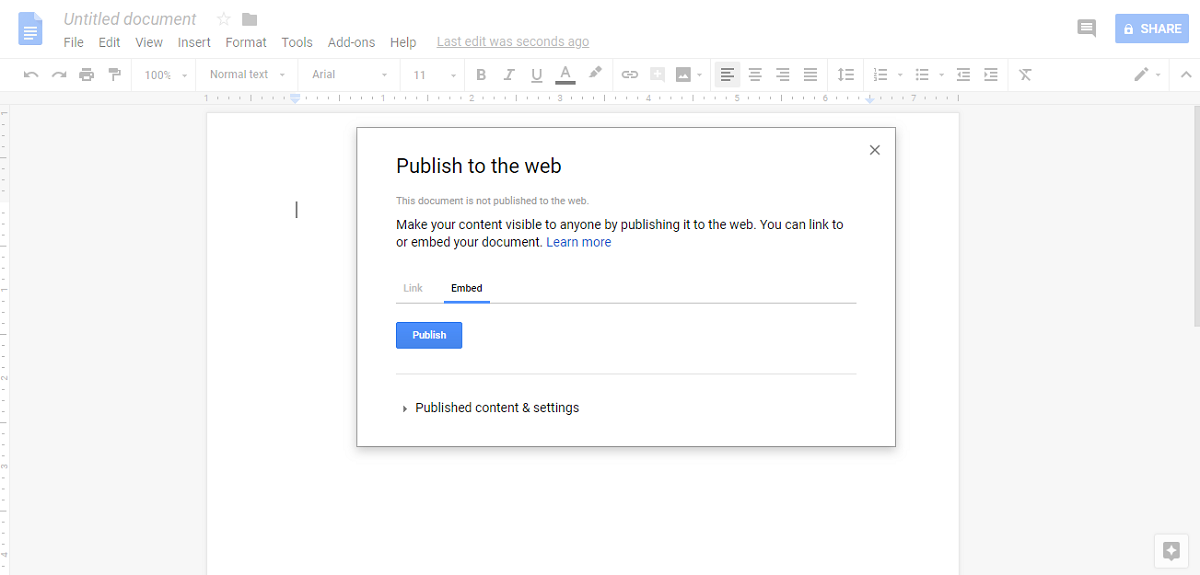
Now, click “Publish”.
You should now see the embed code. Copy this code. You’ll need it for the next step.
Go back to your admin panel. Remember, all you have to do is type in your URL and add “/wp-admin/“ onto the end. You would be surprised at how many people forget to do that and never end up editing or updating their site. Anyway, go to any post or page on your WordPress site. Go to the editor window, and click on “Text Editor”. In this space, paste the copied code. Click publish when ready. You can also click the save as a draft option, or anything other option you may need. The work will still save and the document will still embed, you just will not see it publicly. Anyway, click publish when you’re all done.
Congratulations! You’ve now embedded a Google document. Check out your WordPress site to take a look at your good work! The document can be found on the page you selected when entering the edit mode.
Perhaps one of the best ways to secure your WordPress information, Google Authenticator is a recommended tool to use by WordPress themselves. Google has partnered themselves with WordPress. This means that your information is not at risk.
The way this works is your phone is linked directly to your site. When you try to login from a new or old device, you will be sent a verification phone directly to your phone. You enter this code into a prompt on the site and you will then have access. This means that your site is virtually inaccessible by anyone but you! Pretty cool right?
Disclaimer: You can actually use Google two step authentication on a lot more than just WordPress. One of the most important ways of securing your site is to make sure that the devices you use are secured as well. This means that when you’re signing into your Microsoft or IOS accounts for a laptop, or even into iCloud on an iPad, you can use that two factor authentication. Not only can you secure your website, but you can secure your life as well! How great is that! I’ll answer for you, it’s pretty darn great!
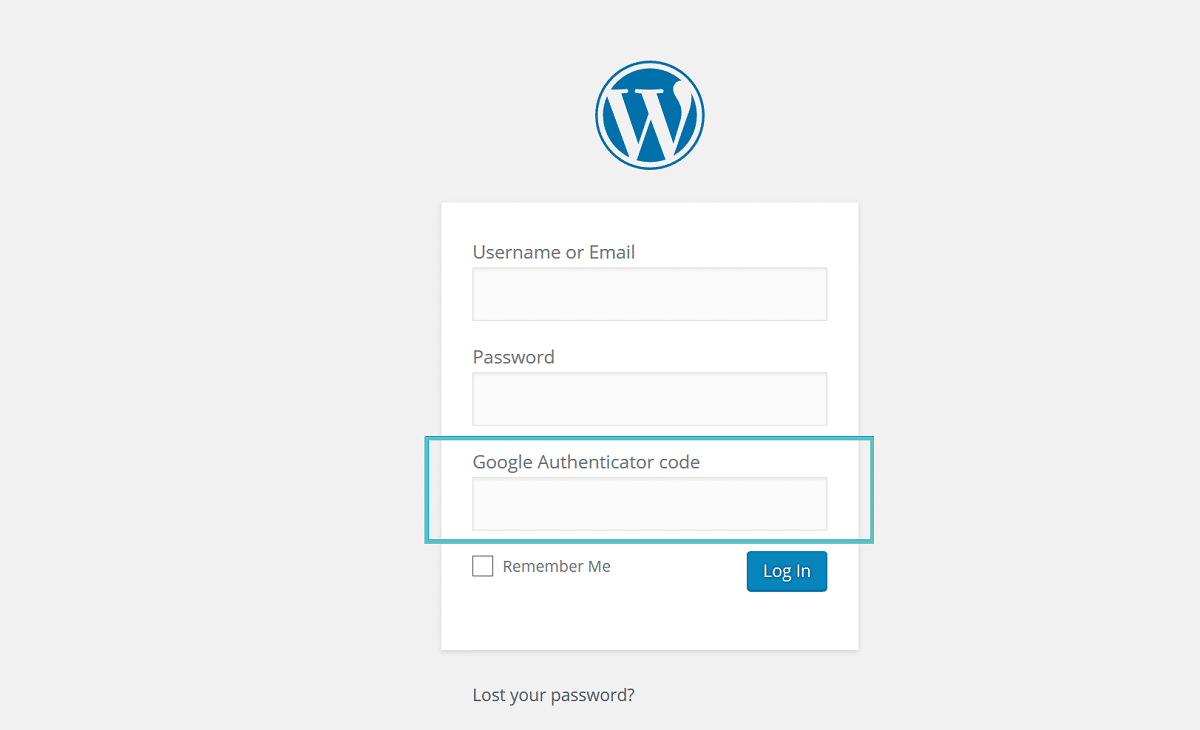
Once you’ve completed the following tutorial, your WordPress login screen will look like the following image. You’ll be sent a code that you will have to type into the authentication field alongside your username and password.
Disclaimer: Sometimes you may be sent a spam message containing a code or phone number. NEVER click on them unless you’re sure that it is your authentication service that sent it to you. If you’re unsure, click “Send Code Again”. If it goes by the same number, you’re good. If not, delete the spam message immediately and block the number they used. In the unlikely case that something similar to your site name pops up on your phone, do not click it. Hackers are able to disguise malware links with hyperlinks over top. You may click the link thinking that someone commented on your blog post when in reality you’re being redirected towards a NSFW or even malicious site! Be careful and proactive ladies and gentlemen! It may save your blog one day!
First off, you’re going to need to install Google Authenticator on your mobile device. This can be found on IOS and Android application stores, free for purchase.
Next, you need to install the Google Authenticator plugin for WordPress. To do this, go to your admin panel by typing in your blog URL. Next, add “/wp-admin/“ on to the end of it. Enter the credentials you were given when you first created your blog. Find the admin menu on the left hand side. Select “Plugins”, click “Add New”, and search up “Google Authenticator”. Download and install the plugin. Activate it if it doesn’t automatically do so by going to your installed plugins page and clicking “Activate”.
Now, go to your WordPress admin menu. Click on “Users”. Next, click “Your Profile”. You should see the following screen.
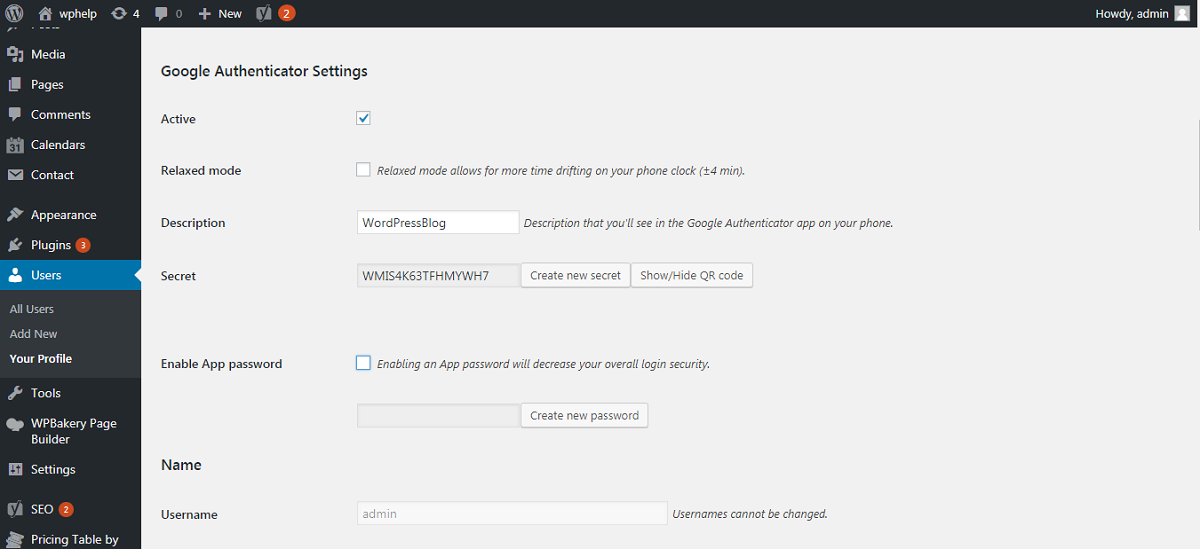
Select “Active”. This means the Authenticator will be in use on your blog.
Disclaimer: On several article in the past, readers tend to copy information out of screenshots under the assumption that that is what they need! Please don’t do this if you want your tool to work! Everything we provide is to act as a sample and nothing more! You can always ask for clarification within the comments section.
Selecting “Relaxed Mode” is optional and is only recommended for slow typers. This gives you more time to enter the code. It’s less secure than the default setting but is still a giant leap forwards for your security then when you’re without it.
Set “Description” to something along the lines of “WordPressBlog” as displayed. This will simply be the name of your account. It’s important that you’ll be able to recognize it as soon as possible.
Next, you can either use “Secret” as a password or use the QR code as a password. DO NOT add spaces to the secret on an Apple device. This runs the risk that it won’t work as planned
Now, go to your Google Authenticator app. Click the plus button in the bottom right corner. Enter your secret code or scan the QR code to add your blog.
Congratulations, your blog now uses Google’s 2 step authentication service. Your security is that much better off.
Using Google Reviews on your blog is perhaps the easiest task on this list. First, go to your admin panel by typing in your URL. Add “/wp-admin/“ onto the end of it. Next, enter the credentials you received when you initially created your blog. Simply go to your “Appearance” settings under your Admin menu on the Admin panel. Click “Plugins”. Click “Add New”. Search for “Google Reviews”.
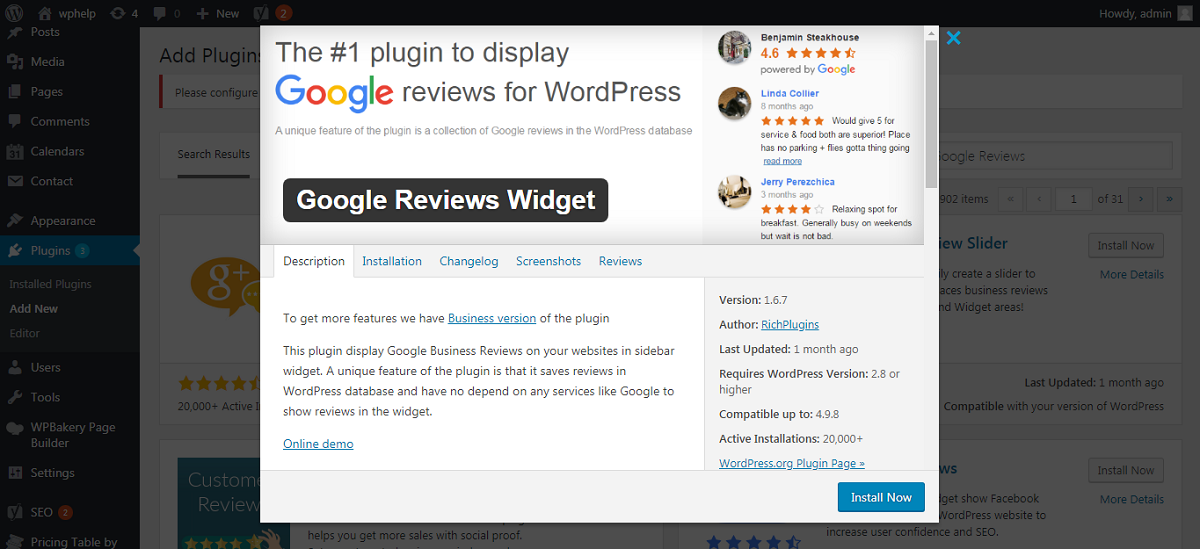
Download and install the plugin. If it does not automatically activate, go to your installed plugins and find “Google Reviews”. Select “Activate”.
You should now see the plugin on your admin menu! Feel free to fiddle with the settings, and configure it to how you want to see reviews.
Congratulations, you’re now using Google Reviews! You can now keep an eye on what people think of your site and your content. Always remember to tailor your content towards your reviews! Unless their spam! If people say your posts are too opinionated, fix them! You don’t want to lose readers! Especially if you’re running an online business. Remember! The customer is always right! First rule of business!
Just like the previous task, Google Language Translator is extremely easy to set up. First, you need to go to your administrative panel. To do this, type in your URL and add “/wp-admin/“ to the end of it. Next, enter the credentials you received when you initially created the blog. Next, find your admin menu and simply go to your “Appearance” settings. Select “Plugins”. Select “Add New”. Search for “Google Language Translator”, and download and install it. Activate it through the “Installed Plugins” section if it does not automatically activate by clicking “Activate”.
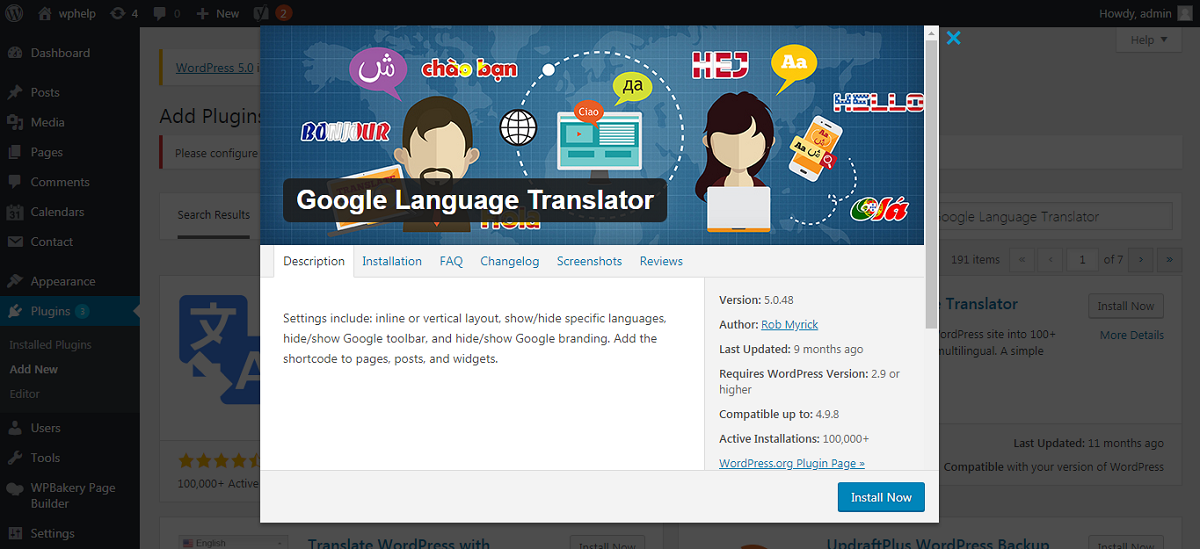
The tool should now appear under your admin menu. Go into the settings and select where you want the tool to show up on your blog. You can add it a widget, page or post. It’s really up to you! Have some fun with it.
It’s important to note that this tool should be placed relatively closed to a multilingual section of your website for user clarity.
Once again, all that you need to do is download an easy to use and intuitive plugin. You’ll need to go to your administrative panel. To do this, type in your website’s URL and add “/wp-admin” to the end. This will take you to a login screen. Enter the credentials you got when you initially signed up and created your blog. Next, find your admin menu. This should be on the left hand side. Simply go to your “Appearance” menu and select “Plugins”. Click “Add New”, and search for “Google Places Reviews”. Download and install it. Activate it through your installed plugins if it does not automatically activate itself by selecting “Installed Plugins”. Next, select “Activate”.
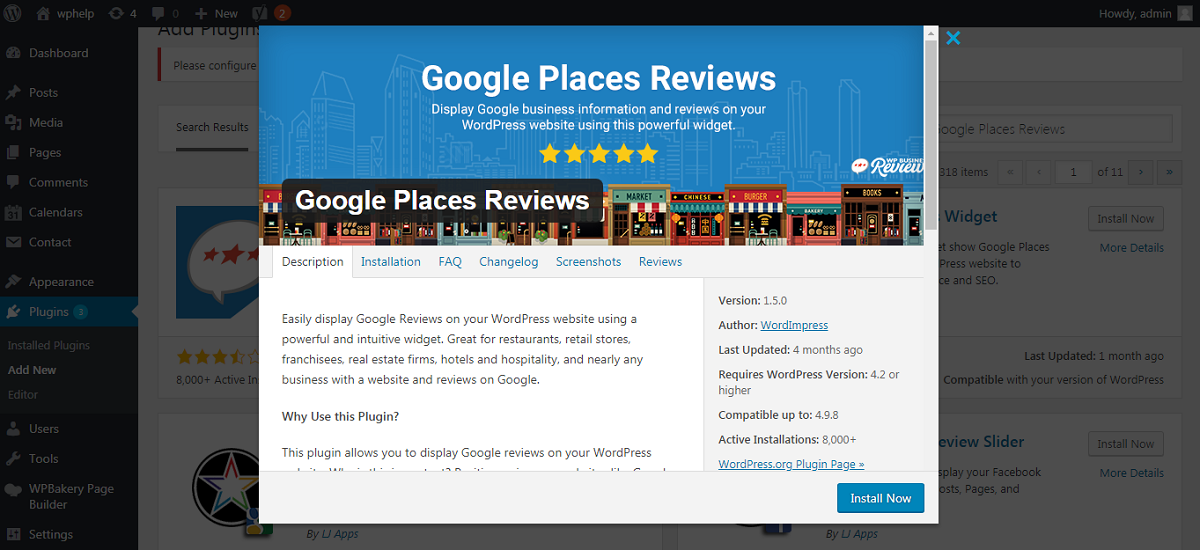
Last but not least, search for the plugin within your admin menu. You can display the plugin through any widget, post or page with a simple click of your mouse. That’s it! Feel free to fiddle with the settings! Otherwise, you’re done!
Google Maps Tips
When using Google maps, make sure that the locations you’ve provided are up to date and accurate. Google is always being updated due to how much the real world updates. You don’t want to provide your readers with false information do you? In a day and age where “Fake News” seems to be everywhere, you have to do your best to stay real and accurate.
Google Document Tips
When using Google documents, make sure that the content within that document is up to date and accurately describes what you’re trying to display to your viewers. Far to often are bloggers losing track of what’s available to readers. Often at times they realize too late, and have already lost many readers. Another tip here is to put all your embedded documents into a folder on Google drive. Once you’ve done this, leave yourself a little reminder on your mobile device or any device for that matter. This will ensure that you can update and check on these documents once in a blue moon.
Google Translate Tips
When using Google translate, make sure that it’s actually needed where you post it. If your site has many multilingual people, add it near where they browse. You don’t want to add it near a section where only one language is spoken. That’s one way to make viewers think that you just add tools for the sake of adding them. Another tip is to add Google translate near the comments if your readers are known to be multilingual. This allows people to interact with each other, even if they have absolutely no prior knowledge in regards to a language other than their own.
Google Reviews Tips
When using Google reviews, an important tip would be to only display those reviews if you’re getting good or great ones. Yes, this is perhaps one of the more sneaky tips on this list, but it works. No customer wants to see your negative reviews. Why display them publicly?! On the opposite note, if your reviews are great, display them everywhere! You want your customers to see them. Make them feel comfortable. Leave prompts across your website encouraging them to leave reviews! Some websites even have review friendly sections. This means that a certain section of a website is only accessible once a user leaves a review. It’s the perfect way to see if your readers actually want to keep reading.
Google Place Reviews Tips
When using Google Place Reviews, make sure that you add only relevant places to your website. If you own a food blog, don’t advertise places that aren’t related to food in any shape or form. That would be ridiculous. Unfortunately it still happens a lot. Sometimes bloggers are even paid to do so, but this hurts them in the long run as their readers are there for the food reviews and not some random place review.
Google 2 Step Authentication Tips
When using Google 2 step authentication tool, make sure that you always have access to your phone. Nothing sucks more than trying to work on a post from somewhere that’s not your house, and not being able to log into your site. Also make sure that your mobile device is password protected and that your text previews are off. If neither of those are on, any random person will have access to the code you need to bypass the two factor authentication. Be careful people! It’s important to be proactive rather than reactive! Remember this! It may have the power to save your blogs life!
Google Domain Tips
When using Google domains, or any domain on your site for that matter, make sure you keep an eye on the billing details. Sometimes people buy domains that they think are a one time purchase, when in reality they’ve been paying dozens of dollars a month without even knowing. That’s a perfect way to drain your account before saying, “But I thought it was a one time thing!”. Remember, be proactive not reactive. A lot of times it’s not even possible to fix something through being reactive. Being proactive however, allows you to fix everything in advance.
Google Analytics Tips
When using Google analytics, keep in mind that it tracks you too. Maybe not when your logged in, but if you visit your site as a viewer to see how it’s doing, expect to see a hit on the view boards. Don’t get too excited, I’d hate for you to be disappointed.
Google Plugins Tips
In regards to Google tools plugins, make sure that the plugins you’re using are actually Google property. NEVER buy or download a plugin from anywhere but your WordPress admin panel. Anywhere else and you may end up losing your data or gaining a bunch of viruses! That ain’t fun!
Backup Tips
Make sure to backup your content! This is perhaps the number one rule when being a blogger. You don’t want to lose all that content! Even if you don’t want to pay for a full backup, you can still copy and paste your work into a third party document writer like notepad. You can even store your work in Google Drive or in Word to a USB device. The possibilities are limitless for this one.
Google Adsense Tips
Often at times many bloggers don’t realize what they’re actually advertising on their sites. It’s important to note what your site is displaying because it may be contrary to your sites opinions and beliefs. Or perhaps even to your own personal opinions and beliefs. Sometimes you may even have to take reader ad reviews into account, otherwise you may lose them as readers. Another tip is to become more cautious of what is going on in the news. Sometimes companies turn out to be shady and corrupt, or have leaders who do disturbing and illegal things. You do not want to advertise for these people. Strip the ads from your site and advertise something else. Being proactive on this one is of vital importance as well. There isn’t much of a way to come back from negative advertisement. You can even use how you’ve stripped a companies ad from your site as good publicity! Just don’t do it too much as advertisers may avoid your site like the plague.
Another advertisement tip is to put the ads on your most popular pages. Make them big but not to big. You want people to click them, but you also don’t want people to leave because of them. Stay away from pop up ads or interactive ads, as studies show people are not at all interested in them and find them incredibly annoying.
Google Sitemaps Tips
When using Google Sitemaps, you have to make sure that all of your pages are of great quality. Since the sitemap indexes them all, it allows people to find them much more easily. You don’t want people to be turned away from your site due to a poorly planned or even poorly managed site page. Another tip is to ensure that every page is updated constantly, in order to bring more awareness towards search browsers.
Google tools is a resource that everyone with the opportunity should try. Not only are they free, but they are incredibly easy to use and manage due to Google and WordPress’ partnership. Google is always coming out with more helpful and easy to use tools that of course can be implemented into WordPress just like all the others. As for right now, this in depth, step by step guide includes every Google tool and how in can be used with WordPress. If you enjoyed this article, stay tuned for more!
If you found this mega tutorial helpful, feel free to share it with others who may be just as interested. Please address any questions or concerns you have within the comment section and we’ll do our best to clarify and answer any questions you may have. Please remain civil and humane within the comments. If you’ve found any error within this tutorial, feel free to point it out peacefully. After all, we’re only here to help people develop their sites. With that in mind, thanks for reading, and we hope we could be of help!


