
How to add Apple Pay to a WordPress Site?
We are often asked which payment method is compatible with the WordPress website. Even though there are plenty of payment methods but we suggest to add Apple Pay to a WordPress Site.
Apple Pay is one of the credible payment gateways that offer security from hacking and vulnerabilities. The iOS system is highly regarded for its safety. Hence, most people in the United States prefer this ecosystem.
Steps to add Apple Pay on a WordPress Site?
Install and Configure
You have to set up a store in order to run an eCommerce WordPress site. You can even manage recurring payments with WooCommerce. So, install and configure it.
Make sure to implement a sleek design for the product pages. It should cover the entire thing, right from tax calculations to shipping rates. In the next step, you need to add Apple Pay to a WordPress site that receives Apple Pay.
Activation and Installation of Stripe
Thanks to the team of Stripe, you get effective support for Apple Pay. Hence, you can manage to sort the issues if you are facing any challenges.
You can be in control of the setup process. The fees are also reasonable. It has a renowned processor.
Firstly, check for the Stripe WordPress plugin. Next, activate and install this plugin.
Click to open a new tab and sign into your business account of Stripe. Enter all the prerequisite details such as bank details, company name, etc.
Once done, head to the WordPress dashboard.
Link Stripe plugin and your business WordPress site
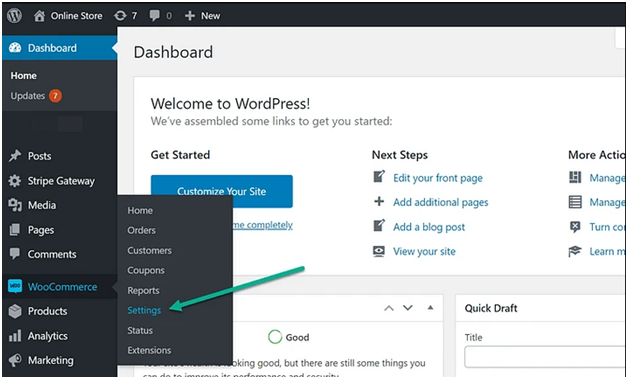
Browse to “WooCommerce” to add Apple Pay to a WordPress Site. Tap “Settings”.
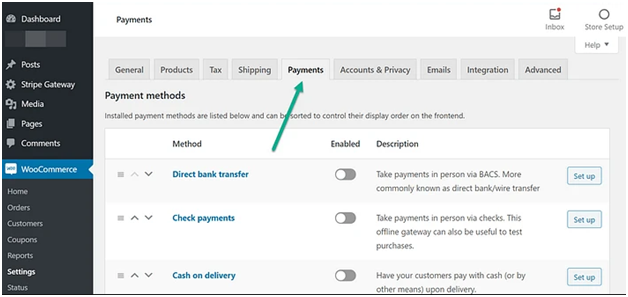
Click “Payments”. Here, you will see all types of payment methods like “Cheque payments”, COD, Stripe, etc”.
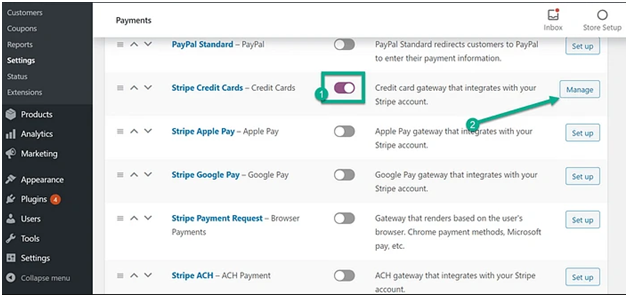
Go to the option of payment “Stripe Credit Cards”. You will witness plenty of fields in the titles with Stripe. It is not necessary now.
Ensure to click on the Stripe Credit Card’s basic functionality before you process.
To add Apple Pay on a WordPress Site, switch the Stripe Credit Cards “ON”. Click “Manage”. In some cases, you may see “Set Up” in place of “Manage”. You need to tap it.
Linking Stripe by employing API Keys
Head to “API Settings” to add Apple Pay to a WordPress Site. If you are ready to collect the payment, make sure to turn “Live”. You will find it near the Mode field. Leave it in “Test Mode” if you are not yet ready.
Tap “Click to Connect”. You need to login into your business Stripe account once you are guided to the next screen.
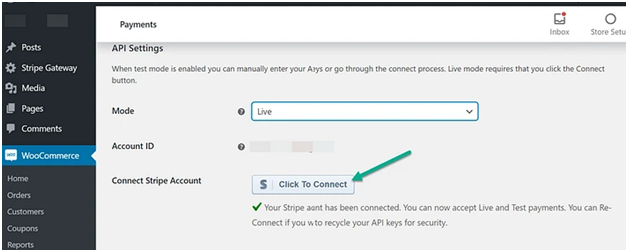
You will come across a page that connects third-party using WordPress. This will only pull your account for the time being till the time you are logged in. Make sure to log in to the account when you get prompt messages as there are chances you are logged out.
You have to pick your business Stripe account when you are logged in. Click “Connect” to add Apple Pay on a WordPress Site.

A checkmark will appear on your screen in green color. You will see the “Stripe Account Has Been Connected” message. On its own, this will create a Publishable Key and Secret Key. You will see this added to the fields of your WordPress dashboard.
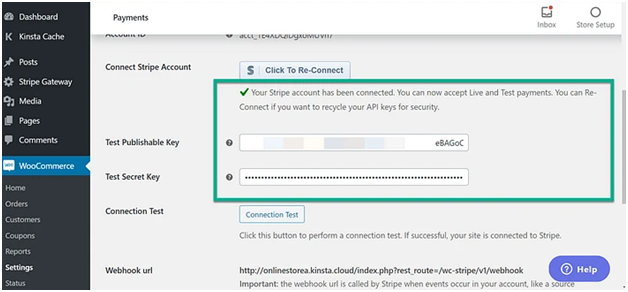
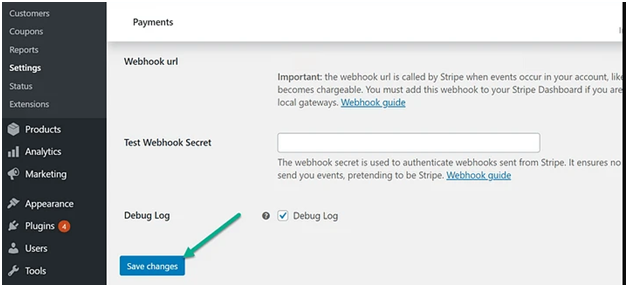
Hit “Save Changes” while navigating to the WooCommerce Payments page. The Stripe keys will be secured within WordPress because of this step. It will qualify them to process your payment.
Activation of WordPress Apple Pay
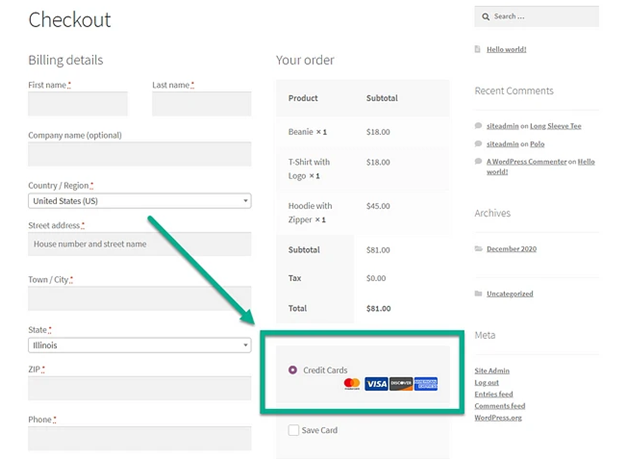
In the previous, you are already done adding Apple Pay to your WordPress step. Hence, it will now allow you to process the credit cards.
Click “Apple Pay” to add Apple Pay to a WordPress Site.
Head back to your WordPress dashboard. To add Apple Pay on a WordPress Site, press “WooCommerce” and click “Settings”.
Next, “Payments” and press “Apple Pay”. You will see this below the Payment section.
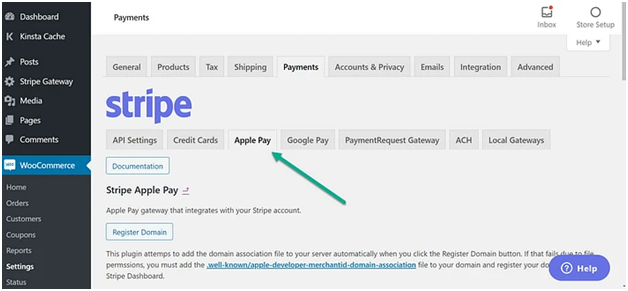
Apple Pay will first authenticate to check whether you are this domain’s owner. You need to share the document for verification. Do this in the hosted website file section.
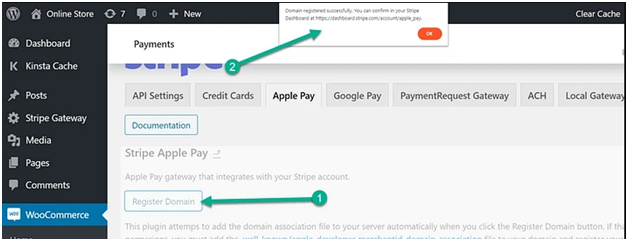
The process will take place automatically. Under the Apple Pay section, click “Register domain”. When done with registration, you will see a popup- “Domain Registered Successfully”.
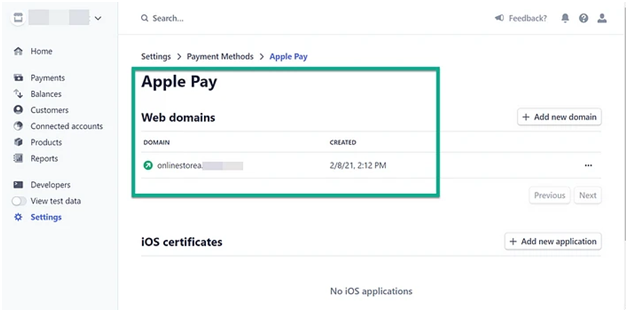
Testing is an important process. So don’t miss it before going live. Go to your Stripe dashboard and click “Settings” to add Apple Pay on a WordPress Site.
Click “Payment Methods” and press “Apple Pay”. Your domain name will be displayed beneath the “Web Domains” list.
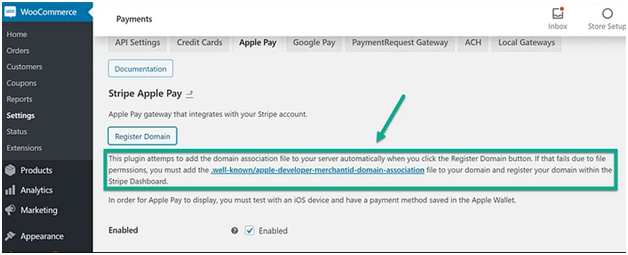
If you are notified about the failure messages, then you need to:-
- Follow the link shared on the WooCommerce Apple Pay Settings
- Manually upload your documents for verification.
Once verified, a checkout module will be displayed “Buy with Apple Pay”.

You are done adding Apple Pay to a WordPress site.
Scale your business with 24×7 WP Support!!
We provide distinguished WordPress help for integration services like Google My Business with WordPress, WooCommerce Facebook pages, etc.
Our team is known in the market for providing the best maintenance support for WordPress SEO, WordPress errors, Lifetime hosting, etc.


