How to Customize Headers in WordPress Using Plugins and Custom Code?
Last updated on September 23rd, 2021 at 12:47 pm
This is a screenshot of our beloved website, WordPress. The first thing that we see on the web page as the developers want us to is the WordPress logo and the name of the site on the header of the web page. If you have not figured out yet, it is a custom header.
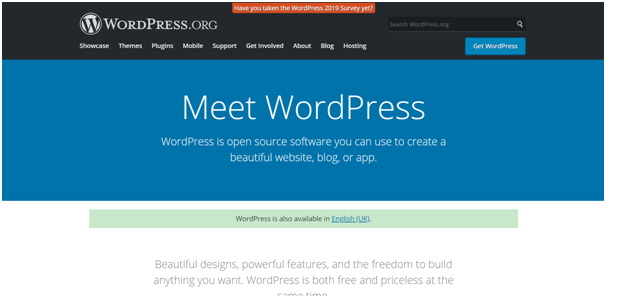
The very first thing that catches the viewer’s eyes is always the header of a website. Be it the header on the Facebook app with the FB logo and search box, or the header of the site that you’re currently surfing.
The header, which also acts as the navigation bar of every website, plays a significant role in creating a good or bad user experience. When the stakes are this high, there has got to be some way for adding creativity to this component the website, right?
Don’t worry! We’ve got you covered. You’re going to customize headers in WordPress, left, right, and center after reading this article.
Types of Headers
Before getting into the real tech of how to customize headers in WordPress, let’s first understand what the different types of headers are. We are sure you’ve seen all the types on some website or the other.
The first type of header is the fixed header. Using a small CSS trick, which is discussed further, you can customize headers in WordPress to fix at the top of the page. This implies that your web page header will be fixed at the top of the web page independent of the user’s scrolling activity.
The second type of header is the fading header. You can customize headers in WordPress so that they fade out when the user scrolls downwards and fade in as soon as the user scrolls upwards. You’ve seen this header on Facebook.
The third type of header is the relatively fixed header. You can also customize headers in WordPress so that they stay at the top of the webpage, and the user has to scroll to the top every time to access the header. The WordPress website’s homepage deploys this header.
What is a custom header in WordPress?
Customizing headers in WordPress is not a very tough task when you have the standard WordPress theme customizer service on your dashboard. The header then developed is a custom/modified header. But all good things come with a catch. The catch to using the standard service is that you have to follow certain constraints on image sizes, formats, etc. for every theme provided.
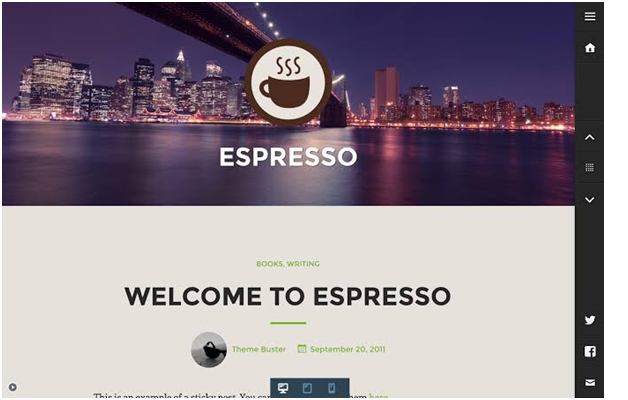
Custom headers enable developers to add a ‘title image’ to each of their headers, and they can crop, rotate and edit any picture through a visual editor, which you can find in Appearance > Header section of the admin panel. Developers can also add strings of texts and videos to their headers. While all this sounds pretty fancy and cool, it is a tedious task to upload all high-quality rich data to the headers, while maintaining responsivity for different screen sizes and keeping a short load time.
What WordPress offers and what we make out of it with code?
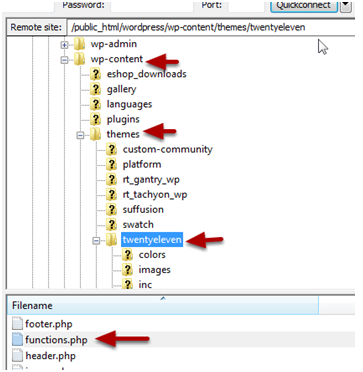
Before customizing your header, you’ll have to set up a WordPress theme customizer in your functions.php file to load themes. To do this, copy-paste the following code. You can refer to the image below to find the file to edit
<code>
function themename_custom_header_setup() {
$args = array(
‘default-image’ => get_template_directory_uri(). ‘img/default-image.jpg’,
‘default-text-color’ => ‘000’,
‘width’ => 1000,
‘height’ => 250,
‘flex-width’ => true,
‘flex-height’ => true,
)
add_theme_support( ‘custom-header’, $args );
}
add_action(‘ after_setup_theme ‘, ‘themename_custom_header_setup ‘ );
</code>
This code will result in a standard responsive header with text. The ‘flex-width’ and ‘flex-height’ attributes make the header responsive if set to ‘true.’
Once this is done, you’ll have to use the after_setup_theme hook to register the custom headers and themes.
Adding an Image to the header
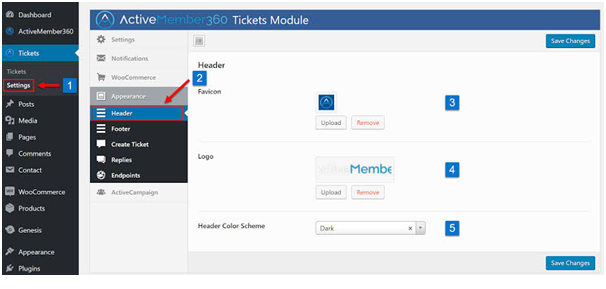
Start by choosing any theme available on WordPress, for example, Twenty Sixteen Default WordPress theme. All themes have specific limitations to the dimensions of the image that you can use for the header. You can view these specifications under the Appearance >> Header section on your admin dashboard. After you’re all caught up with what the theme will accept, follow these steps for getting an image on your header. The image below demonstrates the same.
1) Choose and edit an image
Your first task is to find an image that represents your brand or catches the user’s eye if you want to promote something. There are a ton of websites from where you can get a high-quality intriguing image for your header. You may use this link which lists all such websites. You can now edit the image to give your touch to it or update its dimensions for the chosen theme. Depending on your needs, you can use basic picture editing software like paint to high order vector editing software like Adobe illustrator to do this.
2) Upload the image
For uploading an image for your header, login to your WordPress dashboard. Now follow the steps:
Appearance -> Header -> Header Image (on the left side) -> Add new image
This will open a file upload dialogue box from where you can search and upload your custom header image. You now know how to create a custom header.
3) Image for every page
If you want, you can upload a different image for every web page of your website. To do this, install a WordPress plugin like WP Header Images. Now you can choose and select different custom photos for your WordPress custom headers. You will be able to use this service in the Settings >> WP Header Images section after installing the plugin.
Adding a Text area to your header
Now that you have a custom image you can use it to add many things to your header. To add a text area, you’ll have to add a small piece of code to your header-image.php file. Add the following code to get a text-area on your header.
<code>
<div class=”custom-header”>
<div class=”custom-header-media”>
<?php the_custom_header_markup(); ?>
</div>
<div class=”custom_textbox”>
<div class=”custom_textbox_content”><p>Lorem Impsum</p></div></div>
</code>
This will result in a text-area on your header with the text “Lorem Impsum” in it. You can also tweak the looks of the text area using css which is discussed in the next section. A header with some text looks like:

Adding social media icons
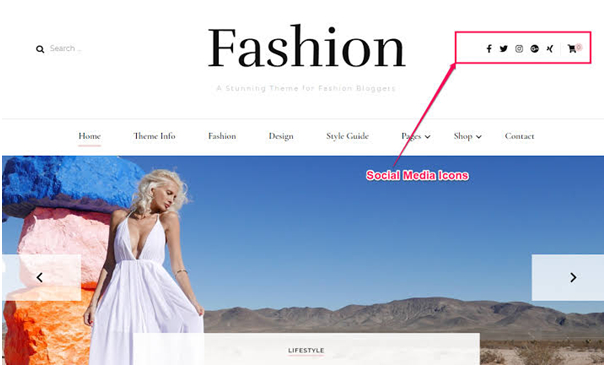
To add social media icons to your header you’ll have to add the following code after the wrap class in your site-branding.php file. A web-page with a header that includes social media icons looks something like this.
<code>
<div class=”social_links”>
<ul> <li><a href=” ” class=”custom_facebook_icon”>
<img alt=”customfacebook” src=” ” />
</a> </li>
<li> <a href=” ” class=”custom_twitter_icon”>
<img alt=”customtwitter” src=” ” />
</a> </li>
<li> <a href=” ” class=”custom_googleplus_icon”>
<img alt=”customgoogleplus” src=” ” />
</a> </li> </ul>
</div>
</code>
Adding widget to your header
To add functional widgets to your header you’ll have to edit your function.php file. Just add the following code anywhere (obviously not in between functions!)
<code>
function custom_widgets()
{
register_sidebar( array(
‘name’ => ‘Custom Header Position’,
‘ id ‘ => ‘ ‘,
‘ description ‘ => __( ‘ Lorem Ipsum , ‘ test’ ),
‘ before_widget ‘ => ‘ < aside id=”CustomWidget” class=”custom_widget”>’,
‘ after_widget ‘ => ” </aside> “,
‘ before_title ‘ => ‘ <h3 class=”widget-title”> ‘,
‘ after_title ‘ => ‘ </h3> ‘,
) );}
add_action( ‘ widgets_init ‘, ‘ custom_widgets ‘ );
</code>
Since this code runs on the back-end of the website you now have to add front-end code that displays the widget on your header. To do this put the following code on your header-image.php file.
<code>
<?php
if ( is_active_sidebar( ‘ custom_header_position ‘ ) ) : ?>
<div id=” ” class=” ” role=” complementary “>
<? php dynamic_sidebar( ‘ custom_header_position ‘ ); ?>
</div>
<?php endif; ?>
</code>
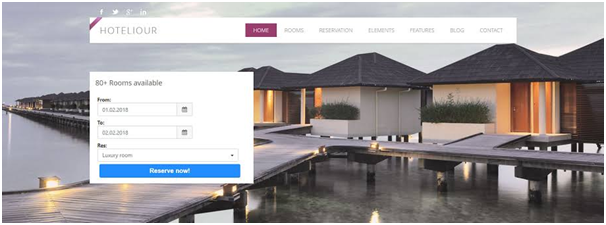
Now you’re good to go! All your task to do is to choose which widget to deploy from Appearance >> Widgets section. You can add multiple widgets which result in a classic webpage like one displayed below.
Adding video to the header
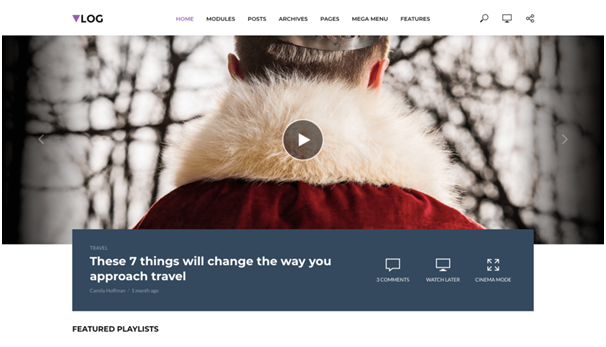
Adding a video to the header is a straightforward task. There are two ways that you can use to upload a video to your header. You can either upload your mp4 video, or you can get any video from YouTube for your header. You can upload your file by following the steps:
Appearance -> Header -> Select Video
This will open a file upload dialogue box from where you can search and upload the desired video for your header.
To get a video from YouTube on your header, you can directly copy and paste the link of your YouTube video in the text box instead of clicking the ‘Select Video’ button in the Appearance -> Header.
The magical CSS
A cascaded style sheet, also known as CSS, is the magic element that takes your website from boring to intriguing. CSS is majorly used on sites all over the web to improve user interface and hence improve user experience. The aspect of CSS that fascinates developers a lot is that it does all of this being ‘cascaded,’ i.e., hidden.
You can create a dedicated CSS file that can be used to edit all elements of the whole website if the right division class and ids are called for editing. You can also add inline CSS, i.e., modify elements in the HTML code directly using the “style” attribute inside the HTML tags.
You can attach the following code to attach the CSS stylesheet that you’ve written to the webpages’ code.
<code>
<link rel=”stylesheet” href=”stylesheet_name.css”>
</code>
Inside the stylesheet, you have to first call the class that you want to edit and then edit them. For calling a particular class, use the following code.
<code>
HTML code: <p class=”className”>This is a paragraph.</p>
CSS code: p.error {
font-color: red;
}
</code>
This will result in all paragraph tags with class ‘className’ to display red text.
There are numerous CSS properties that you can choose from to create magical designs. Below is a list of all the ones that are used most frequently.
| Property | Usage |
|---|---|
| z-index | Defines the 3-D index of the element. Basically, takes integers values. |
| visibility | Defines if the element will be visible or not. Takes the values between 0 to 1. You can also use the Opacity property for this. |
| transition-property | Defines the name of the CSS property for which the transition function i.e. the animation is developed. It takes names of CSS properties as inputs. |
| text-overflow | Defines what will happen if texts overflow of it’s box elements like a division of span. Takes values like ‘hidden’, ‘scroll’ etc. |
| text-align | Defines the horizontal alignment of text. Takes values ‘left’, ‘right’, ‘centre’ and ‘justified’. |
| scroll-behavior | Defines whether to smoothly animate the scroll position in a scrollable box, instead of a straight jump |
| position | Defines the positioning method used for an element (static, relative, absolute or fixed) |
| padding | A combined property for all the padding- properties like left-padding, right-padding etc. |
| overflow | Defines the consequences if and when content overflows an element's box like division or span. |
You can find the entire list here. You can use these CSS properties to tweak all the elements that you added to your header.
So now you know how to create custom headers in WordPress. But it’s not this tough to edit and customize headers. Though these approaches provide a tremendous amount of freedom in terms of creativity, writing code for customizing headers might be a cumbersome task for some people.
However, by now, you know that the industry of plugins helping to develop and manage WordPress assets is humongous. Hence, there a ton of WordPress plugins that you can integrate to create custom headers.
Plugins to the blogger’s rescue
Open Source Frameworks
There are a couple of frameworks like Materialize by Google and Bootstrap by Twitter that offers open-source codes for headers and other elements of a webpage. The frameworks provide elements like sliders and animations. With a little more knowledge of web-development, once can use these frameworks to develop extraordinary websites.
There are two ways of integrating these frameworks. You can either link them through a CDN link, or you can upload their files on your directory and call them on your HTML code. I would suggest you do the latter as the former results in increased load time.
What do the best players do?
There are practices that the best website developers have in common. Some of them are listed below:
Image type: When using still images, vectors, i.e., pictures editable by Adobe Illustrator, can be a better choice than stock images. This will give you an edge as these are small in size and don’t pixelate on any scale.
GIFs over Video: If a video that you’re uploading or linking can be replaced by a gif developed with a set of pictures, it is always preferred to use gifs. This is results in less space consumption and reduced load time.
Context-based media: Yes, I’m sure that the stars and moons are lovely. But does it make sense to have their pictures on your website if you’re not selling land in space?
Summary
A header is one of the essential elements of your webpage. Hence, if you host a website on WordPress, you should know how to customize headers in WordPress.
There are numerous ways to do this, as you read. Most people who don’t understand code use premium plugins. But we would encourage people with a little understanding of code to try and understand frameworks offered by Google and Twitter.
Always remember that your header should always be sophisticated and be able to serve some purpose and not just be present there for the sake of displaying pictures and pop-ups


