How to fix serve static content from cookies domain
Last updated on February 1st, 2022 at 06:15 am
If any user needs to visit the GT Matrix or google website speed check then complete website speed with the errors will be shown after scanning the website over the certain platform. The most common error that will be shown is served static content from a cookieless domain. We are going to resolve this issue or error with the help of our developer expert. Users no need to worry about this issue because it can be resolved very easily. The only thing is that the user needs to read the complete article carefully and there are two methods for that user to resolve this error. Both methods are given below in detail check it now and read this article with Patience. Before going in-depth we should know about what is a cookie domain so read the below section to enhance your knowledge about the cookie’s domain.
What is the cookieless domain?
Before knowing about the cookieless domain we should know about cookies first. So, let’s start with cookies. The first question that comes to our mind is what is a cookie? when the user visits any website with the help of a browser for the first time, the user makes an HTTP request in the browser and the file of that website is to be stored in the browser that is a term to be used as cookies. again the user visiting the same website at that time the browser will send the user to the same file along with cookies stored in the browser or a machine.
For example, any website asking for permission related to location storage reference ID browsing reference at that time cookies may be stored to your browser or a machine. In the next meanwhile users visit the same website then the browser automatically sends it to the users on the same website without asking any permission.
What is the requirement for any user to set up a cookieless domain?
The basic thing is to upload cookies for any domain. While any user cut all cookies that will automatically improve website loading speed. however, any user must visit any website and it really interacts with static assets of that website. Now static assets mean the static content which includes CSS, JavaScript and a complete image file of the website. So every user must serve static content for their own website so that website can take less time to load over any Browser.
How to fix serve static content from a cookieless domain?
First of all, any user needs to move their WordPress website from HTTP to HTTPS. After successfully importing the important WordPress website into HTTPS now we take a step ahead and resolve the current problem that has been faced by many users. In this section, we are going to explain this issue in detail.
To fix serve static content from a cookieless domain in two ways.
- Using content delivery network (CDN)
- Setting up a subdomain and also pointing to our main domain
Method 1: Using CDN (content delivery network)
If any user Pocket allows then this is the easiest and fastest way to resolve this problem. For that user needs to sign up for content delivery network (CDN) services. If any user is using a content delivery network then with the help of that service user can directly interact with the server in other words we can say that it is a direct connection between client and server. In that manner, the user complete website runs through CDN and no need to worry about cookie domain warnings. According to our experts, all CDN services providers are not the same but we must refer to use or go for Kye CDN.
Method 2: Setting up a subdomain and also pointing to our main domain
If we move towards the next method then we can say that Setting up a subdomain and also pointing to our main domain is also a good solution to recover such kind of error. Follow all the steps that are given below.
Step 1
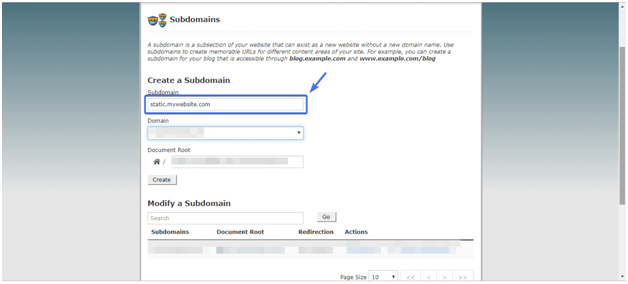
- First of all, the user must log in to the CPanel of the website. It will help to navigate the sub-domain pages.
- Users must be aware that the subdomain must look like the example given below.
- Example- http://static.mywebsite.com
- Check out the image for better reference which is given below.

Note – Users need to put their own website domain in the palace of “mywebsite.com”.
Step 2:
- Now the user needs to confirm all their DNS records and CNAME records. These things are going to compare with the new subdomain to point out the main domain.
- Check out all the steps to confirm DNS records and CNAME records carefully which are given below.
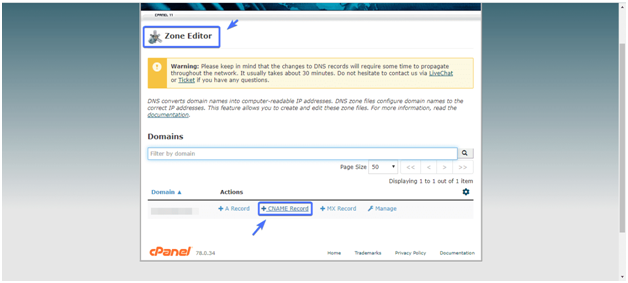
- After login in to the c panel, users need to navigate to the “DNS Zone Editor” options. After that user needs to click on the CNAME option.
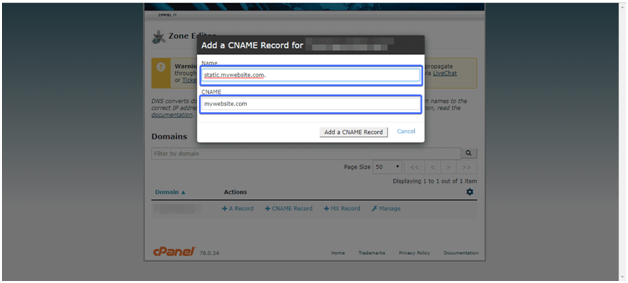
- Check out the image given below which provides user enhancement regarding configuring CNAME.

- In the Domain name Section users need to type a subdomain name.
- In the CNAME section users need to type the main website name.

- Now the user finally added CNAME Record successfully in the given sections.
Step -3
- Now users need to connect their website to FTP service with the help of FileZilla.
- After doing that the user ended up opening the file directory.
- Then search it on wp-config.php in all folders then open it. And copy the code that has been given below. And paste it on “WP-config.php”.
Code-
define(“WP_CONTENT_URL”, “http://static.domain.com”);
define(“COOKIE_DOMAIN”, “domain.com”);
Note- After pasting the code user don’t forget to save the file. Live Chat


