How to Fix WordPress Website Not Updating Right Away
Last updated on August 11th, 2021 at 08:16 am
This is a very common issue. This issue has generated too many WordPress users. So in this article, we are going to discuss how to remove any WordPress website not updating right away? Latest understand how the user will get to know about this issue. Before going into detail in this article user will know about it in this way, if the user updates any post or page but in real-time it will not be seen updated. So let us read this article carefully and learn how to fix this error?
Why my WordPress website is not updating right away?
The main reason behind that the WordPress website contains a cache so this cache will be stored on your browser so let’s remove by the help of some good and enhance methods. All WordPress websites are hosted on a different hosting service. And these all hosting service stores temporary caches for their use. There is some other reason also that the user is using a WordPress cache plugin in WordPress websites, but that plugin is not configured properly. This is the last but not the least that user using a browser that also stores the temporary cache in it.
If the user makes multiple changes in the WordPress website after that temporary cache that is stored is expired and New castle stored in place of it. The newest and the best symptom about to know this issue is that new post that has been generated by the user will not see on the real-time during browsing. Now let’s start with the help of a few basic methods of how to remove the WordPress cache by using the selected plugin. Follow all the steps which are given below
WP Rocket
According to our expertise, we are going to explain how to remove the complete cache of any WordPress website by using the WP rocket WordPress plugin follow all the step which are given below.
- First of all, a user needs to login to the WordPress dashboard by using a login ID or username and password after that click on the submit option.
- Now user successfully logged in the WordPress dashboard area. User can see on the left top of the screen a dashboard context menu appear on the screen.
- Now the user must click on the plugin option which is present in the context menu. After that is a context menu appears on the screen. User must click add new plugin option in the sub context menu.
- Now a new screen appears in front of the user can see is search bar present on the right side now the user must enter a keyword that is “WP Rocket plugin”. And now hit the enter button.
- Now move towards the next step that is installing and activating the WP Rocket plugin. First of all, the user needs to click on the install button to install that plugin on the WordPress website.
- After the successful installation process has been complete now the user needs to click on the activate button. After successfully activating the WP Rocket plugin is ready to use now.
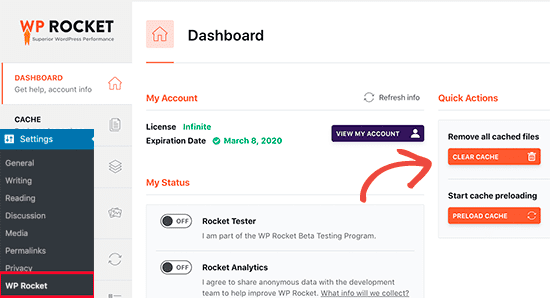
- Now setting up the WP Rocket plugin according to user requirement. First of all, the user needs to empty all the cache using the setting area. And click on the clear cache button which is under the dashboard tab as you can see in the image given below.
SiteGround
Now let’s remove the cache from the WordPress website by using the Siteground WordPress plugin to follow all the steps given below how to install activate and set up the SiteGround WordPress plugin.
- First of all, the user needs to login to the WordPress dashboard by using a login ID or username and password after that click on the submit option.
- Now user successfully logged in the WordPress dashboard area. User can see on the left top of the screen a dashboard context menu appear on the screen.
- Now the user must click on the plugin option which is present in the context menu. After that is a context menu appears on the screen. User must click add new plugin option in the sub context menu.
- Now a new screen appears in front of the user can see is search bar present on the right side now the user must enter a keyword that is “Siteground plugin”. And now hit the enter button.
- Now move towards the next step that is installing and activating the SiteGround plugin. First of all, the user needs to click on the install button to install that plugin on the WordPress website.
- After the successful installation process has been complete now the user needs to click on the activate button. After successfully activating the SiteGround plugin is ready to use now.
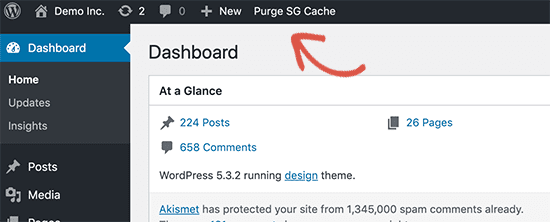
- Deleting all caches by using the SG Optimizer Plugin. Before doing that user must go to the WordPress admin toolbar and activate the Purge SG Cache button.
W3 Total Cache Plugin
- First of all, the user needs to login to the WordPress dashboard by and drink login ID or username and password after that click on the submit option.
- Now user successfully logged in to the WordPress dashboard area. User can see on the left top of the screen a dashboard context menu appear on the screen.
- Now the user must click on the plugin option which is present in the context menu. After that is a context menu appears on the screen. User must click add new plugin option in the sub context menu.
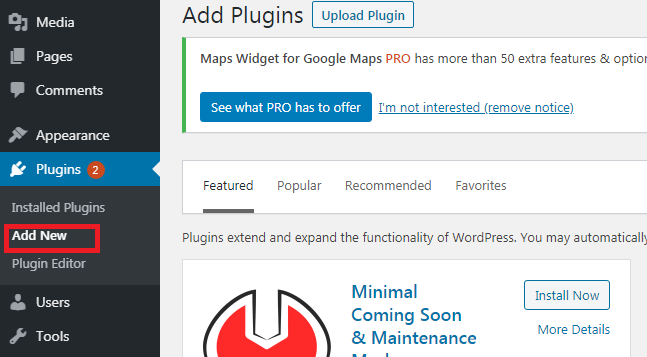
- Now a new screen appears in front of the user can see is search bar present on the right side now the user must enter a keyword that is “W3 total cache”. And now hit the enter button.
- Now move towards the next step that is installing and activating w3 total cache plugin. First of all, the user needs to click on the install button to install that plugin on the WordPress website.
- After the successful installation process has been complete now the user needs to click on the activate button. After successfully activating w3 total cache plugin is ready to use now.
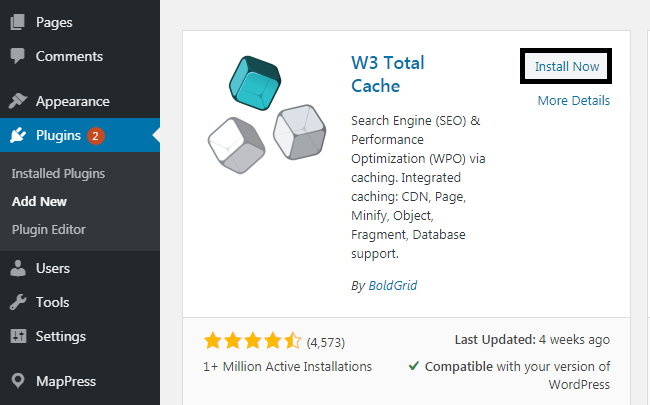
- Now setting up w3 total cache plugin according to user requirement. First of all, the user needs to empty all the cache using the setting area.
- After clicking on empty all caches now the change will be visible to the homepage of the WordPress website.
Do we hope that you like this article which is based on how to fix the WordPress website not updating right away? At last, we are always curious to know your feedback, so please send your valuable feedback into the comment box, and we always welcome your queries and. Our expert resolves your all queries in a very short time so if you have any queries related to this article we are always welcome you in the comment box and comment there.


