
How to make use of Gmail SMTP Server for free?
Last updated on October 13th, 2021 at 11:28 am
Gmail SMTP server recalls super smooth functions and searches operations and proudly these features are usable in our application just because of SMTP. You can think of it as a Gmail API that is usable in your application.
SMTP stands for Simple Mail Transfer Protocol and it’s a feature of the native Gmail application to use to send emails from different desktop clients such as Mozilla Thunderbird, Outlook, and Windows Mail.
What more important is that you can integrate it into the WordPress website and call it to send and receive emails. So, if you want to have an email sending service on your WordPress website, this is by far the most reliable thing you can do without having spent an additional cost for email service.
Gmail server will let you execute 500 emails on a per-day basis which is more than enough unless you have a giant stand in the market.
In this article, we will cover a few things in details about Gmail SMTP Server.
This is custom heading element
The setting provided below can be used to set up an email client. Fill in the info provided below when asked about Gmail SMTP information:
Server address: smtp.gmail.com
Name: User_name
Username: Gmail_email_address
Password: Your_Password
Port (SSL): 465
Port (TLS): 587
Besides this, you can configure this setting too:
Gmail SMTP TLS/SSL required: Yes
Configuring outgoing server in Mozilla Thunderbird

If you want to configure the outgoing server in Mozilla Thunderbird, you can follow the steps provided below:
In the account setting, select Outgoing Server (SMTP) at the end of the row. An entry detail will appear. Either edit that entry or create a new entry.
It can be configured as follows:
The server’s name will remain the same as in the previous case that will be smtp.gmail.com since we are using the Gmail SMTP server. Port will also be 587. The username and Password checkbox should be checked.
In the User Name field, you will have to enter your email id without ‘@gmail.com’. In the case you are using Google apps for your website, you must use the full email address. Connection security should be marked to the STARTTLS and now proceed to save the information. After save is successful, select your new email account from the list. And then, pick the SMTP server from the dropdown in the Outgoing Server (SMTP) field.
Sending Emails from the WordPress Dashboard through Gmail SMTP Server
For the sake of your WordPress to send informational and transactional emails, let’s get quick into how you can setup and use the Gmail SMTP server. This method is ultra-reliable and will work like a charm over the PHP mail method.
As a prerequisite, you will need to make a google app so that you can arrange Gmail SMTP via API. Along the way, a WordPress plugin named Post SMTP Mailer/Email Log plugin will also be required.
It is a better idea to have a google app over the idea of just plugging the SMTP details. This setup will take a little bit of time but believe me once you are setup; your site will remain to assistance. Not again you will need to look at it back.
The process will revolve around:
- Installing the required WordPress plugin strictly is the first step since it will provide you with the URLs that you’ll be using in the Google application.
- Creating a Google app seems like the most complicated part but you can trust this article for assured success
- Configure Google app API and WordPress Plugin
- Sending a test mail (Optional but recommended)
1. Installing and Configuring Post SMTP Mailer/ Email log
You can also use the WordPress SMTP plugin, but here we will be using the Post SMTP Mailer/Email Log plugin from Worpress.org. We will install and active it.
After activating the plugin, your WordPress dashboard will be embedded with an option called Post SMTP. Click on it and then click on show all settings under the ‘Start the Wizard’ option.
Then navigate to the message and set the email address associated with the sender that is your email address and name. you can use a different email address if you prefer or you can add the one you own.
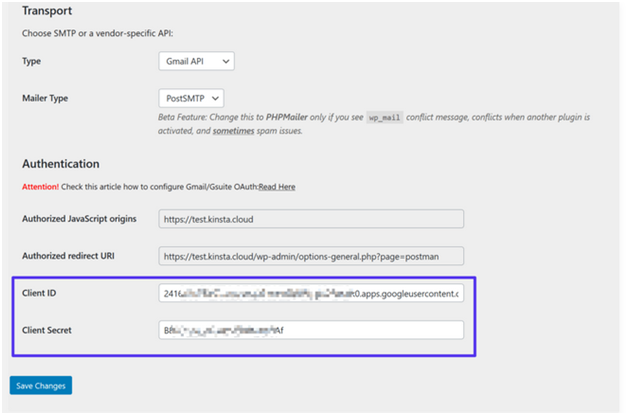
Next click on the account tab and in the ‘Type’ option beneath ‘Choose SMTP or a vendor-specific API’, choose Gmail API in the dropdown. After making this choice, you will witness some extra option beneath the authentication box. Leave this page open as it is.
2. Create a Google App
Creating a Google app is all about navigating to a lot of pages and clicking a lot of buttons and that is what makes it the most complicated part of this tutorial. However, if you follow this article properly if will be able to grab it without facing a problem. This application will allow your WordPress site to securely send and receive emails. Let’s head to step 1.
a. Create a project
To start a project, navigate to Google Cloud Platform. If you are signed up and synced, your first project will automatically be created with the name ‘My First Project’
If you want to create a new project, you can simply click on the dropdown arrow beside ‘My New Project’ or you can rename it too.
b. Enable the Gmail API
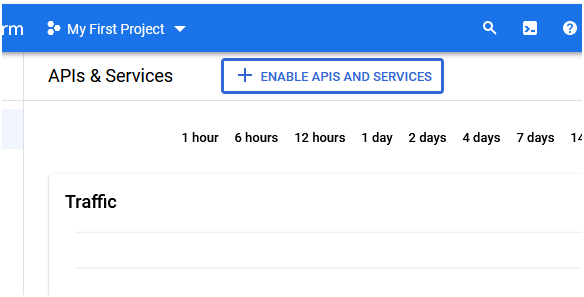
Once you are done with creating or renaming your project, you can click on Enable APIs and Services.
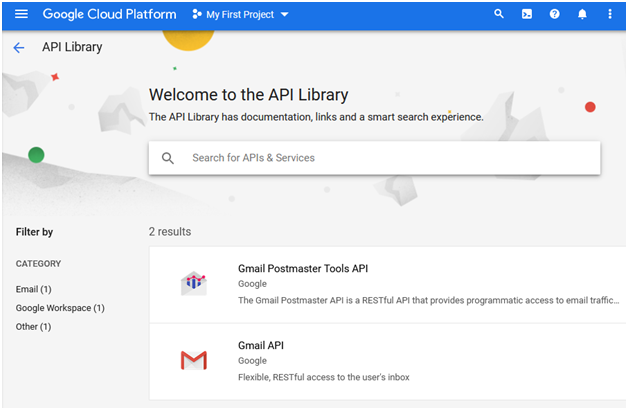
It will navigate you to an API library. Here, you may find the Gmail API just beneath the search box. In case if you don’t, you can search for ‘Gmail API’ with the help of a search box.
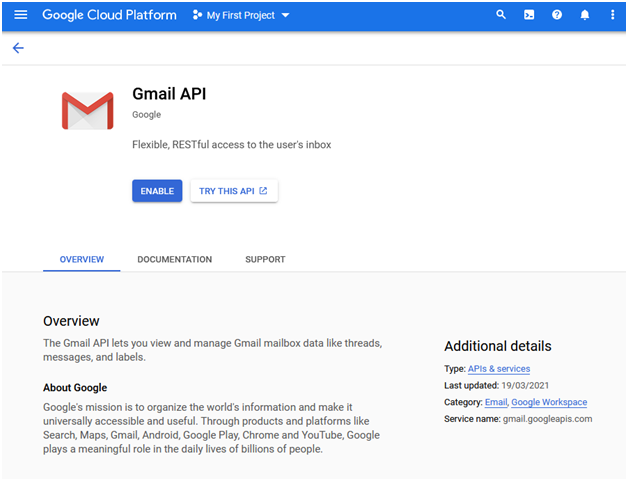
Now click on Gmail API to open it and click on ‘Enable’
c. Creating Credentials
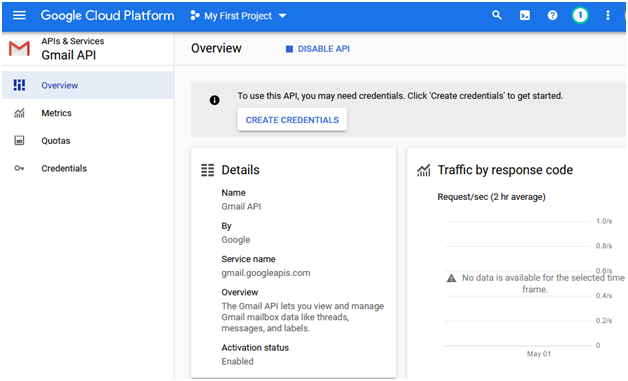
As you enable the Gmail API, you will be navigated to the separate Gmail API interface. Here, you will witness a button saying ‘Create Credentials’.
In the add credential page, it will ask you the following things and you have to choose from the dropdowns:
i. Which API are you using?
Gmail API
ii. What data will you be accessing?
User data
iii. Where will you be calling the API from?
The Web browser (JavaScript)
Click on the ‘What credential do I need button’ in the next step.
d. Setting up a consent Screen
A consent screen authorization will be required, you need to fulfil the google requirements and conditions.
Click the button ‘Set up Consent Screen’ and a tab will open where you can configure an 0Auth consent screen. Select External under the user type and click ‘Create’.
In the next page, add the required information and click Save and Continue.
e. OAuth Client ID
In this section, you will be asked your application type, you can go with ‘Web Application’ for a WordPress website. Now, a few more information will be required such as Authorized JS (JavaScript) Origins and Authorized redirect URLs.
Enter the following information:
Name – the name of your website
Authorized JavaScript origins – the Post SMTP Mailer/Email Log plugin (Step #1).
Authorized redirect URIs – Post SMTP Mailer/Email Log plugin (Step #1).
Once entered the following information, click on ‘Create’
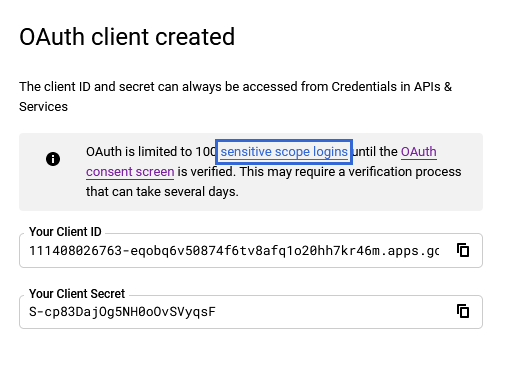
As you click on create, a popup will appear reading the OAuth client-created success message. Here, two additional things you will be provided named Client ‘ID’ and ‘Secret’.
f. Add Gmail App Client IDs to Post SMTP Mailer/Email Log
Navigate back to the WordPress Dashboard and paste the Client ID and the Client Secret in the Authentication option where we left in step 1. Click on save change and grant permission with google in the next step.
Now go to your website and finish the authorization process to send a test email.
Conclusion
The article rotated around configuring a Gmail SMTP server in Mozilla Thunderbird and your WordPress Website. We hope you got a clear understanding of the configuration and are ready to perform it on your own. Head the start and if stuck, don’t forget to put comments down below or contact 24x7WPSupport directly.


