How to Print Shipping Labels in WooCommerce?
Last updated on December 20th, 2022 at 04:59 am
Roselyn George is an e-commerce merchant who struggles hard between inventory, marketing, & other dozen tasks. She wishes for a few extra hours as 24 hours is just not enough for her.
The same is the story of any e-commerce merchant!!
Even though it’s not possible to bend the Time Rules, you can free some hours. One such area is simple shipping labels for WooCommerce. So, print shipping labels in WooCommerce today!!
Introduction to the shipping label
A shipping label is complete information that is glued on the packed order. It helps to figure out product-specific instructions and delivery destinations. In this label, details like the customer’s name, address details, tracking numbers, etc., are shared.
You can benefit a lot in your business by automating shipping label management. It will eliminate all the manual tasks. It will also help you focus on self-care and cut back on your working days.
Reasons to automate the process of shipping labels
- Stress-free regarding tasks
A store owner has to switch hats constantly every minute. In such a scenario, automating the shipping label process will help to stay focused and agile.
- Third-Party carrier websites are a BIG No-No
It is a time-consuming process to use a third-party carrier website. There are high chances of making mistakes. Entering the details of customers manually makes you prone to incomplete details or typo errors.
Apart from this, carrier websites such as USPS allow you to print twenty labels at a time. You may face trouble when handling 100 sensitive orders at a single time.
- Save yourselves from running to post offices
Shipping automation allows you to schedule USPS pickup or drop packages in a dropbox. You can save yourself by avoiding waiting in line at the post office.
Now that you have understood shipping process automation, let’s take a look at WooCommerce. In addition, let us also try to know why it is the best choice to automate the shipping process.
Advantages of WooCommerce shipping
WooCommerce shipping can easily integrate with the dashboard of WooCommerce. It can also be embedded with the WooCommerce mobile app. Hence, you can print shipping labels with a swift breeze.
You can print your international and domestic labels effectively. Thus allowing the merchants to fulfill their customers’ orders across the globe. You will also get discounted rates.
- Grab…..It’s free
You do not have to pay anything for per-label fees or subscription plans. You may have to pay for the carrier shipping costs.
- Ship internationally with DHL Express and domestically with USPS
You get access to exclusive as well as low shipping rates from DHL and USPS instantly.
It allows you to easily print labels from WooCommerce mobile apps or dashboards directly. You do not have to invest hours copying and pasting between the carriers and the dashboard. Moreover, you can avoid potential errors.
WooCommerce Shipping is developed into your dashboard. It will assist you to integrate the order fulfillment process from the initial point to the endpoint. You will just require labels and printers.
With WooCommerce mobile app, you can easily manage all the processes at a go. It is quick to integrate WooCommerce shipping with mobile apps.
Manage labels with WooCommerce Mobile App
Without any system, you can manage and print WooCommerce shipping labels with the WooCommerce mobile app. Connect the printer to your smartphone.
With it, you can reprint existing labels, complete custom forms, etc.
A. Steps to print shipping labels in WooCommerce
Install the plugin WooCommerce Shipping services from the WooCommerce store.
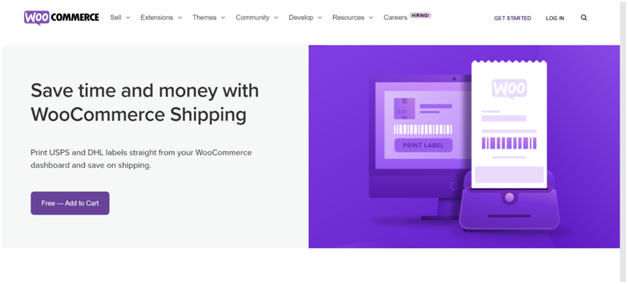
To access the default, you need to head to “WooCommerce” and click “Settings”.
Tap “Shipping” and hit “WooCommerce Shipping” to print shipping labels in WooCommerce.
Click the button, “Add Packages”. By default, the services of DHL and USPS will be displayed here. For integrating additional shipping courier companies, you have to install the additional plugins.
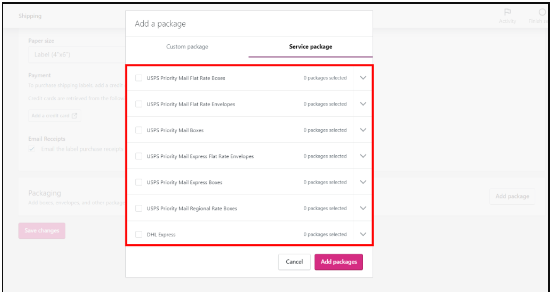
We will be discussing print shipping labels for DHL and USPS using WooCommerce shipping service for now.
Once you are done setting up your shipping partner, navigate to “WooCommerce”.
Click “Settings” to print shipping labels in WooCommerce and hit “Shipping”.
Head to the section of “WooCommerce Shipping” and click it.
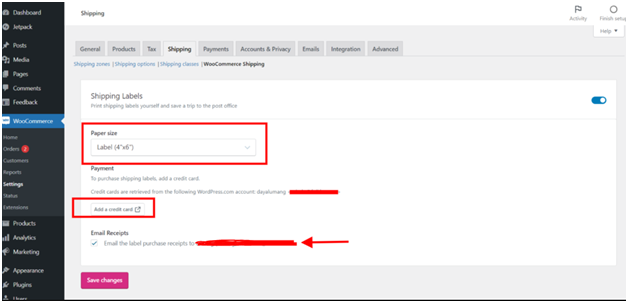
Among the three existing options, you can do the setting for the default print label. They are:-
- Letter
- Legal
- Label
If you want, you can add the option of a credit card. You can save this for future transactions.
Once you have saved these changes, place an order from your WooCommerce store testing. Pick the available shipping services from the checkout page after comparing the shipping charges.
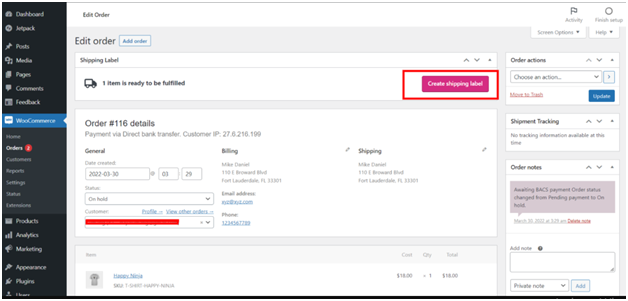
Go to “WooCommerce” to print shipping labels in WooCommerce. Hit “Order” and check the last order.
Check for the button “Create Shipping Label” at the top, and tap it.
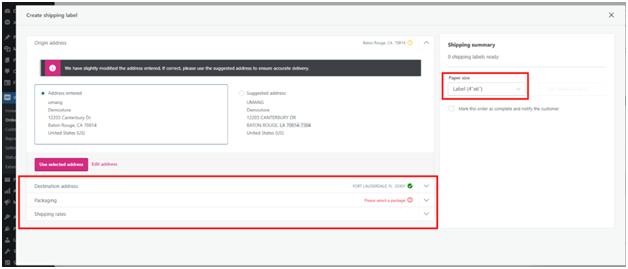
On a new screen, you need to confirm the address for delivery and pick the packaging option.
Choose the shipping charges from the given options to print shipping labels in WooCommerce.
When done, pick the paper size and purchase the shipping label.
B. Use plugins to print shipping labels in WooCommerce
There are many print label plugins available. On the page of checkout, you can include as many options for the courier. This will allow the customers to pick their desired shipping vendor for order delivery
Here, we will be using two plugins to print shipping labels in WooCommerce.
1. ELEX WooCommerce DHL Shipping Plugin
Using this plugin, you can showcase the shipping services on your checkout page and cart. You have to integrate the ELEX WooCommerce DHL shipping plugin with the WooCommerce checkout page. This will side by side create shipping labels for the orders placed.
The WooCommerce store owners and customers get the flexibility to keep a track of the shipment. They just need to check their order page for tracking.
Installation and activation of the plugin to print shipping labels in WooCommerce
Once you successfully purchase the plugin go to “WP Dashboard”.
Hit “Plugins” to print shipping labels in WooCommerce and tap “Add New”.
Use the button, “Upload New”. When done with the installation, click the button “Activate”.
For enabling the settings in real-time head to “WooCommerce”.
Click “Settings” and then “Shipping” to print shipping labels in WooCommerce.
Next, tap “DHL Express”. Head to the tab “General” and share your account number with your Site ID and password.
Next, you have to enable the two options to print shipping labels in WooCommerce. They are:-
- Shipping Labels
- Real-time Rates
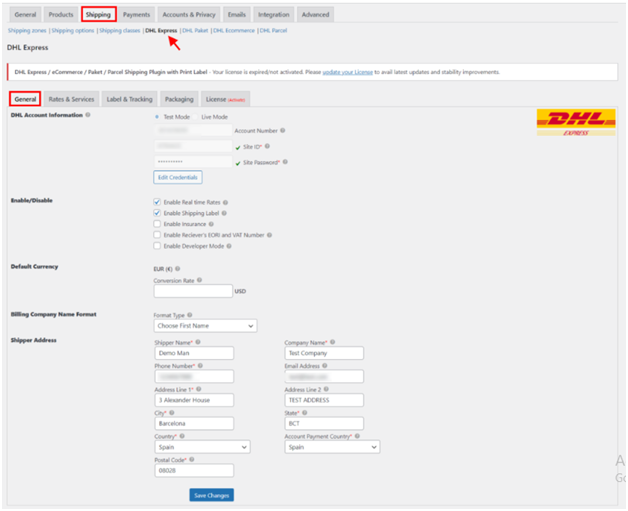
When done, you need to share the address of your store and save the settings. You will see the real-time rates of DHL on the page of Checkout.
Use ELEX WooCommerce DHL Express to print shipping labels in WooCommerce
You have to place an order by heading over to your WooCommerce store.
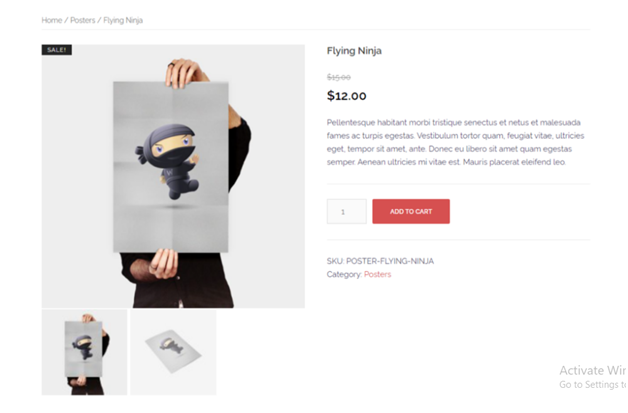
Choose an item from your WooCommerce store and add it to your cart. Head to the Checkout page to print shipping labels in WooCommerce.
To place an order, you need to employ any payment methods that are activated already on the WooCommerce store.
It will show the details of shipping along with the shipping rates. Tap the button “Place Order”.
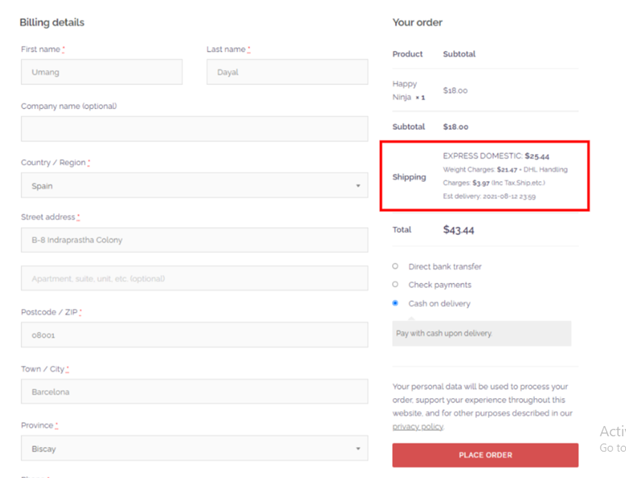
Once placed the order, you will be taken to the screen of order completion. You need to visit “WooCommerce” to modify your order or complete the shipment.
Pick the order according to the Customer Name or Order ID. Please check the image for your reference on how the single order page will be displayed.

You will see the shipment progress in the option “Status”. The moment you change the status to “Completed” for the order, the customer will get an email. This will be an automatically-generated email for the order that has been shipped and delivered.
You can customize the details like “Shipping” and “Billing” on the single order page. In the “Order Notes”, you can leave product-related updates for the customer.
When done with modifying and checking the delivery details of the customer, scroll down. Then you have to tap the button, “General Packages”.
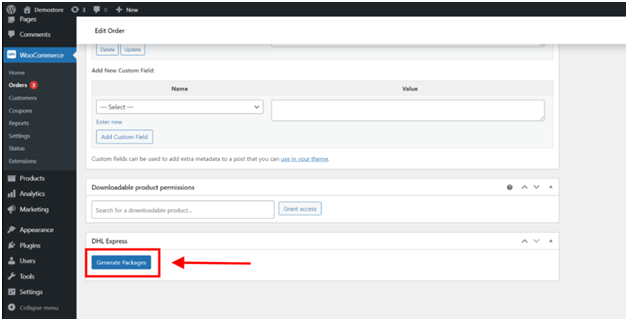
Through this button, you will see additional details as in the image below:-
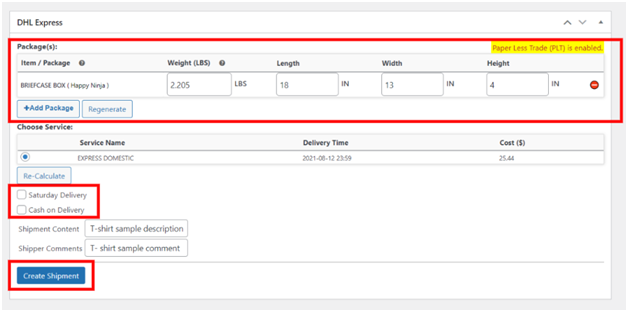
In the tab “Package(s)”, you will see the dimensions mentioned. It will include the height, length, width, and weight used for packaging.
If you want you can re-edit the dimensions.
You can check the service name of the delivery with the time and total cost applied for packaging and shipping.
When done with these details, tap the button, “Create Shipment”.
The shipment will be created, and it will be displayed as:-

Shipment Number:-
A shipment number is generated automatically. It is used to track the location of the shipment. You can even identify the overall progress. Tap it and you will be guided to the official website of DHL. Check all the information related to the shipment here.
With this plugin, you can generate “Commercial invoices”.
You might be thinking what is this Commercial invoice? Well, it is an official document. It is solid proof of sale between the buyer and customer.
When exported, an individual or business offers an official custom document. This works as proof of what product is exported. It will also cover the details such as the manufacturing country. In addition, it will share the parties who handled the shipping process.
Tap the button “Reset Shipment” to repeat the entire process discussed above.
Shipment Label:-
Tap it to go to the new page. Here, you can check the WooCommerce shipping label.
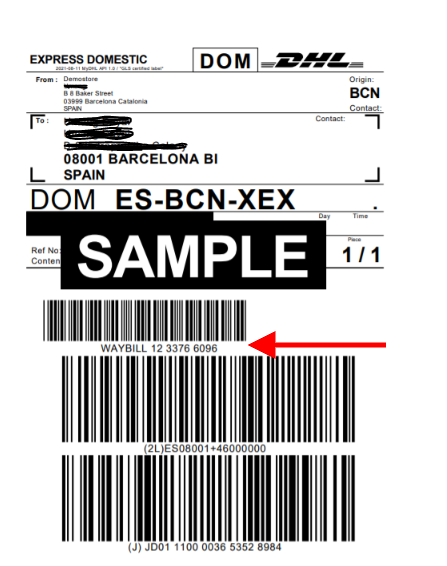
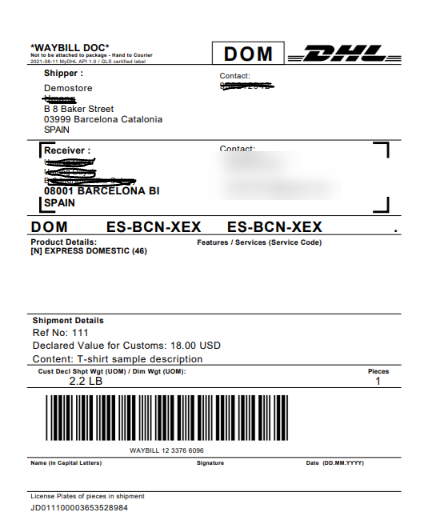
On the shipping label, you will have all the details of shipping. It will include the following:-
- Barcode
- Contact information of the receiver
- Delivery address of the receiver
- Custom details
- Service code of shipment
- Product-specific information
- Reference number
- Specific instructions (if any) related to packaging
- Number of pieces in the order
- Weight of the product
2. ELEX EasyPost Plugin
With this plugin, you can integrate almost all the major courier services. This plugin allows users to display the services and their charges on the checkout page and cart.
Follow the steps (as above) for installation and activation.
Use ELEX EasyPost Plugin to print shipping labels in WooCommerce
Place your order on the WooCommerce store. Navigate to the “Order Page” from the dashboard of WP.
Visit “WooCommerce” and tap “Orders” to print shipping labels in WooCommerce.
Choose the option “Select the placed order (check the order id/date)”.
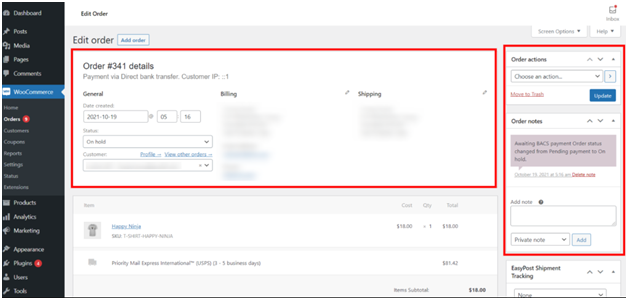
Here, you can amend the delivery and billing details. You can even access the contact details of the customers. In addition, you can edit or view the communication order notes.
Navigate and check for the tab EasyPost, and hit “Generate Shipping Label By Using EasyPost API”.
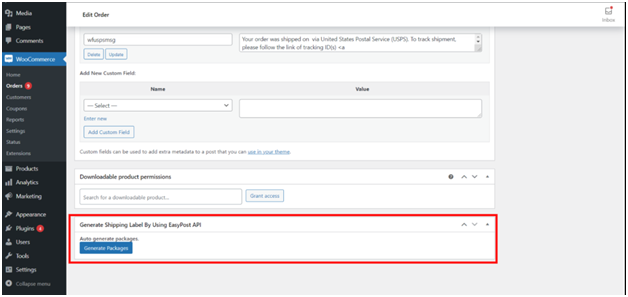
Hit the tab “Generate Packages”. The following product-related information will be generated:-
- Dimensions of the product
- Rates of packages
- Shipping service name and many more.
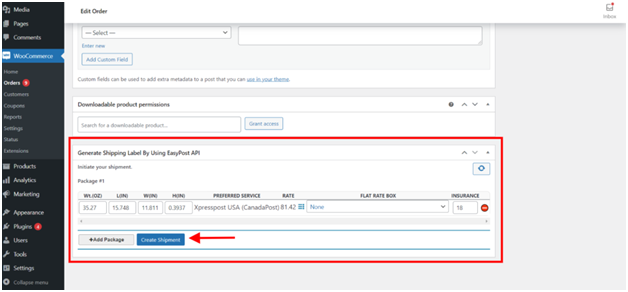
When done, hit the button “Create Shipment”. It will do the confirmation of the shipment with EasyPost. You can access the print shipping labels in WooCommerce and Tracking ID.
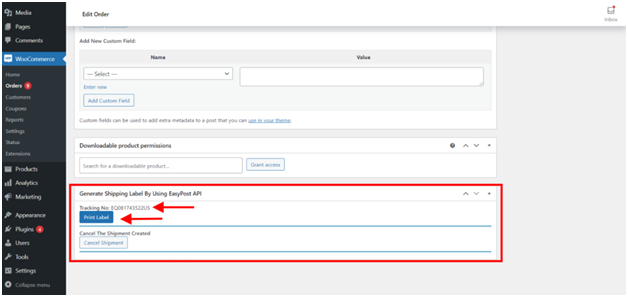
Check for the button shipping label and tracking number.
Click “Print Label” and it will open a new window tab.

This label will have the following details:-
- Customer’s billing address
- Specific details
- Barcode
These all details will help to deliver the order correctly.
Facing trouble to print shipping labels in WooCommerce? Hire 24×7 WP Support!!
We are an adroit WordPress support service company with extensive years of experience. Our professionals are extolled all across the globe for high-quality services.


