A Newcomer’s guide to integrate Salesforce with WordPress
Last updated on May 30th, 2024 at 06:39 am
Be it a small-scale industry or a leading enterprise, RoI is a crucial part of any business. For this, they invest in websites that do not experience technical difficulties.
Any entrepreneur with bigger aspirations will look for options that win new clients. Their team will have proper plans to outsell the rivals and conquer the market. They will try every possible tool, policy, means, and way. One such solution is Salesforce.
Salesforce to WordPress integration is a great approach. This will outshine your vibrant business domain. With web development plans for WordPress using Salesforce, you can have a steady growth pattern.
WordPress and Salesforce integration can assist you to manage the potential information. It can also help you with great pinpoint space for conversion and improvise the strategy of networking.
Table of Content
- A short brief to Salesforce and WordPress
- Some stats and facts related to Salesforce and WordPress
- Reasons for WordPress and Salesforce integration
- Requirement for WordPress and Salesforce integrations
- How to choose the right Salesforce to WordPress integration for your site?
- Plugins for WordPress and Salesforce integrations
- A step-by-step process for Salesforce to WordPress integration
A short brief to Salesforce and WordPress
Salesforce is a widely used CRM. It helps the business to manage workflows with other services/ apps in one place. Contrary, WordPress is the prominent CMS (Content Management System). It assists in hosting and building websites. With Salesforce to WordPress integration, you can give a delightful browsing experience. It can also improvise the marketing workflow.
Some stats and facts related to Salesforce and WordPress
- Currently, about 91% of businesses use Customer Relationship Management. Capterra states that Salesforce has captured almost one-third of the users.
- IDC named Salesforce as the #1 Customer Relationship Management provider.
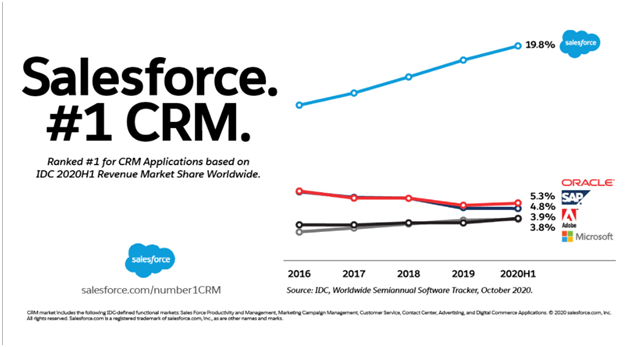
Source: Salesforce:
- The market share of WordPress in CMS is 60.8%.
- Almost 14.7% of the world’s top sites are powered by WordPres
Reasons for WordPress and Salesforce integration
- It automates the synchronization of the data. Hence, you do not have to manually work to fill in the customer’s data from your site to CRM.
- You can send the form submission to the CRM of your Salesforce from your site as a new contact.
- Because of faster response, you can expect sales growth. This can even help you to generate the leads of potential customers.
Do you have plans to integrate Salesforce with WordPress? If yes, then read further!!
Here in this guide, we will understand how you can do Salesforce to WordPress integration. We will delve to know seamless workflows and automation of Salesforce and WordPress.
Requirement for WordPress and Salesforce integrations
There are numerous things that you must analyze while you integrate Salesforce with WordPress. This includes:-
- Details from the clients
- Handled data after the collection
How to choose the right Salesforce to WordPress integration for your site?
● Grade A
If you are searching for the best option then Zapier is your best shot. It provides the capabilities of app connection and can build up the Salesforce. This Salesforce to WordPress integration has proved to be a great asset for large-level enterprises.
● Grade B
WPForms and Gravity Forms have earned a remarkable name since their evolutions. These both provide conditional logic and options of advanced fields. They are a great option for an eCommerce business that is marketing-oriented. It makes use of frequent polls and surveys.
● Grade C
This Grade provides great lightweight functionalities. Hence, one can easily gather the names and emails of the users. This plugin is best for those who are looking for basic functions. It is beneficial for businesses that do not want to bog down with features.
Plugins for WordPress and Salesforce integrations
Again, you will find plenty of plugins to integrate Salesforce with WordPress. They are:-
● Zapier
This is an application wherein you can easily integrate Salesforce with WordPress. Instead of API calls, it uses actions and triggers. It also gives great assistance in:-
- Strategies for paid search
- Email marketing
This plugin has proved to be a great tool for lead generation.
● WordPress leads for Salesforce
This plugin will allow you to easily analyze, segment, and capture the activities. It is free of cost. Hence, you can easily integrate Salesforce with WordPress at no cost. Your user can easily gather the lead data through:-
- Comment tracking
- Referrals
- Data gathering via social media
- Email tracking
● Web-to-Lead for Salesforce
Nowadays, most businesses are implementing this plugin. One can easily captivate the leads using the functionality of web-lead. For instance, when a user visits the site. He/she can fill and submit the lead form. It is submitted in Salesforce. And is then created as a new lead.
A step-by-step process for Salesforce to WordPress integration
It is a robust process for Salesforce to WordPress integration. You can employ the use of some amazing web-to-lead Plugins. Let us understand this simply in detail:-
#Step No 1: Check the version of your Salesforce
Firstly, ensure to check the API access to your salesforce account before you start the whole process. Checking this will allow you to avoid any troubles in the future. You can access the APIs on the following Salesforce plans:-
- Performance Edition
- Developer Edition
- Unlimited Edition
- Enterprise Edition
You can log in to your Salesforce and log in to know about your editions. It will be displayed on your browser in the area of the title.

If you cannot see this, you can check this alternatively:-
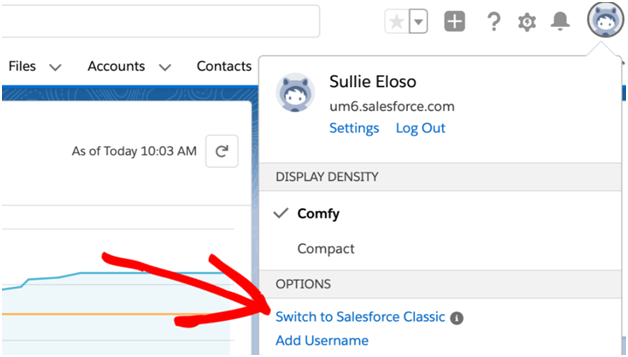
In the Lighting experience, tap the icon of your profile and click Switch to Salesforce Classic.
When you are done, click the “Setup” option as displayed in the image.

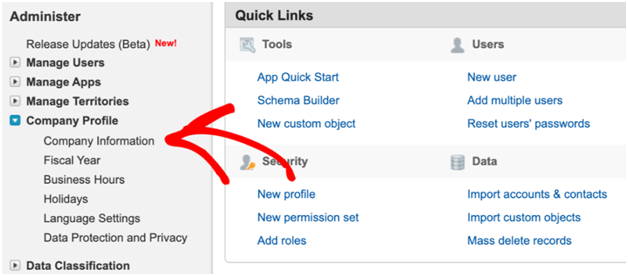
You will see the edition of Salesforce at the right bottom of the page.
#Step No 2: Installation of WPForms Plugin
The next step is to install the WPForms Plugin. For this, you need to set up and connect to Salesforce.
On the dashboard of WordPress, Tap “WPForms” and hit “Addons”. You can check them in the sidebar of your website.
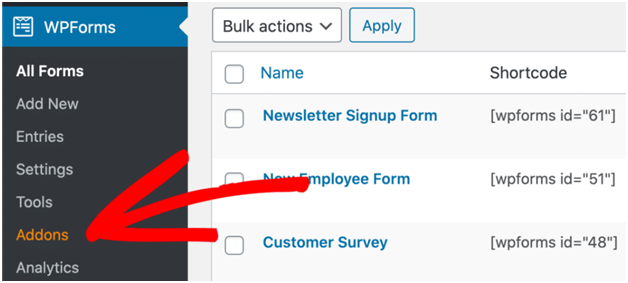
You can install the Addon of Salesforce by checking this option. (Check the image above to understand this clearly). Now you are ready!!
Now let us link WPForms to Salesforce. To integrate further, you need to keep the tab of WordPress open. This will assist you to quickly switching back to the WPForms.
#Step No 3: Set up to integrate Salesforce with WordPress
You need to first log into your account at Salesforce. If you do not have done that then you need to switch to the layout of Salesforce Classic.
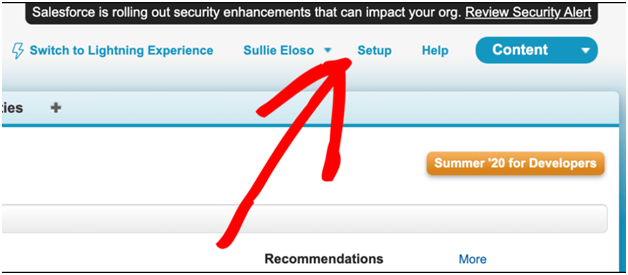
When it is done loading, you need to tap the Setup. Check the image below it is on the top navigation bar.
Then you must scroll down and check for the menu item named “Build”.
Then you need to tap “Create”. You will see the list, check for “Apps”

While you scroll down, you will come across the section Connected Apps. Tap the button New.
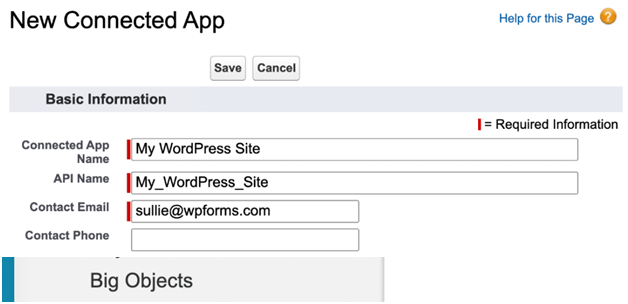
You are all set to build your app in the New Connected App. Here you will see two fields, make sure to fill the blanks:-
- In the section Connected App Name, you need to add the desired name of your app. The Salesforce will then copy this name to the field of API Name automatically.
- In the field of Contact Email, fill your email address.
#Step No 4: Set up the permissions of your Salesforce app
On the same screen, you must set up for the confirmation.
Next, you need to check for the section of API and mark the checkbox that states
Enable OAuth Settings.

Now, you must copy the URL of WPForms callback. And then you need to paste this link to Salesforce.
In a separate tab, you must check into your WordPress website and tap WPForms and click Settings.

Tap the button “Integrations”.

Scroll through till you notice the icon of Salesforce. Make sure to tap the small arrow. This you can see on the left side of the Salesforce logo. Check for Add New Account. Click it

You will get the URL of Callback. Tap the icon and copy the URL to the clipboard.
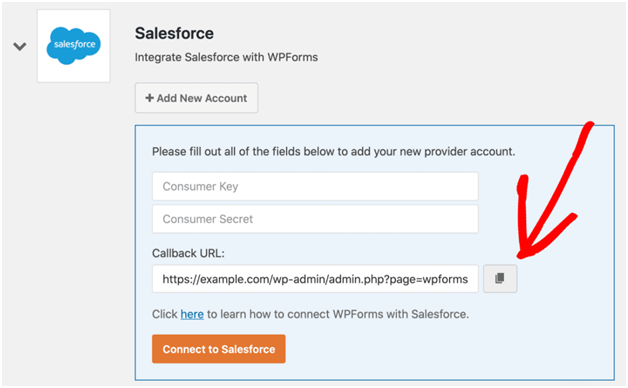
Now you need to switch back to the tab of Salesforce. Into the box of OAuth, settings paste the Callback URL.

Next, you need to scroll down a bit and onto the section of Selected OAuth Scopes. Check for the following:-
- API wherein you can manage and access the data
- Offline_access or refresh_token where you can raise the request at any time.
Do not forget to tap the arrows. This you can check at the right side of the section. When you are done tap “Save”.
The Salesforce pop up a message and will seek your permission for confirmation. Take time or else you will come across the following error:-
error=invalid_client_id&error_description=client%20identifier%20invalid
If you come across this message then you need to worry. It will take time for the set up of the connection in the Salesforce.
#Step No 5: Connecting WordPress to Salesforce
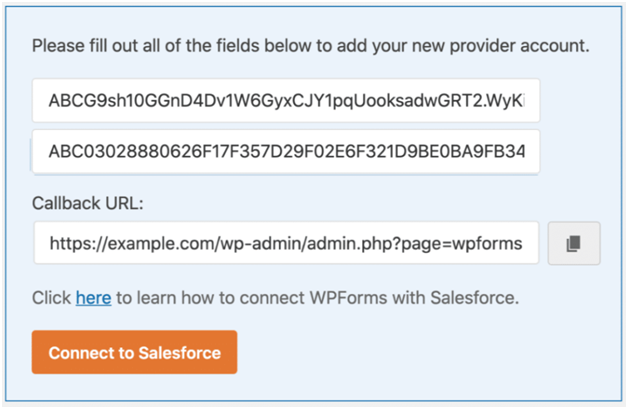
Into the WordPress copy the API keys. Like earlier, keep both tabs of WordPress and Salesforce open.
Do not forget to follow these procedures”-
- In the browser tab of Salesforce, tap the button “Copy”. This you will find next to the Consumer Key. On the tab of WPForms paste the key.
- Again in the Salesforce tab, check onto the right side of the screen and check for Secret Key. Next to it, you will see Click to reveal. Tap and Copy it & paste this to WPForms.
When you are set, tap Connect to Salesforce.
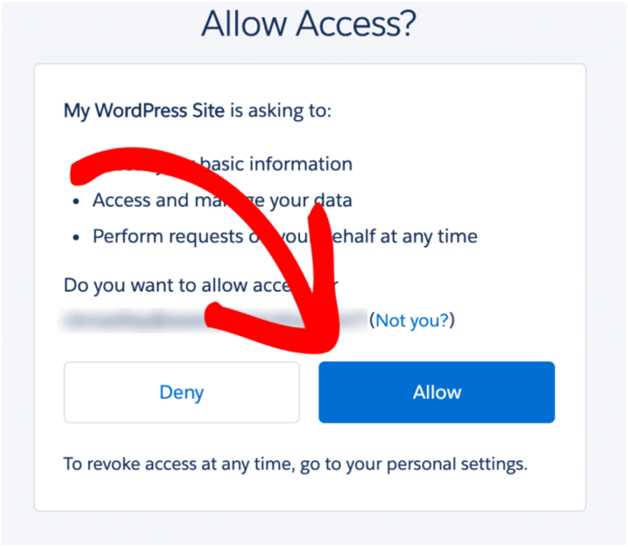
Then you need to log in once again to your Salesforce account. Then Click the button Allow.
All set!! You have connected your Salesforce account with WordPress. You can see the pop-up that displays a success message.
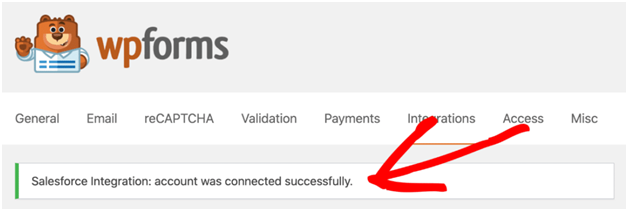
You will have a connected account with the page of Integration too!!

#Step No 6: Creation of Salesforce WordPress Form
Now since we are set up with Salesforce Integration, we have to send data through the form in the Salesforce.
WordPress Forms will help you to connect with any Salesforce form. You can build each form with different objects. For instance, you can easily craft:-
- Contacts
- Opportunities
- Accounts
- Cases
- Campaigns
- Products
- Leads
Here, we will craft the lead from the contact form (which we had developed earlier).
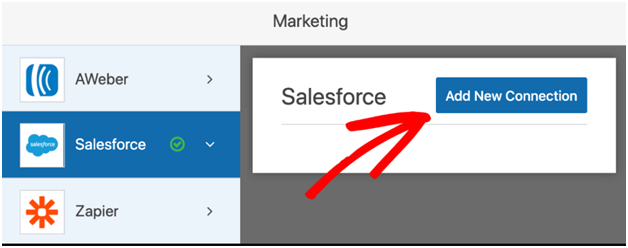
In the form builder, tap Marketing.
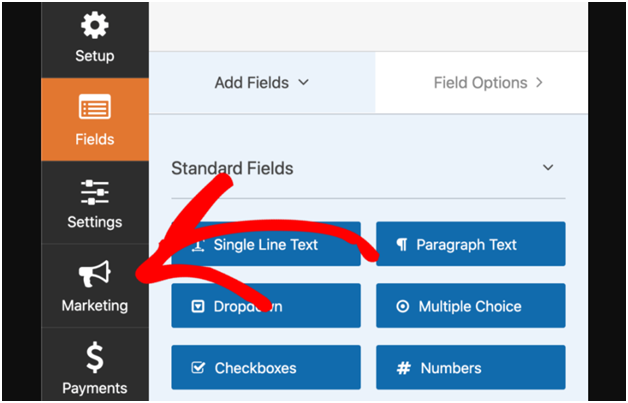
Next tap Salesforce >> Add New Connection.
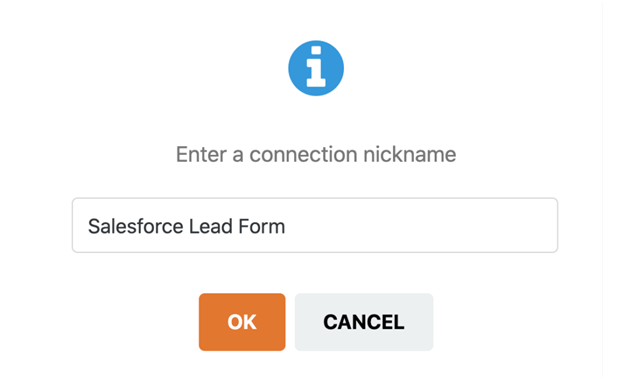
You will have to fill in the details regarding the connection name on the WPForms. You can check this in the form builder and you can clearly identify this at a later stage.
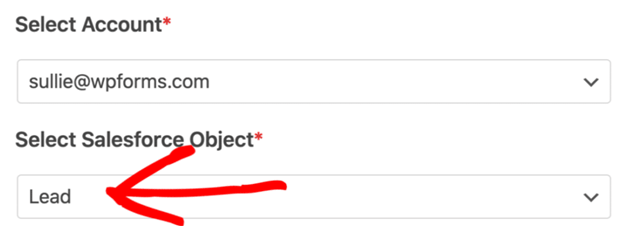
You need to choose the account of your Salesforce from the first dropdown. Onto the second one, choose Lead.
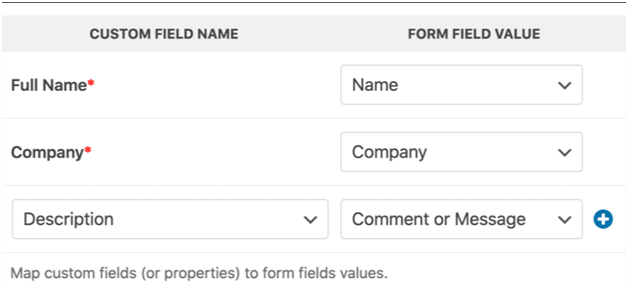
In your Salesforce account, you need to map the sections.
You can save your form.
#Step No 7: Launch your Salesforce WordPress integration
You will be done with just a few steps.
Click Embed (As shown in the image below).
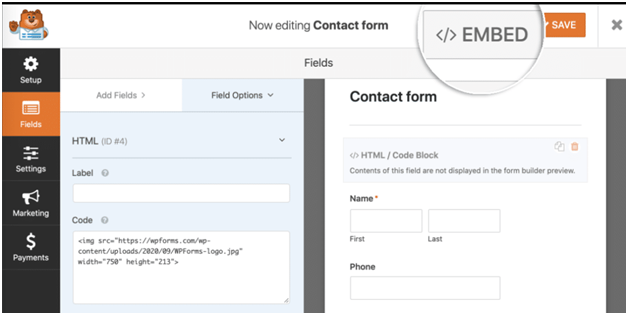
Fill in all the details that have been asked in the sections.

When you are done, tap the button Let’s Go button.
With WPForms, you can automatically develop your page of WordPress page. You need not be tense regarding the form, it will be embedded in it. Press Publish and you are all set to go LIVE.
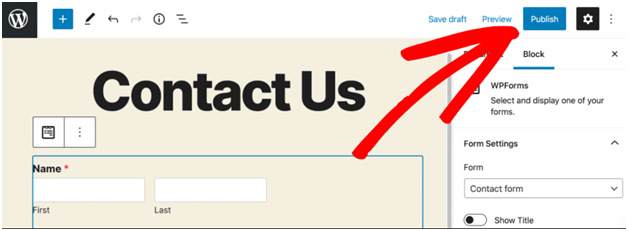
You can even test your form to check if the features, working, and functionalities are doing fine. When you submit, you will see (check the image) in the Salesforce:-

You are LIVE with your Salesforce WordPress integration!!. If in future, if you are finding it hard to access WordPress Admin. Check this post!!


