What are Dashicons and How to Use Them in WordPress
Last updated on September 29th, 2021 at 10:52 am
As we know that we are using the 5.6 current version of WordPress but Dashicons are to release in WordPress after version 3.8. These icons are present in the format of SVG files. These icons can be fit into any size without doing any custom pixelization. These icons are very responsive. Most of the time these icons are used for dashboard menu items. These can be added by two methods such as backend method and frontend method. Read this article carefully to get all the detailed information. Let’s take a step ahead.
How to Enable Dashicons on the WP Front-end?
As we know that we all are using WordPress websites in that we want to establish the Dashicons. For that, we want to enable by visiting the theme by using the admin panel of the website. Now let’s have a look carefully step by step which is given below.
- The user must log in to the admin panel of the WordPress website putting the correct credentials. It required a login id or email id and password.
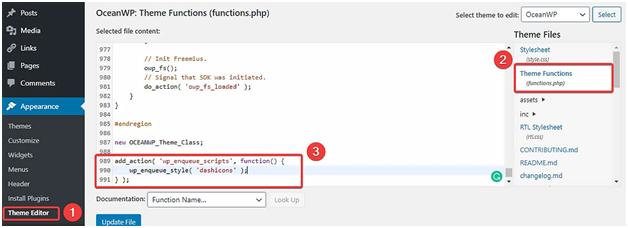
- After successful login user must click on the Appearance / Theme Editor option. This option is present on the left side of the screen in the context menu.
- After that, a new screen appears in front of the user. Over there user must click on the functio.php file.
- Then the user needs to scroll down and at the end of the functio.php code, the user must add this code which is given below.
Code need to copy and paste for enabling Dashicons in wordpress theme.
add_action( ‘wp_enqueue_scripts’, function() {
wp_enqueue_style( ‘dashicons’ );
} );
Check out the image which is given below for a better understanding.

Note:-
According to our expert and developer users need to do an update in a child theme. Because if in future there is an update released by the theme organisation then this code will be overridden and make a change in the function.php file. However, to avoid this kind of glitch user need to update all thing in the child them of the website.
How to get Dashicons with the help of HTML and CSS code?
WordPress contains its HTML and CSS code file and if we palace any icon over there then it contains the same thing as that icon. When a user is on wordpress.org and looking for developer resources then theft starts from here. Go through all the steps very carefully which are given below.
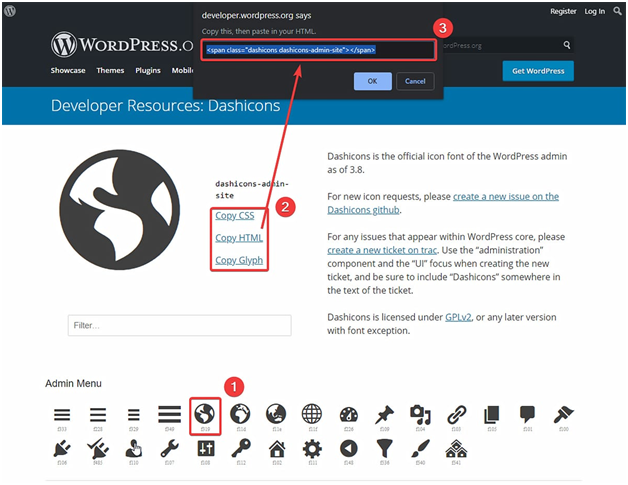
- The user after visiting the developer resources icon user must click on any one icon. The choice is to depend upon the user to choose any icon.
- After that user must click on HTML or CSS. For detailed information, the user must check out the image given below.

- Now a new window appears in front of the user. The user must copy that code and by pressing CTRL + C.
- Now it completely depends upon the user where the user wants to display that icon. At that place, the user needs to paste that icon.
How to display Dashicons in posts and pages?
If any user wants to add any type of Dashicons on Posts and pages. Then the user needs to login into the WordPress admin area. Steps to login into the admin area described above in detail. After that user needs to enter the text into the editor portion. This text is given below.
<h2 class=”dashicons-before dashicons-smiley”>A Cheerful Headline</h2>
Or alternatively, you can use this code:
<h2><span class=”dashicons dashicons-smiley”></span> A Cheerful Headline</h2>
The user doesn’t forget to save that post or publish that post after adding the above text. After that user reloads or refreshes the given page. Check out the image given below.

How to use WP Dashicons for the navigation menu?
The user needs to follow these steps to add WP Dashicons for the navigation menu. The user follows these steps carefully.
- First of all, the user must log in to the wordpress admin panel by putting correct credentials. Users can follow detailed steps to login into the wordpress admin panel are given above.
- After that user can see a context menu that appears on the left side of the screen. In that contact menu, there are a lot of options are present, Now the user needs to click on the Appearance/Menus.
- Now a new window appears in front of the user. Over here user needs to enter the HTML code of that menu icon. This HTML code has been got from wordpress.org in the navigation label. To understand in better wany the user can check out the image given below.

Here we prove that adding navigation with an icon menu is very simple. Now in case any user wants to display text with the icon menu then the user fills the text field at the end of the navigation label field. User can see in the image given below.

All things go perfectly then the user can see the final image like this.

How to use the Dashicons on the backend?
There are different icons to be used for the custom posts in the other words these Dashicons are to be used by doing coding work. Now we are going to learn how to add Dashicons on the backend or as a custom. In this case user no need to enable Dashicons by going to function.php files. So the user can skip the first step that we discuss above. Now follow these steps which are given below carefully we are going to add custom Dashicons.
- The user needs to enter the wordpress admin panel by using the correct credential.
- After that users can see the context menu appear on the left side of the screen. Now the user needs to click on the Appearance/Theme Editor.
- After that user click on the function.php file option. After that user can see coding appears on the screen.
- The user needs to scroll down the function.php file code and then the user needs to copy the code which is given below and the page at the end of the function.php file.
Copy the given code and paste the code at the end of the function.php file.
Code
function create_posttype() {
register_post_type( ‘movies’,
array(
‘labels’ => array(
‘name’ => __( ‘Movies’ ),
‘singular_name’ => __( ‘Movie’ )
),
‘public’ => true,
‘menu_icon’ => ‘dashicons-format-video’,
‘has_archive’ => true,
‘rewrite’ => array(‘slug’ => ‘movies’),
)
);
}
add_action( ‘init’, ‘create_posttype’ );
Conclusion
This complete article is on how to add Dashicons and how to use these into the wordpress theme. If any user still has any issue we provide a 27×7 support service. Users can put their issues into the comment section. Our technical support team reverts to your issue in a very short period. In this article, we cover both methods to add Dashicons into wordpress such as the front end and backend process.


