What Is WordPress Multisite and How to Create It?
Last updated on September 28th, 2021 at 10:41 am
WordPress is assuredly the most popular CMS in the World. It not only lets you create captivating websites, blog content, and app, but it also supports the Multisite functionality. You might be thinking why is it necessary to use the WordPress multisite feature? Even if it is a requisite, then how to create it? Before all of that, what exactly is the Multisite feature?
Being a WordPress user, you might be aware of its multisite functionality, and if not, this article will guide you about everything you would want and need to know about the multisite feature such as the description of WordPress multisite, how to install and set up WordPress multisite, pros and cons of WordPress multisite, how do you manage it, who needs it, and much more.
Let us first understand what is Multisite functionality?
What is WordPress Multisite?
WordPress multisite is a network that allows you to manage and run multiple sites to your WordPress installation. You can add this feature to your new or even existing WordPress site. It lets you build modern sites swiftly and provide you the ease of managing different websites using the same username and password.
With this functionality, you can also allow various users to signup and create their accounts and blogs on your domain. It is also equipped with certain advanced features that you can operate and use to customize your blog or website on your network.
One of the best parts about multisite is that it is very easy to install as it has the same folder structure, codebase, reporting and core files. Hence you can say that installing a WordPress multisite is not much convoluted as compared to installing a standard WordPress site. Furthermore, updating multisite is the same as updating the WordPress site.
WordPress multisite also takes care of your server space used by a separate WordPress installation for each site as all your network plugins and themes are stored only once, even though you use them on multiple locations.
What is the difference between WordPress installation and WordPress multisite?
The key differences are listed below-
- The user roles that means network admin role is added once multisite is activated
- The number of individual sites
- Access to the number of WordPress multisite plugins and themes- which can only be installed by the network admin
- The data storage- Multisite stores some data for the entire network alongside creates extra database tables for each website
- The media storage- Extra folders are added in order to get uploaded to each site by Multisite functionality
- The admin screens- Some screens are added by Multisite to manage the network effortlessly
Pros and Cons of WordPress Multisite
A WordPress Multisite is very useful in the following ways-
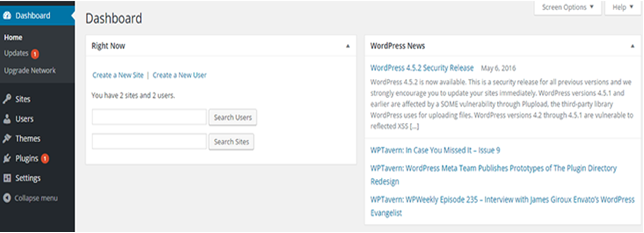
- You can manage ample sites from a single dashboard
- Subject to limitations, admins of the individual sites are allowed to operate their sites.
- Users are permitted to create their own blogs on your domain, and once they build it, they can even manage them. You can restrict its access to users if you want to keep it private,
- You can install plugins and themes only once and then activate them for multiple sites across the entire network.
- It also facilitates to manage the updates effectively as you need not update your WordPress themes or plugins.
Monetization of the network is possible by offering hosting services to others. However, this may not be possible for you if you are on shared hosting.
Cons of WordPress Multisite
- WordPress Multisite may affect all the sites on the network if your server or website is experiencing downtime
- The plugins and themes cannot be added or deleted to the individual sites. They can only be activated or deactivated if they are present on the network
- Multisite may not support all the plugins. You would need to check the compatibility of the plugins with WordPress multisite before you install themselves
- The speed of your site may be affected adversely when you experience a spike in its traffic. This may disturb the rate of all other sites on the network. It will be difficult for a beginner to handle server resources and manage traffic
- If you are looking to add bountiful high traffic sites, you are liable to upgrade your hosting needs. And multisite does not support all hosting plans or web hosting providers which limits your options
- Even if only one site gets hacked, all your sites will get hacked which are on your network
Without proper professional support or help, it may become complicated for you to migrate or separate a site from the multisite.
Who needs a WordPress Multisite?
The reason for managing multiple websites is not enough to start using a multisite network. If this is the need, and because of this reason you want to install and activate WordPress multisite, you can instead opt for WordPress management tools options.
These are third-party tools that are used for the same purpose, which is to manage multiple WordPress sites from a single dashboard. However, you need to pay a certain amount in order to use these tools as they are featured with additional security and performance monitoring as well as management. You also have an option to manage websites from contrasting web servers, clients, etc.
Listed below are the situations that suggest that you must go for this option of using a WordPress Multisite network-
- When you want to outsource your website’s day-to-day activities management to other admins
- When you want to manage all the sites from a single dashboard alongside need an individual sign-on access
- When you want to streamline the entire process of updating your WordPress site as the themes, plugins, and core will need to be updated not for the individual sites, but only for the network
- A business or magazine websites with distinctive sections managed by different teams at different locations and branches
- WordPress multisite is ideal for NGOs (Non-Profit Organizations) and government sites as they can use it to manage various departments and locations. This further allows them to use their own theme, subdomain, management team, etc
- Colleges and Schools providing an opportunity to the students to create their own blogs on college or school servers
- Web developers or designers who want to publicize their web related work not only with the screenshots but with the contemporary website that exists as a subdomain on your leading site
- Multisite is an excellent option for monetizing your website for exponential growth by enabling others to create their own website in the network
- If you want to cut down the cost by not paying for multiple web hosting plans. As you don’t need to do that for the websites that could easily be stored together
What are the Requirements for WordPress Multisite to operate?
The first and most important thing is to get a WordPress hosting. All the websites share the same server resources on the WordPress multisite network. You can also opt for a shared hosting option if your website will not be having huge traffic. However, if you want to use WordPress multisite network, you need to go for VPS hosting.
There are some web hosting that offers both the hosting options that are dedicated/VPS and shared with its clients. If you want to go for such servers, Bluehost is one of the most renowned web hosting providers which are used by numerous clients. Moreover, it is also the official WordPress hosting partner.
Furthermore, you require subdomain, subdirectory, FTP access, and a backup of your WordPress installation. You need to follow the entire process, and other factors need to be considered while creating WordPress Multisite. We are going to discuss this with the next step.
How to Install and Set up a WordPress Multisite?
There is a sequence of instructions that need to be followed to create Multisite in WordPress-
1) Download & Install WordPress
We are supposing that you are building up the WordPress Multisite from scratch, and to begin with it, you first need to install WordPress. You would always have a choice before you install WordPress using either subdomains or subdirectories for your network web addresses depending upon your requirements and budget.
The subdirectory will create a new directory entirely within your site. You need not adjust your DNS records or domains with your web hosting account as it looks like this-
https://yournetworkname.com/websiteB/
Whereas, if you go for Subdomain option, it would be costlier than Subdirectory but will leave a better impact on the visitor as it is only composed of your network name. You will be left with no choice but to choose a subdomain if your site existed for 30 days or more than that, and you are planning to use Multisite. Creating your website with subdomain shall look like this-
https://websiteA.yournetworkname.com
If you choose subdomains, you need to set up wildcard subdomains on your server and follow the next step. However, if you decide subdirectories, you need not follow the next level.
2) Setting up Wildcard Subdomains
Your multisite network needs to be configured with wildcard subdomains. In order to set it up, you first need to login to WordPress hosting account. Then visit the Domain section and click on Subdomains.
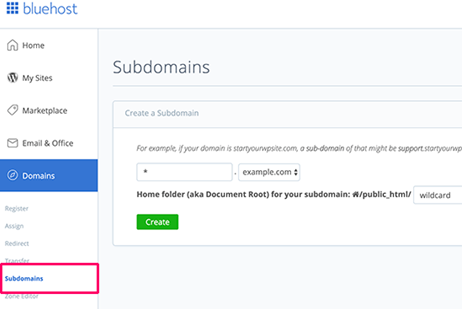
You could also choose any other web host depending upon your preferences and needs. This screenshot is taken from the BlueHost web hosting provider.
When you will visit the next page, Sign In the subdomain field and select your domain from the drop-down menu.
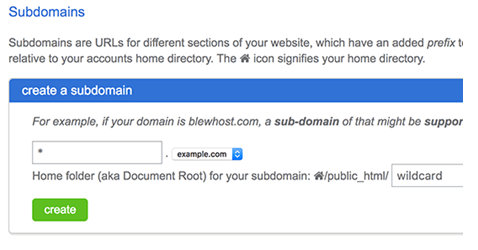
Cpanel will display the document in the field below by detecting it automatically. Then you just need to hit Create tab to add your Wildcard Subdomain.
3) Backup Your Site
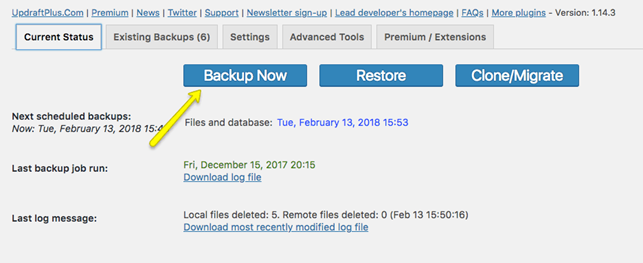
Always ensure that all your site content, be it WordPress Multisite Themes or Plugins, whatever you have on your existing or new WordPress site, capture a backup before you proceed with the following steps. Remember, this network site will now be serving as the central hub for your Multisite. So there is no scope of sloppiness.
WordPress multisite performance
4) Update wp-config.php
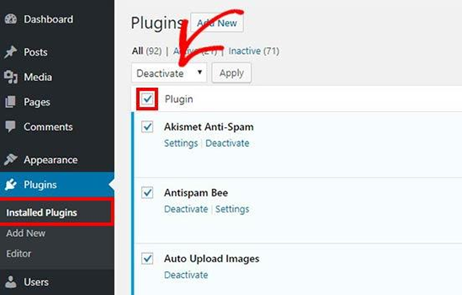
Before you update your WordPress site’s files and enable WordPress Network Multisite feature, it is advisable to deactivate all your plugins, which are currently running on your WordPress site. Once you have disabled the plugins, log into your web hosting account. You can update your files using FTP file or file manager tools.

The next step is to find the wp-config.php file which could also be labeled as public-HTML as shown below-
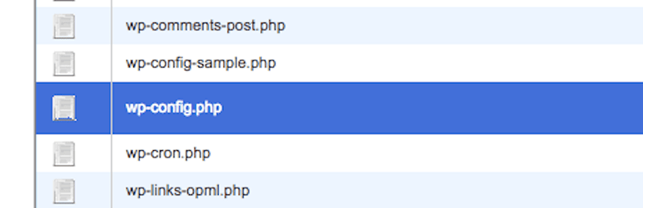
Then, you need to add a code to your wp-config.php file, as shown below.
1/* Multisite */
2define( ‘WP_ALLOW_MULTISITE’, true );
Once you add this code, it should look like this.
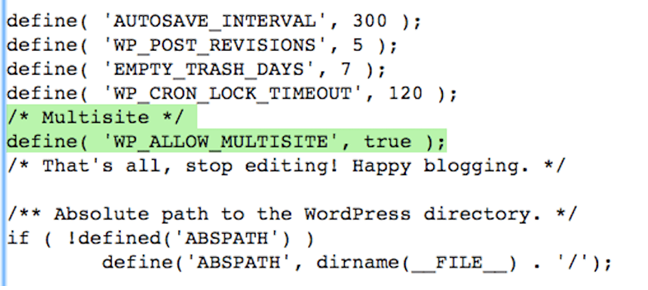
Hit the button save and upload this file back to the server.
5) Install Multisite Network in WordPress
You will see an option called network setup after uploading the wp-confog.php file once you login back to your WordPress site, under the tools option. After setting up this feature and completing the entire process that we are about to mention, will undoubtedly enhance the WordPress Multisite Performance than ever before.
As we have already informed about this before that you need to deactivate all the plugins, especially if you are setting it up on an existing WordPress site. For doing it, you would need to navigate to Plugins> Installed Plugins page and select all plugins. Go to the Bulk Options tab and deactivate the plugins from the drop-down menu and click on the Apply tab as shown below
To configure your network multisite, head over to Tools> Network Setup.
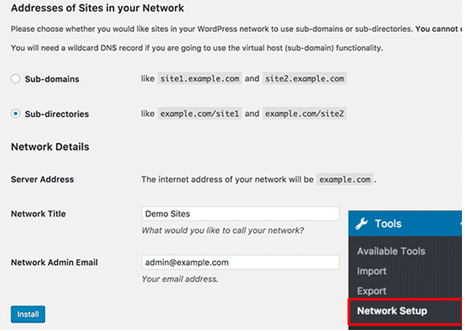
The next action is to ascertain whether you are using Subdirectories or Subdomains directories to establish your domain structure. Once you are done with that, you need to provide the title of your network, and before finishing it up, always ensure that the email id you have provided is correct.
You may also need to assign super admin rights to someone else if you are not the one who will be managing it and create a suitable name for your network. Do not forget to enter your email address here, as shown in the image below.
You will see the subdomain installation option only if your WordPress installation option is new. And through this, you would have got an idea that you cannot use subdirectories if you want to use multisite for your WordPress site, the only option that you are liable to choose is sub-domain.
As you can see the option above in the left side bottom of the screen, click the Install tab after filling in all the details.
6) Set up WordPress Multisite Feature
Once you have installed the Multisite network feature, the next thing you need to know is how to set up a Multisite network feature in WordPress. You can easily enable this feature even on any existing WordPress site.
There are some codes that you need to add to your htaccess file and wp-config.php as you can see in the image below-
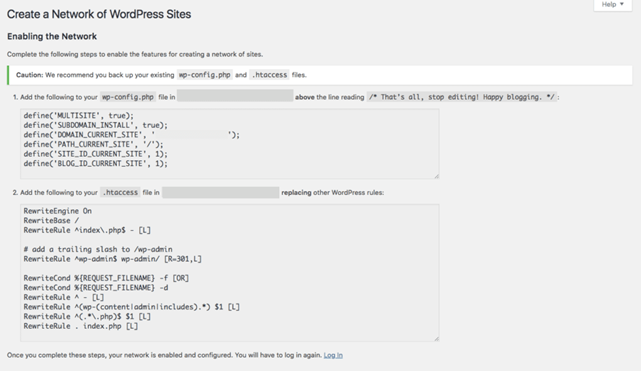
To copy and paste this code in these two files, you need to use File Manager or FTP client in the cPanel. If you want to reveal your hidden files, always ensure to keep this option turned on.
Wp-config.php file needs to be opened once again for editing. Then you need to paste the following set of code using WordPress instructions for guidance.
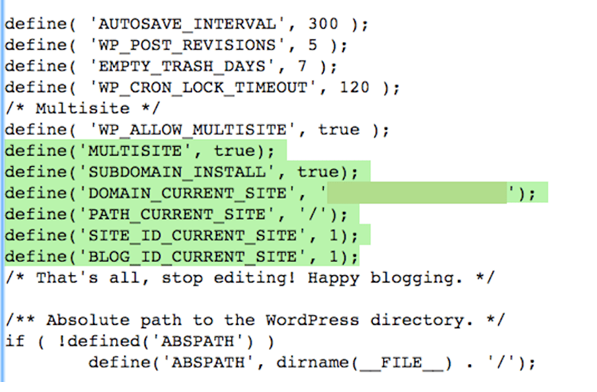
Once you have added the above snippet, always save your changes and close.
The next thing is to edit the htaccess file. As mostly all these related files are hidden on the server and it is imperative to ensure that these hidden files are exposed within the file manager. When you are not able to find or see all the hidden files and to present all of them, the best way is to add the following code to your file manager’s URL.
&showhidden=1&saveoption=1
Now, as you have found all your htaccess files, you need to locate the below-mentioned lines in your file
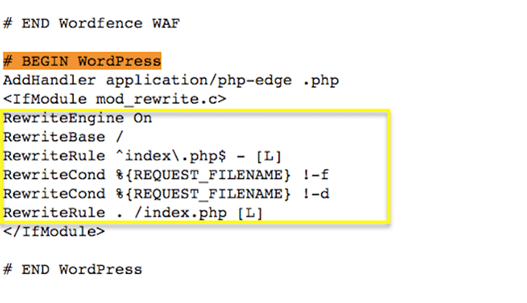
You can create a new one containing the above set of lines only if you do not have any htaccess file. And then, upload it to the server. The final look of your data will be like this
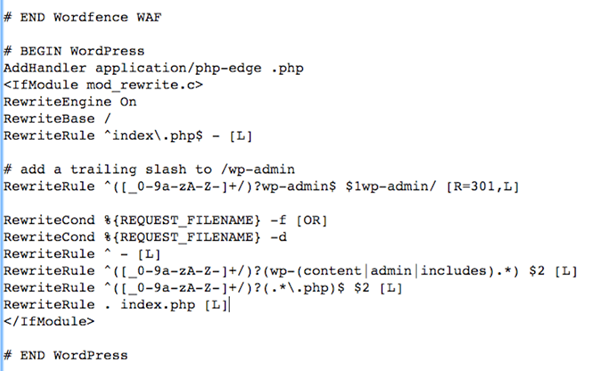
After performing all these actions, you need to re-login to access your Multisite network feature to your WordPress website.
Configure Your Settings
Once you have installed and set up the WordPress multisite feature, the next crucial step is to configure your network settings to perform all the tasks efficiently. To change the network settings, or to set other settings, you need to head over to Network Dashboard.
Click on Network Admin>Dashboard when you go to the admin toolbar under the My Sites option.
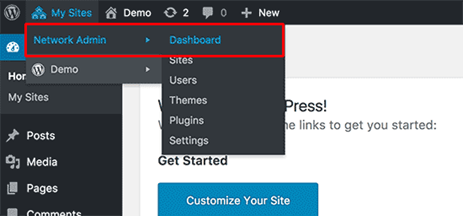
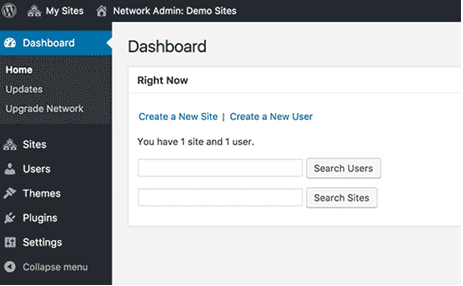
This will redirect you to the Multisite Network Dashboard. You will see a few options for managing your multisite network. Along with those options, you will see a Right Now dashboard widget that will enable you to add new users and build a new site.
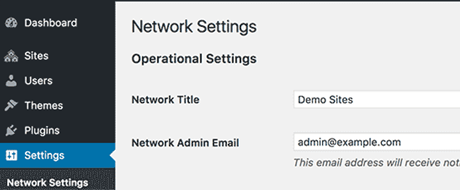
Click on the Settings tab in the Admin Sidebar of the Dashboard to configure your network settings. The first option that you will get is of Network Title, and the second option includes Network Admin Email that you had already entered priorly (during the multisite network setup).
How to Run sites in a WordPress Multisite network?
The whole set of process needs to be followed in order to manage the network for your site. It includes 2 ways to maintain or add sites. The first way is to add it via the Frontend, and the second is via the admin. Let’s have a look at the first option, that is the Frontend.
1) Creating a Site From The Frontend
You can let your users create their websites. They could do it manually, or you can install a plugin. They will start the site-building process from /wp-signup.php screen, which is on the main site.
When you navigate this option being a user, you will get 2 options to either create a new site and log in with an existing user account or to create a new user account and the website at the same time (For the users who do not have any account registered).
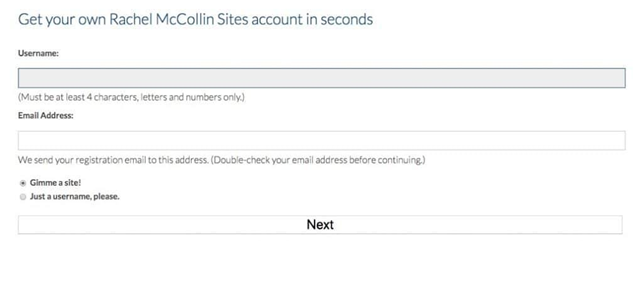
If you create a site manually, you need to perform the following instructions-
- Head over to My Sites> Network Admin in the admin menu under the network admin screens
- Navigate to Sites>Add new
- Type in Site address whether it is subdomain or subdirectory, the site title along with the email address of the site administrator
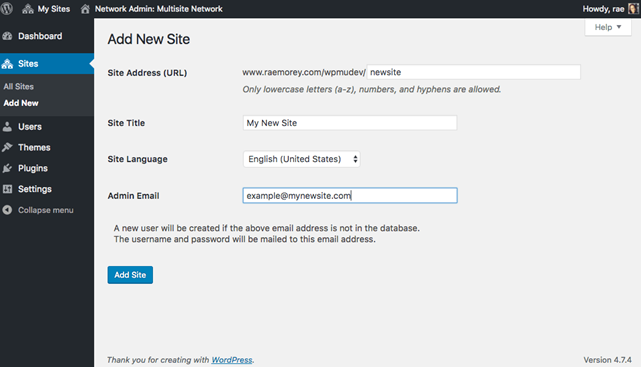
If you built a site from the admin screens, you will need to visit the My Sites dropdown menu. Building your website this way will benefit you to provide site admin privileges to you. However, if someone else creates the site, the person who is making the site is entitled to those site admin privileges, although you can add yourself as a site admin through the Site Screens to any site.
In the image below, you will be able to see a selection of the sites in the network that has already been set up on the site owner’s domain.
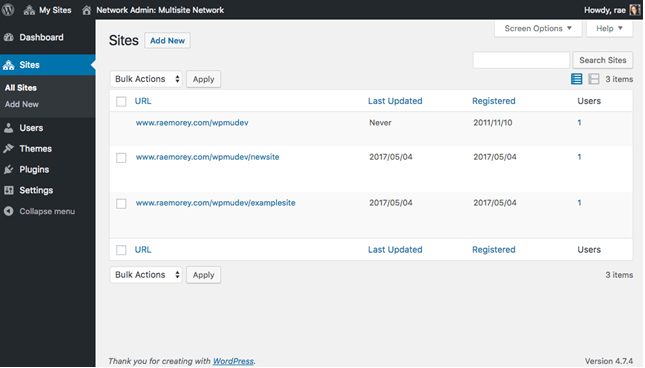
2) Adding a Site via the WordPress Admin
Head over to Sites links in the left-hand menu of the Network Admin Dashboard. Once you go through the Sites option, it will enable you to see a list of the sites in your network if you have already added before. If you are starting from scratch, the file will be empty.
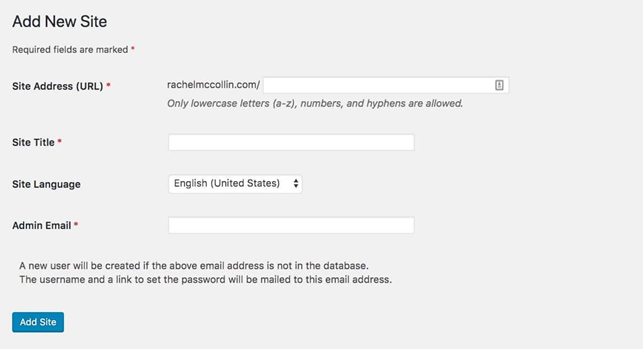
Hit the tab Add New and go to the Add New screen to create a new site.
I am text block. Click edit button to change this text. Lorem ipsum dolor sit amet, consectetur adipiscing elit. Ut elit tellus, luctus nec ullamcorper mattis, pulvinar dapibus leo.
Once you fill in all the necessary details as shown above in the image, click the Add Site tab and save it. Performing this task, your new site will be displayed when you go back to the Sites Screen. You will see the available options of some links when you hover your mouse over its name, which is listed below-
- Dashboard- The site’s dashboard will help your site to get configured and enable you to add new pages as well as posts
- Edit- This option is only to edit the settings not the content
- Archive- This option makes it inaccessible for the site admins and users temporarily (Till the time you have to opt for it)
- Deactivate- It is to deactivate the site so that it cannot be accessed or even visible to anyone (It can be done temporarily or permanently)
- Delete- This option is to delete the entire website and all its data
- Spam- It is for the users who have built the site. Marking as spam does not allow the same user to create more sites
- Visit- To visit the frontend of the site
You can check out the screenshot below which is just an example of an existing website on a network-
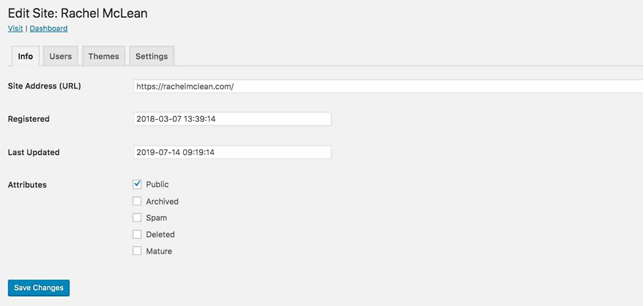
You can even change the main settings of the site, such as its title and the domain name. Apart from the users and the settings page, you can also access the themes page to determine which themes to enable for your site.
You will certainly want to enable a theme for each site, whether you are hosting your own site or your client’s site. Whereas, you might want to allow multiple network themes if you are running a network in which clients are allowed to create their own sites themselves.
How to Add Themes and Plugins to Your Multisite Network
You are not entitled to install themes and plugins on your own even if you are an individual site admin. It is only the network admin, who is allowed to add the required themes and plugins to enable it for all the users operating all the sites on your network.
i) Installing and Setting up a Theme for your Multisite Network
a) Installing
Go to My Sites>Network Admin>Themes to add themes.
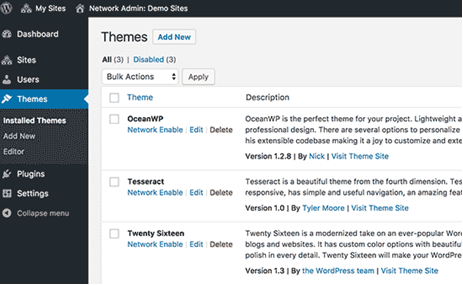
The themes which are already installed on your Multisite would be visible on this page. By clicking the option Network Enable, you can make any theme available to other sites. Whereas, to deactivate the theme you can click on Network Disable tab (Network disable will only be visible in the case when a theme is already existing).
Hit the Add New button to add a new theme that is at the top of your screen and install the theme you want for your WordPress Multisite network. With the option of Network Enable, you can make that particular theme (which is installed) available to all the sites on your system.
b) Setting up
Once you are done with its installations and added a couple of themes, the next step is to set up a default theme for your every new site of your Multisite Network.
You require to add the following code to your wp-config.php file if you want another theme to be your default theme for new sites.
1 // Setting default theme for new sites
2define( ‘WP_DEFAULT_THEME’, ‘your-theme’);
In ‘your theme’ section, you need to replace the name of the theme you want to set up. Using the name of your theme’s folder is advisable that you can easily find by looking at the wp/content/themes/folder.
The best WordPress themes that can be used for any website are as follows-
- Tyche
- Allegiant
- Divi
- Shapely
- Webify
- Jevelin
ii) Installing Plugins for your Multisite Network
To install the plugins, head over to My Sites> Network Admin> Plugins and click on the Network Activate button to activate each plugin to your multisite network.
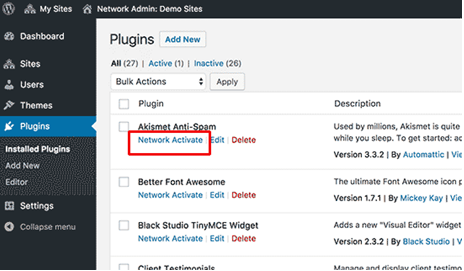
Listed below are the few plugins which are considered to be one of the best plugins that can be used by all the websites-
- TinyMCE Advanced
- Google XML Sitemaps
- Elementor Page Builder
- WP Super Cache
- Smush Image Compression and Optimization
- SpeedProd
- YoastSEO
Some Common WordPress Multisite
Mentioned below are a few examples of WordPress multisite. This will inform you about how does the multisite look like and also let you know about the kind of businesses this multisite feature is used for-
1) WordPress.com
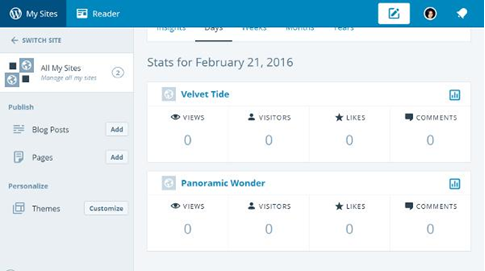
This multisite enables users to build their own websites on WordPress. WordPress.com is a domain that is capable of hosting tons of sites under one roof. It helps you to focus on ‘Content’ not ‘Administration’ as it was launched to manage all your WordPress sites and Jetpack enabled sites efficiently.
You can view the stats for all your websites and make fundamental changes to particular sites on a single page by accessing the main admin panel. You do not even need to enter the individual admin panel for each site; you just need to create new blog posts and pages from the admin panel provided to you by WordPress.com
2) BBC America

It is a satellite and cable channel that telecast many renowned shows on television. Every show that is aired on BBC news has its website as its website is equipped with the WordPress Multisite feature. All the mini-sites are empowered by a single framework and use child theme as default.
3) Edublogs
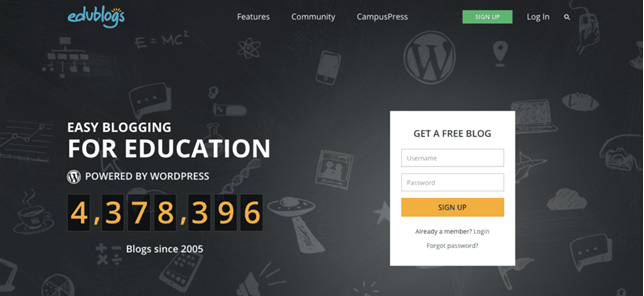
Edublogs is famous for offering multisite services to schools and universities across the world. Edublogs invites people to create and host their web content on their network for free of cost. Usually, professors and teachers use the basic version of it to add students as contributors and host their own blogs. It has hosted more than 3 billion blogs for the last 14 years.
4) OpenView Venture Partners
Its primary function is to assist technology companies that are capable of turning their vision into reality. Technically, there are 3 sites run by a company-
- Corporate website
- Corporate Blog
- Multi-Author Blog called Labs
OpenView venture partners easily run all these sites under one roof using these two subdomains, which are labs.openviewpartners.com and blog.openviewpartner.com. The centralized theme is used to build every website due to which the site operates smoothly with the Multisite installation.

5) Reuters Blogs
It was found in the United Kingdom as a news agency a long time back in 1851. The Reuters agency has experienced an exponential growth online and massive expansion with its own set of blogs, which are named as Reuters Blogs. These blogs include all the information from A to Z, be it tech, politics, current events, or any other, powered by WordPress Multisite.

6) Spotted By Locals
This WordPress multisite offers extensive city guides for all the countries that come to Europe. Spotted by Locals has ample ideal city guides that can captivate and allow the users to write their guides and experiences for the place they have visited or resided in.

7) A Way To Garden
A Way To Garden has become a leading garden blog on the web. The owner of the site Margaret Roach has empowered her website with a wide variety of sections from her online shop to her blog as she got the WordPress Multisite feature installed on her website.

8) New York Times
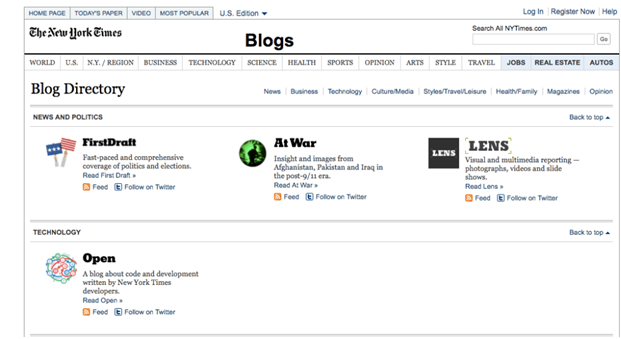
It is one of the most successful online magazines or news site that is powered with subdomains that enables the individual blogs to remain within the network. It is best suited when it has a unique identity while it belongs to the same brand that needs to be separated into its subsection of the website. It’s network powers more than 60 blogs by using a WordPress Multisite installation, which covers general topics that range from culture to the economy to politics to the arts.
WordPress Multisite Use Cases
Listed below are some examples which will inform you of the ways by which you can use the WordPress Multisite-
1) Business-Sites
WordPress Multisite is apt for the sites which deal in a broad range of business divisions in order to make those sites efficient to use.
By empowering your website with the WordPress multisite feature, you will be able to share data and users across sites, use the same parent plugin and theme across the site, and the best part has only one WordPress installation to update. It will save your time and money immensely while you are building your site or even in managing your site.

One of the leading examples of business sites is BBC America that uses the WordPress Multisite feature for a growing number of sites at a huge pace.
2) Hosting Client Sites
WordPress Multisite facilitated client sites, builders/creators, to migrate all the sites to one network under one roof and keep the code updated there. This migration has made the entire process hassle-free as only a single WordPress installation has benefited them to back up all your data and keep it secure.
Domain mapping could be used to map the client’s domain to their site. It will further ensure to apply the client domain to the admin screens alongside the public site. It will not trouble your client ever that you are using a Multisite network to host their site.
3) Personal Sites
Operating more than 1 personal site will become more comfortable and save your time when you use the Multisite network to migrate all of your websites. You will enjoy the following advantages if you keep all your sites on a single multisite network-
- It saves your time on updating them and on hosting space
- They have code in common for all the installed parent themes and plugins
- It will enable to display the data from one site on another site in your network
To map individuals’ domain names to each site, you can take the help of domain mapping. They will look like separate sites to all the users.
4) Multilingual online shops and websites
Using the Multisite feature is imperative for multilingual websites and online shops as they deal with an array of products and services that, too, in different languages in one installation. The ideal way is to install the Multisite network to your multilingual websites and carry out its operations through it to ensure its uniformity.
5) Community Networks
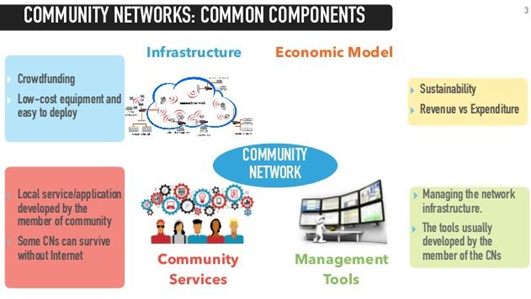
Community organizations or groups may find it expensive to maintain their online presence regularly. WordPress Multisite helps these community networks to save money by hosting multiple group sites and facilitate the network of those groups to connect with each other efficiently.
The plugins could be installed to share the content between the sites, enables the users to interact with each other in the admin screens, and also let users follow each other’s blogs.
However, for some of the use cases, the multisite may not prove to be an ideal solution. For instance, if you have only one website or when you are dealing with such customers who have different hoster, however, you have created numerous websites.
What is WordPress Multisite Domain Mapping?
It is one of the most considerate features of the Multisite network. It allows you to map a domain to your site in your network and act as if the same domain is hosting the mapped website.
You might want to pay more heed to know how to map a domain to a site. The first thing to check whether it is pointing to your network or not. If yes, you are good to go. If not, then you need to add the domain and make it a point to your site. The next step is to add the domain name to the site’s settings.
Navigate to Sites and click Edit in the network admin screens under the site you want to map. Add the domain name in the site editing screen and click on the Save changes tab.
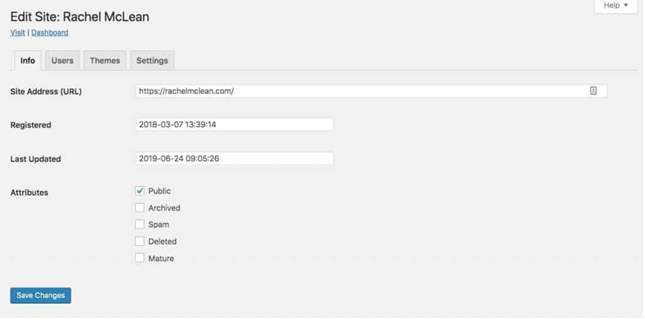
Whether you have opted for subdirectory or subdomains on your network, that site will start using the new domain now.
Troubleshooting WordPress Multisite Issues
The need for troubleshooting Multisite may arise when a domain mapping issue occurs and incase of wildcard subdomains incorrect configuration. Always ensure before setting up the WordPress multisite whether your web host supports wildcard subdomains. Listed below are some common issues that Multisite users may face along with their fixes-
1) Log in issues on multisite installs and how to fix them?
Most of the users face this issue when they are using this multisite feature with subdirectories. Even after adding the required code in the wp-config.php file, some users are unable to login to their site’s admin area.
This issue can be fixed by replacing-
define(‘SUBDOMAIN_INSTALL’, false);
Once you have replaced with the above code, line in the wp-config.php file with the following code-
define(‘SUBDOMAIN_INSTALL’, ‘false’);
2) Determining unconfirmed users
Some site admins face this issue when they are not able to find users who are registered on their network and do not even get an activation email.
Once you know that you are facing this problem of having unconfirmed users in WordPress, the initial action that you require to take is head over to theNetwork Admin page> Plugins page on your WordPress site. Then you need to install and activate network for the unconfirmed plugin. To activate the network, you need to go to Users> Unconfirmed Page.
The entire list of all the pending unconfirmed users will be in front of your screen as shown below.
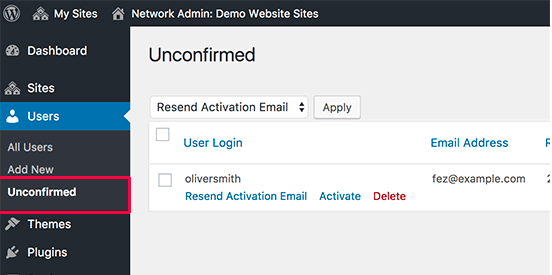
Once you have got that list of unconfirmed users you could resend them an activation mail, activate all the unconfirmed users manually or delete the users account.
3) Exporting a Site from Multisite to its own WordPress Install
Being a site owner, you may want to Export a site to its own WordPress install. You need to follow 3 steps that are mentioned below-
i) Exporting a single site in Multisite network
Login to the dashboard and clickTools> Export. The next move is to make sure that the content is fully checked. Then you need to click on Download Export File Button.
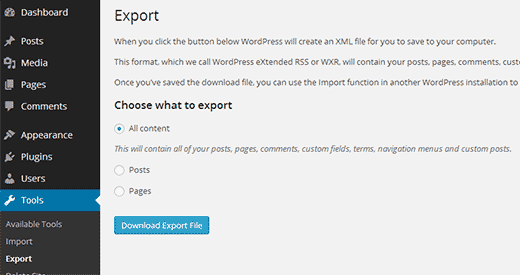
You need to download the XML file containing all your data that will be created by WordPress. Save it.
ii) Importing Child Site to new Domain
Login to your WordPress admin area and choose the location where you want to move your child site. Then go to Tools> Import. You will see the options under the Import screen which are shown in the image below
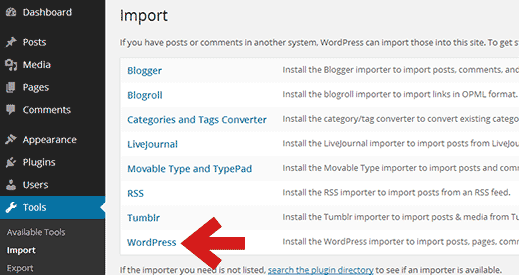
You need to click on install WordPress Importer Plugin. Once its installed, the next step is to click on Activate Plugin and Run Importer.
Then you will see Import Attachments option. This will let you download images from your pages and posts. Once you do this, WordPress will start importing your content. As soon as its done, you will get an option of ‘All Done’.
iii) Set Up Redirection
You need not set up any redirection if you are already using custom domains for all WordPress Multisite. You only need to do it only if you are using directory or subdomains structure in your Multisite network.
a)Redirecting from Directory to new Domain
You need to use the following code in the htaccess file-
Options +FollowSymLinks
RewriteEngine on
RewriteCond %{HTTP_HOST} ^subdomain\.example\.com$ [NC]
RewriteRule ^(.*)$ http://www.example.net/$1 [L,R=301]
b) Redirecting from Directory to New Domains
The below-mentioned code needs to be pasted in the htaccess file-
Options +FollowSymLinks
RewriteEngine On
RewriteRule ^childsite/(.*)$ http://example.net/$1 [R=301,L]
If you do not like the code method, you can also redirect by using the Safe redirect Manager
iv) Troubleshooting the Migration
You may need to split up your XML file if it is too large in size. Moreover, if you are not able to import your images correctly or you are facing any issue while importing, you can try importing them as external images.
FAQs on WordPress Multisite
Q1) Can Multisite be run on local machine?
Last updated on September 28th, 2021 at 10:41 am
A1) Yes, you can run multisite on your local machine. For that, you would have to install WordPress by using MAMP after that activate Multisite is a similar procedure as you would do on the remote server. The only difference is that subdomains cannot be used on local machines.
Q2) Can SSL be used with Multisite? If yes, then how can it be done?
Last updated on September 28th, 2021 at 10:41 am
A2) Yes, you can use SSL with multisite. There are two styles of doing it, the first way is to get an SSL certificate for the network domain, or you can also get it for any domain that you are redirecting to your network by using domain mapping. In case if you get SSL for your network domain and you are using subdomains, then you would require a wildcard SSL and that is slightly costlier.
Perhaps, if you are using subdirectories, in that situation you would need to have a wildcard SSL. But, if you are using domain mapping then or mapping each domain you would need an SSL Certificate.
Q3) Does using multisite make my website faster?
Last updated on September 28th, 2021 at 10:41 am
A3) Well, it depends on numerous aspects. Better WordPress hosting with a plethora of server resources would enable your website to run faster. Hence, on a shared hosting account, if the traffic increases it would, in turn, increase memory usage and that would lead to the reduced speed of your website on a multisite network.
Q4) When I sign in as Network Admin, the list of the sites do not display on “My Sites” list in the admin bar, what can be done for this?
Last updated on September 28th, 2021 at 10:41 am
A4) This is not a big issue, here are the steps that you need to follow for this. The first task that you require to do is to see is you are registered against all those sites. For this you would have to head to the network admin menu and click on the Sites, then click on Edit for checking every site and then you would have to go to the Users tab. See, if it shows you as a user, if not, and then add yourself as a user.
There is one thing that if you have a large network then you would not be able to this for every single site. In that case, you can use the User Switching plugin to check if you are logged in as another user.
Q5) How can I share user roles and logins across the multisite network?
Last updated on September 28th, 2021 at 10:41 am
A5) A user when registered on one site cannot register to another site on a similar network. The understanding behind it is that they are already registered in the shared database of WordPress, but they would not have any user role advantages on other websites.
If you wish to do this, then you would have to go for a third-party plugin, as that would help you to sync users across all the networks. One thing that you have to keep in mind is that by this you are giving admin privileges to your site to a third party.
Conclusion
Did you find our WordPress Multisite guide persuasive? Did you get all the answers to your questions that you were looking for? If yes, you can start with the installation right now. In case of any more questions related to this topic, you can reach us out in the comments in the drop-down section.
You can check out WordPress Visitor Statistics and Analytics here.
We hope that you have got to know why and how WordPress becomes more potent with the Multisite feature. It is just that you need to know under what situations you should use it. As you have seen the screenshots, the use cases, and all the requisites that you should know about WordPress Multisite, you will not be facing any issues while managing a standard WordPress site.


